

Air Campaigns
Want to start or join a group build? This is where to start.
Want to start or join a group build? This is where to start.
Hosted by Frederick Boucher, Michael Satin
OFFICIAL: Anti-Shipping Campaign

warreni

Joined: August 14, 2007
KitMaker: 5,926 posts
AeroScale: 2,201 posts

Posted: Saturday, February 05, 2011 - 07:58 AM UTC
Gunze H63 is the metallic blue colour you are after Damien. If you can't get Gunze where you are give me a yell and I will get some for you.

rochaped

Joined: August 27, 2010
KitMaker: 679 posts
AeroScale: 669 posts

Posted: Saturday, February 05, 2011 - 08:29 AM UTC
Aaron,
Dont be put off by some bad reviews...I'm currently ending a bf 108 from Eduard and it's a little gem. Even more so if you consider what's in the box for the price asked. I'm a big Tamiya fan myself, but their newer kits are a bit over-priced even if superbly engineered, and in my opinion Eduard's almost catching up Jap standards on this matter.
Best
Pedro

camogirl

Joined: October 20, 2005
KitMaker: 1,045 posts
AeroScale: 622 posts

Posted: Saturday, February 05, 2011 - 09:15 AM UTC
Well this is what it looks like at the moment


Allen has just rescused it from a test flight as it is going together terribly I vow once this is together and finished I am avoiding accurate miniature kits I really do not get on with them at all. Actually its the only accurate miniatures kit in the entire stash
Allen has just rescused it from a test flight as it is going together terribly I vow once this is together and finished I am avoiding accurate miniature kits I really do not get on with them at all. Actually its the only accurate miniatures kit in the entire stash


611_sqd

Joined: January 24, 2011
KitMaker: 470 posts
AeroScale: 99 posts
Posted: Saturday, February 05, 2011 - 10:30 AM UTC
I wanted their bf-110's something bad. I am a HUGE Luftwaffe and RAF fan and 110's have always just looked cool. I read several reviews where the engine cowling would not line up at all. As that is the problem this JU-88 has [bad fit everywhere] it kind of made me scared of spending the cash.
Quoted Text
Aaron,
Dont be put off by some bad reviews...I'm currently ending a bf 108 from Eduard and it's a little gem. Even more so if you consider what's in the box for the price asked. I'm a big Tamiya fan myself, but their newer kits are a bit over-priced even if superbly engineered, and in my opinion Eduard's almost catching up Jap standards on this matter.
Best
Pedro
611_sqd
Joined: January 24, 2011
KitMaker: 470 posts
AeroScale: 99 posts
Posted: Saturday, February 05, 2011 - 10:31 AM UTC
Quoted Text
. Actually its the only accurate miniatures kit in the entire stash
Kind of ironic for them to be call Accurate Miniatures


SUNDON

Joined: January 19, 2009
KitMaker: 158 posts
AeroScale: 155 posts

Posted: Saturday, February 05, 2011 - 08:22 PM UTC
All this talk about Accurate Miniatures. Your've enticed me into this Campaign with a SBD-3 Dauntless from (yes your've guessed it) Accurate Miniatures.Going to build straight OOB but may add some harnesses later.

Martin.
Martin.

Tomcat31

#042
Joined: November 18, 2006
KitMaker: 2,828 posts
AeroScale: 1,720 posts

Posted: Saturday, February 05, 2011 - 09:55 PM UTC
Keep your sanity man and don't do it
Honestly with the problems Sam has had with her Mitchell and the fit issues I've had with their Vindicator. I don't think I'll want to build one of their kits again. But in saying that I hope your goes well as i'd be interested to to see how their Dauntless builds up
Honestly with the problems Sam has had with her Mitchell and the fit issues I've had with their Vindicator. I don't think I'll want to build one of their kits again. But in saying that I hope your goes well as i'd be interested to to see how their Dauntless builds up


AussieReg
#007
Joined: June 09, 2009
KitMaker: 8,156 posts
AeroScale: 3,756 posts
Posted: Saturday, February 05, 2011 - 10:23 PM UTC
Hi Martin, and thanks for checking in !
Don't listen to Tomcat mate, just dive in (sorry Allen). You've gotta find out one day what this kit is like, so it might as well be right now !!
I'm sure you will be helping out a few others who either have this in the stash, or are considering investing in an SBD kit in the near future.
Please just post progress pics and let us know how it goes together, for better or for worse so to speak.
Cheers, D


windysean

Joined: September 11, 2009
KitMaker: 1,917 posts
AeroScale: 563 posts
Posted: Sunday, February 06, 2011 - 06:47 AM UTC
I finished masking my Academy TBF finally, dabbed some zinc chromate green on the canopy framing (making sure not to blob or jab the paint under the tape), and now I've sprayed white for the lower color.


I also started to scratchbuild a torpedo to pose underneath. Using measurements from the internet, I searched around for something the right diameter, and only a pen on my workbench was correct, so I chopped a length of it for the torp body, and piece of an F-16's fuel tank. Of course the pen shaft wasn't styrene, but Tenax 7 seems to have joined them okay.

thanks for looking,
-Sean.
I also started to scratchbuild a torpedo to pose underneath. Using measurements from the internet, I searched around for something the right diameter, and only a pen on my workbench was correct, so I chopped a length of it for the torp body, and piece of an F-16's fuel tank. Of course the pen shaft wasn't styrene, but Tenax 7 seems to have joined them okay.
thanks for looking,
-Sean.

CMOT70
Joined: August 23, 2007
KitMaker: 629 posts
AeroScale: 539 posts
Posted: Sunday, February 06, 2011 - 09:50 PM UTC
Quoted Text
All this talk about Accurate Miniatures. Your've enticed me into this Campaign with a SBD-3 Dauntless from (yes your've guessed it) Accurate Miniatures.Going to build straight OOB but may add some harnesses later.
Martin.
Accurate Miniatures kits that i've built have tended to be on par with the sort of complexity as most newer Eduard kits. Don't be scared of them, they're fine kits except for maybe the Vindicator which was finished off after the original company went under.
In fact the AM F3F kits are two of the finest 1/48 kits ever produced. And i've never heard anything bad about the SBD's, all i've heard is that they're way better than the Hasegawa kits.
Anyway i've got the final top colours on now, ready for clear and decals.

Andrew
AussieReg
#007
Joined: June 09, 2009
KitMaker: 8,156 posts
AeroScale: 3,756 posts
Posted: Monday, February 07, 2011 - 12:35 AM UTC
Sean, nice innovation with the Torpedo, but just make sure the pen you demolished isn't the one you gave wifey for christmas last year !!
Andrew, very nice job on the Camo for Kate !
I'm still plodding along with the rigging on mine, so while the CA dries here's a mini-tutorial on how I'm doing the antenna wires. I'm sure there are better and easier ways, so please feel free to enlighten me guys !!
First a pic

What I've done is take a new blade and take a very thin slice off the top of the antenna post to flatten it, then using a fine razor saw (visible mid-right in the pic) I've cut a thin groove in the top of the post. I put a small drop of CA in the groove, lay the wire in (in this case I'm using "Invisible mending thread"), then grab the tag end with a haemostat and balance it so the wire is held tight acroos the top of the post. Once the CA is set I add another small drop to the top of the wire to give it some extra strength, and this also rebuilds the top of the antenna post to it's original shape (or pretty close).
Here's a closer look

Once the CA is all set I take a permanent marker and un-invisible (perhaps de-invisible or re-visible) the Invisible Mending Thread !!
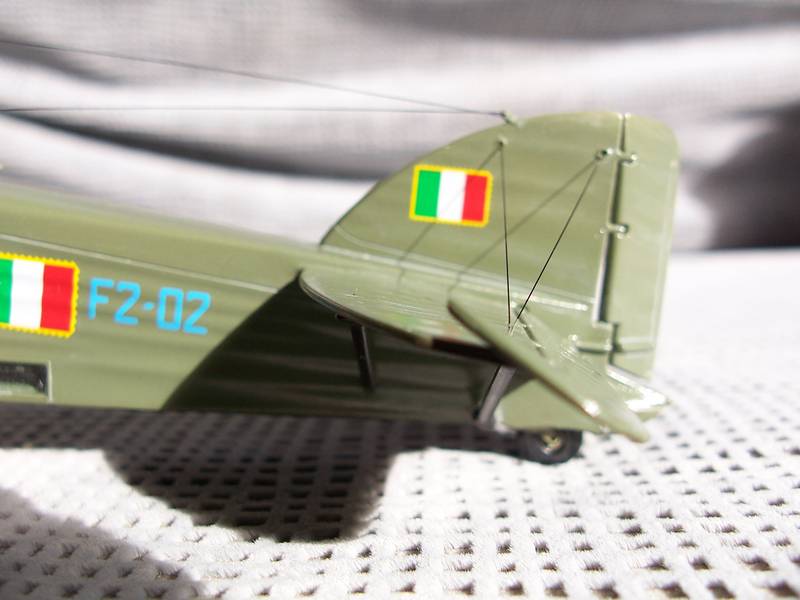
Here's a shot of the tailplane rigging

Once the rigging is done it's just a couple of small touch-ups, re-fix the doodads that got knocked off by my clumsy mitts, flat clear, and on the shelf she goes !!
Cheers, D
Andrew, very nice job on the Camo for Kate !
I'm still plodding along with the rigging on mine, so while the CA dries here's a mini-tutorial on how I'm doing the antenna wires. I'm sure there are better and easier ways, so please feel free to enlighten me guys !!
First a pic
What I've done is take a new blade and take a very thin slice off the top of the antenna post to flatten it, then using a fine razor saw (visible mid-right in the pic) I've cut a thin groove in the top of the post. I put a small drop of CA in the groove, lay the wire in (in this case I'm using "Invisible mending thread"), then grab the tag end with a haemostat and balance it so the wire is held tight acroos the top of the post. Once the CA is set I add another small drop to the top of the wire to give it some extra strength, and this also rebuilds the top of the antenna post to it's original shape (or pretty close).
Here's a closer look
Once the CA is all set I take a permanent marker and un-invisible (perhaps de-invisible or re-visible) the Invisible Mending Thread !!
Here's a shot of the tailplane rigging
Once the rigging is done it's just a couple of small touch-ups, re-fix the doodads that got knocked off by my clumsy mitts, flat clear, and on the shelf she goes !!
Cheers, D
SUNDON
Joined: January 19, 2009
KitMaker: 158 posts
AeroScale: 155 posts
Posted: Monday, February 07, 2011 - 03:51 AM UTC
Made a start today.

So far so good , hopefully I won't have as many problems with my build as others have had with there Accurate Miniature kits.
Martin
So far so good , hopefully I won't have as many problems with my build as others have had with there Accurate Miniature kits.
Martin
611_sqd
Joined: January 24, 2011
KitMaker: 470 posts
AeroScale: 99 posts
Posted: Monday, February 07, 2011 - 03:07 PM UTC
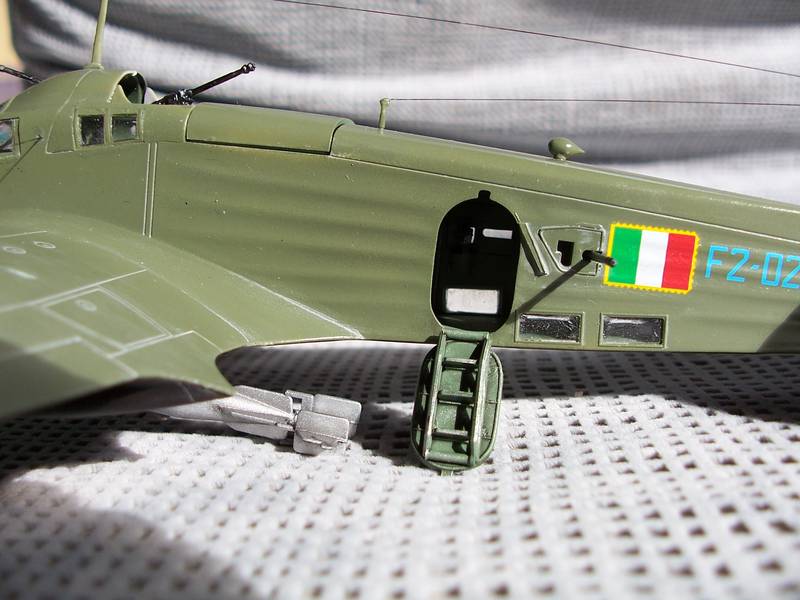
Still can't find my airbrush so I used my old testors airbrush. This came with a paint set I got from Zellers several years back. It uses can propellant and for block colors it is...ok. Canned propellant sucks bad. As it gets colder it sprays worse. So you have to paint it in a very staggered kind of way and wait for the can to heat up again. If your patient the end result is fine. Useless for fine work like on the Dornier in our build here.
So the light blue is on. I haven't taken all the masks off yet when the pic was done and as the first solid green is a dark one I didn't bother masking off the top as the green will go over fine. Bombs are being painted and then they will go on. Have to mask the bottom off and do the first solid green then mask of the camo for the black green. A coat of future and some weathering and this puppy will be done.

So the light blue is on. I haven't taken all the masks off yet when the pic was done and as the first solid green is a dark one I didn't bother masking off the top as the green will go over fine. Bombs are being painted and then they will go on. Have to mask the bottom off and do the first solid green then mask of the camo for the black green. A coat of future and some weathering and this puppy will be done.
AussieReg
#007
Joined: June 09, 2009
KitMaker: 8,156 posts
AeroScale: 3,756 posts
Posted: Monday, February 07, 2011 - 03:35 PM UTC
Looking good Aaron, you have overcome the fit issues very well by the looks of it now !!
Likewise Martin, good quick progress on your AccMin SBD.
Don't forget that the first post of this thread is a Roll Call/Build Status Log to summarise who is doing what and where !!
Cheers, D
Likewise Martin, good quick progress on your AccMin SBD.
Don't forget that the first post of this thread is a Roll Call/Build Status Log to summarise who is doing what and where !!
Cheers, D
SUNDON
Joined: January 19, 2009
KitMaker: 158 posts
AeroScale: 155 posts
Posted: Tuesday, February 08, 2011 - 01:51 AM UTC
Some colour added to the cickpit parts.

I'll add a wash before I begin to put it together.
Martin
I'll add a wash before I begin to put it together.
Martin
windysean
Joined: September 11, 2009
KitMaker: 1,917 posts
AeroScale: 563 posts
Posted: Tuesday, February 08, 2011 - 02:59 AM UTC
Martin! That cockpit is going to look awesome! (of course, I haven't done a 1/48 scale plane in 30 years, and have never painted a 1/48 cockpit at all  ) With the canopies pulled back, like on the box art, that's going to be a real delight to see inside. Okay, I'll calm down-- the effect after the wash might be too much for me to handle .
Looks like Accurate Miniature did it's homework on that OOB cockpit.
Painting is coming along on my little 1/72 Avenger with the 3-color camoflage. Second color is curing today. Third color tonight or tomorrow.
-Sean.
) With the canopies pulled back, like on the box art, that's going to be a real delight to see inside. Okay, I'll calm down-- the effect after the wash might be too much for me to handle .Looks like Accurate Miniature did it's homework on that OOB cockpit.
Painting is coming along on my little 1/72 Avenger with the 3-color camoflage. Second color is curing today. Third color tonight or tomorrow.
-Sean.

md72

#439
Joined: November 05, 2005
KitMaker: 4,950 posts
AeroScale: 3,192 posts

Posted: Tuesday, February 08, 2011 - 03:36 AM UTC
D, thanks for the rigging tutorial. What dia of invisible thread did you use? I used .006" on a 1/72 and it looked way out of scale. Your's looks much better.
Is the aft end looped back forward or does it end there?

Is the aft end looped back forward or does it end there?


BlackWidow

Joined: August 09, 2009
KitMaker: 1,732 posts
AeroScale: 1,336 posts
Posted: Tuesday, February 08, 2011 - 08:17 AM UTC
@Damian
Your italian ship cracker looks stunning, mate! It sure will be a pearl on your shelf when finished!
@Aaron
Good to see your process on the Ju 88 and that you didn't loose faith in your skills. I'm sure it will come out nicely in the end. But maybe one day you can spend a bit more money and get that Hasegawa jewel. Though I only build in quarter scale I might get that one too one day. And thanks for your compliment about my Dornier ....
@Martin
Several years ago during my more or less glorious brush days I built a Night Avenger from A/M and the fitting was very good. They made in their early years already perfect model kits like Tamigawa (Tamiya/Hasegawa) does today. So don't worry about your build ....
Well, my campaign build is nearly finished. Everthing is glued and painted and my ship hunter just waits for the final satin coating. Should be ready to show by next weekend. Pics follow then ....
Torsten


mpatman
Joined: March 09, 2006
KitMaker: 248 posts
AeroScale: 160 posts

Posted: Tuesday, February 08, 2011 - 01:00 PM UTC
Andrew, lovely paintwork on the Kate!
I used Lifecolor for the Aotake Blue but did not like it so I was going to try the Clear Blue over Silver next time, but might give the Gunze a go?
I will have some pics of my Grace up tonight, I am getting near the end of my build and just need to sit down and get those last few bits and pieces done.
MARK
AussieReg
#007
Joined: June 09, 2009
KitMaker: 8,156 posts
AeroScale: 3,756 posts
Posted: Wednesday, February 09, 2011 - 12:29 AM UTC
Quoted Text
D, thanks for the rigging tutorial. What dia of invisible thread did you use? I used .006" on a 1/72 and it looked way out of scale. Your's looks much better.
Is the aft end looped back forward or does it end there?
Hi Mark. I checked the packaging for the thread and it doesn't have a nominated diameter, sorry about that.
I forgot to detail how I did the tail end of the antenna wires. I used the fine wire from a "bread tie" after I stripped the plastic off and made a tiny loop. I drilled a hole in the tail of the aircraft to take the loop, then threaded the wire through and crimped it with some needle-nose pliers to hold the thread tight. I glued the loop into the tail as the first step of the antenna rigging, then fixed it to the two forward posts. I will get some close up pics once it is all finished.
Cheers, D
SUNDON
Joined: January 19, 2009
KitMaker: 158 posts
AeroScale: 155 posts
Posted: Wednesday, February 09, 2011 - 09:28 AM UTC
Made some more progress today finished the cockpit with a light wash.


Finished the day with a bit of test fitting.


Martin
Finished the day with a bit of test fitting.
Martin
mpatman
Joined: March 09, 2006
KitMaker: 248 posts
AeroScale: 160 posts
Posted: Wednesday, February 09, 2011 - 06:43 PM UTC
Hi Everyone,
I have finished the Grace Today, the Hasegawa kit is very detailed but I did have a few fit issues and there were a few sink marks in he bomb bay and other areas.
I have painted her pretty clean in the Markings of the 752nd Air Corp in April 1945. It is a rather large plane and has some great lines with the Corsair looking wings.


Bombs shown as per campaign rules:


First Campaign finished for the year, now onto my Spitfire! I have been a bit foolish and enlisted in 6 other Campaigns that all start in the next month or 2....
Cheers,
Mark
I have finished the Grace Today, the Hasegawa kit is very detailed but I did have a few fit issues and there were a few sink marks in he bomb bay and other areas.
I have painted her pretty clean in the Markings of the 752nd Air Corp in April 1945. It is a rather large plane and has some great lines with the Corsair looking wings.
Bombs shown as per campaign rules:
First Campaign finished for the year, now onto my Spitfire! I have been a bit foolish and enlisted in 6 other Campaigns that all start in the next month or 2....
Cheers,
Mark

vonHengest
Joined: June 29, 2010
KitMaker: 5,854 posts
AeroScale: 372 posts

Posted: Wednesday, February 09, 2011 - 07:07 PM UTC
Nice job Mark! I'm sure you already mentioned this, but what scale is the kit?
mpatman
Joined: March 09, 2006
KitMaker: 248 posts
AeroScale: 160 posts
Posted: Wednesday, February 09, 2011 - 07:12 PM UTC
Hi Jeremy,
it's 1/48 scale.
Mark
it's 1/48 scale.
Mark
AussieReg
#007
Joined: June 09, 2009
KitMaker: 8,156 posts
AeroScale: 3,756 posts
Posted: Wednesday, February 09, 2011 - 07:30 PM UTC
Super job there Mark, your Grace loooks superb, and that evil pair of weapons just pushing against the racks trying to burst a hull or two set it off nicely.
Martin it seems like the AccMin curse skipped the SBD kit, your build is looking really sharp mate.
I got the S.79 finished last night !


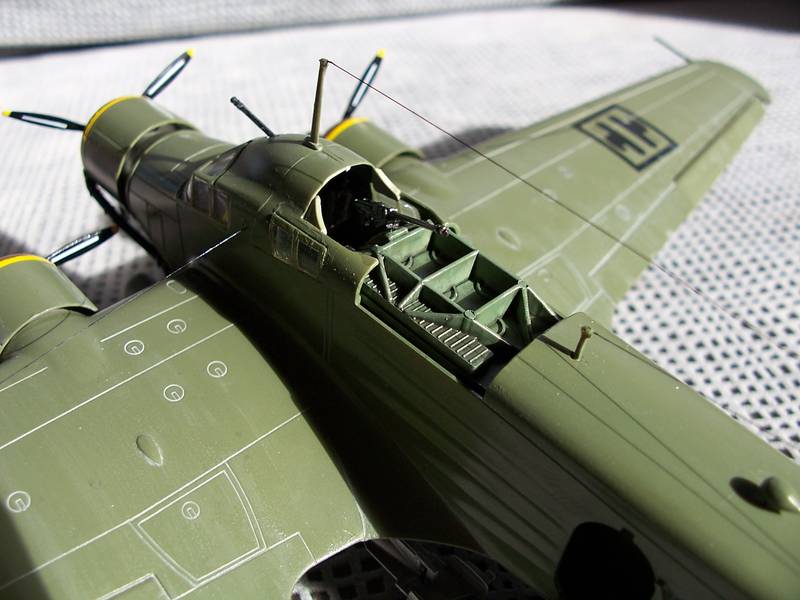
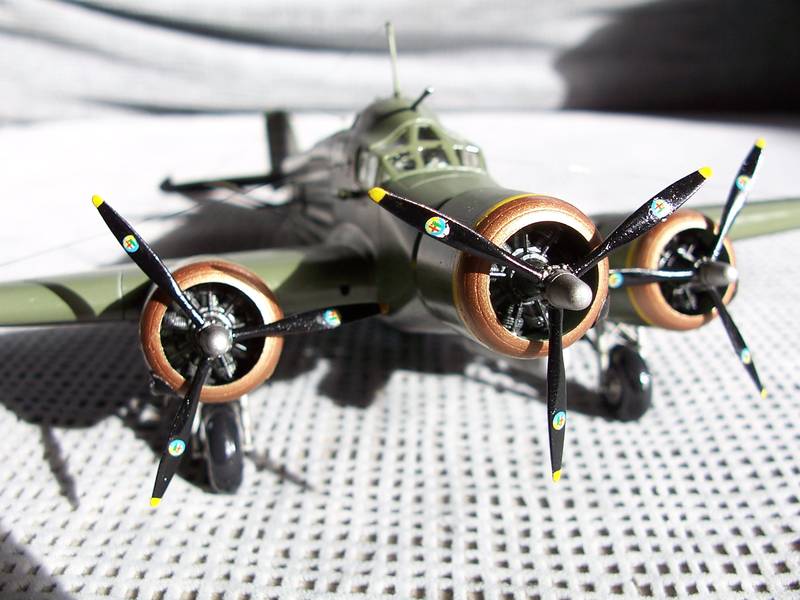
And the nasty part


I might put another thin coat of flat clear on it later, but for now it's on the display shelf YAY !!
Martin it seems like the AccMin curse skipped the SBD kit, your build is looking really sharp mate.
I got the S.79 finished last night !
And the nasty part
I might put another thin coat of flat clear on it later, but for now it's on the display shelf YAY !!
 |

WEB HOSTING BY


Copyright ©2021 AeroScale and Kitmaker Network, a subsidiary of Silver Star Enterprises
All Rights Reserved. Please read our Conditions of Use and Privacy Policy.
All Rights Reserved. Please read our Conditions of Use and Privacy Policy.