

Air Campaigns
Want to start or join a group build? This is where to start.
Want to start or join a group build? This is where to start.
Hosted by Frederick Boucher, Michael Satin
OFFICIAL: Aerial Screw Helicopter Campaign
flyboy92187

Joined: March 30, 2011
KitMaker: 199 posts
AeroScale: 150 posts

Posted: Thursday, October 13, 2011 - 12:21 PM UTC
That Hip is looking Hip!!! Sharp paint job, looking forward to seeing how that kristal klear works.
Red4
Joined: April 01, 2002
KitMaker: 4,287 posts
AeroScale: 1,164 posts

Posted: Thursday, October 13, 2011 - 12:40 PM UTC
Thanks. Won't be long before I get to that stage.. 
"Q"
"Q"

Keeperofsouls2099
Joined: January 14, 2009
KitMaker: 2,798 posts
AeroScale: 2,443 posts
Posted: Thursday, October 13, 2011 - 01:06 PM UTC
Good job red very crisp and clean 


Jessie_C


Joined: September 03, 2009
KitMaker: 6,965 posts
AeroScale: 6,247 posts

Posted: Thursday, October 13, 2011 - 02:33 PM UTC
More done on my little Mil


Keeperofsouls2099
Joined: January 14, 2009
KitMaker: 2,798 posts
AeroScale: 2,443 posts
Posted: Thursday, October 13, 2011 - 03:01 PM UTC
Almost there Jess looking good thanks for taking part
Red4
Joined: April 01, 2002
KitMaker: 4,287 posts
AeroScale: 1,164 posts
Posted: Friday, October 14, 2011 - 09:43 AM UTC
It's decal time...all 4 of them Also time to address the windows. I mentioned earlier that I was going to use Krystal Kleer (KK) for the windows instead of the kit supplied ones. KK is really easy to use. It is somewhat like a thick white glue that dries clear and can be used for many things...not just making windows. To start, you need a tooth pick, a paint brush and a Q-tip. Dip the toothpick into the KK and get a fair amount on it. Not too much as it can and will run on you. Once you use it once or twice, you'll figure out how much to use. Place the KK laden toothpick into said window opening and touch it to one side. The KK will grab the side. Now, move the toothpick around in the opening to spread the KK. It will form a film over the window opening. Slowly pull the toothpick out and viola', one window ready for drying. It is that simple. I'm not sure just how large an opening you can do with this stuff, but little windows are a snap and make things so much easier to deal with rather than masking etc. It will take upwards of an hour to dry depending on how heavy you applied the material. The q-tip and paint brush are for any goofs. Best to clean it up quickly as once it set, it will take considerably more effort....been there done that.
I mentioned you can use it for other purposes....
Canopy attachment, gap filler, PE adhesive, simulate glass instrument faces...etc. I use this in conjunction with Future for attaching my canopies. It dries clear, doesn't attack the plastic and cleans up really easy using just a wet paint brush.. Hope this helps those who asked about using the KK material. "Q"

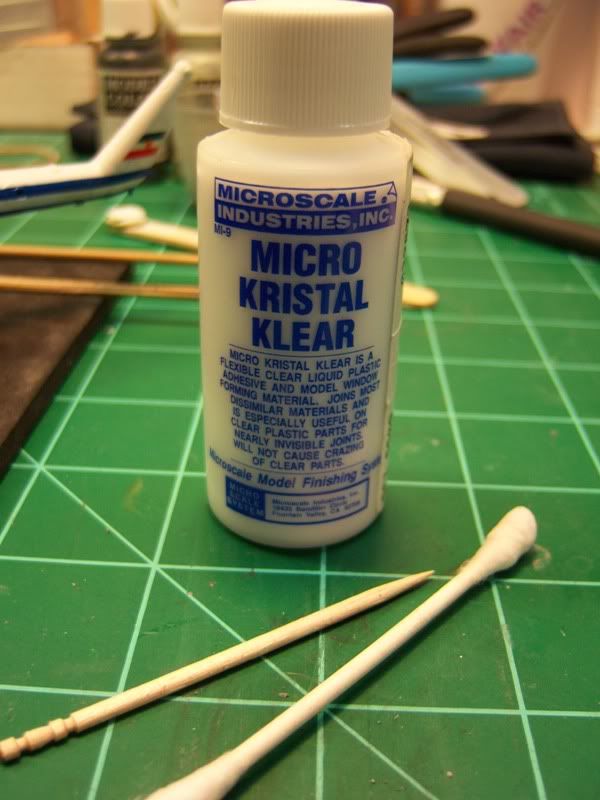
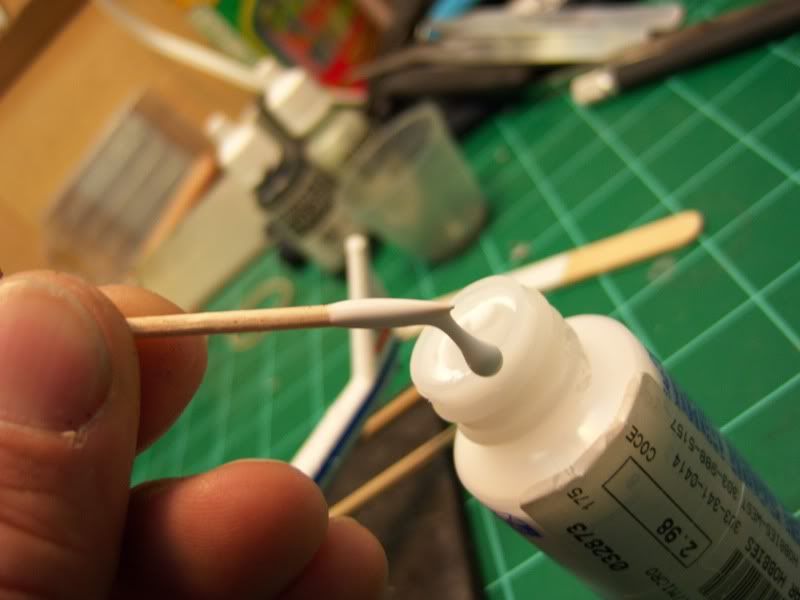


Also time to address the windows. I mentioned earlier that I was going to use Krystal Kleer (KK) for the windows instead of the kit supplied ones. KK is really easy to use. It is somewhat like a thick white glue that dries clear and can be used for many things...not just making windows. To start, you need a tooth pick, a paint brush and a Q-tip. Dip the toothpick into the KK and get a fair amount on it. Not too much as it can and will run on you. Once you use it once or twice, you'll figure out how much to use. Place the KK laden toothpick into said window opening and touch it to one side. The KK will grab the side. Now, move the toothpick around in the opening to spread the KK. It will form a film over the window opening. Slowly pull the toothpick out and viola', one window ready for drying. It is that simple. I'm not sure just how large an opening you can do with this stuff, but little windows are a snap and make things so much easier to deal with rather than masking etc. It will take upwards of an hour to dry depending on how heavy you applied the material. The q-tip and paint brush are for any goofs. Best to clean it up quickly as once it set, it will take considerably more effort....been there done that. I mentioned you can use it for other purposes....
Canopy attachment, gap filler, PE adhesive, simulate glass instrument faces...etc. I use this in conjunction with Future for attaching my canopies. It dries clear, doesn't attack the plastic and cleans up really easy using just a wet paint brush.. Hope this helps those who asked about using the KK material.
"Q"flyboy92187
Joined: March 30, 2011
KitMaker: 199 posts
AeroScale: 150 posts
Posted: Friday, October 14, 2011 - 09:57 AM UTC
Thank you for that! I look forward to seing the result. It is easier to see how it works with the visual aid. I may have to pick some of that up and do the same on my hip.
Red4
Joined: April 01, 2002
KitMaker: 4,287 posts
AeroScale: 1,164 posts
Posted: Friday, October 14, 2011 - 10:08 AM UTC
My pleasure. Hope it works out for you as well. Now to do the other side. "Q"
"Q"Jessie_C
Joined: September 03, 2009
KitMaker: 6,965 posts
AeroScale: 6,247 posts
Posted: Saturday, October 15, 2011 - 01:42 PM UTC
All of a sudden it's in colour!


Touching up to follow...
Touching up to follow...
Keeperofsouls2099
Joined: January 14, 2009
KitMaker: 2,798 posts
AeroScale: 2,443 posts
Posted: Sunday, October 16, 2011 - 03:47 AM UTC
Jess I'm glad to see you got some paint flowing and your heading towards the finish line
By the way guys don't forget to sign up for pin-ups 2 lots of fun last time and something for everyone to build.
By the way guys don't forget to sign up for pin-ups 2 lots of fun last time and something for everyone to build.

HARV

#012
Joined: November 07, 2003
KitMaker: 3,098 posts
AeroScale: 79 posts
Posted: Sunday, October 16, 2011 - 08:22 AM UTC
Well I am going to call this one finished.
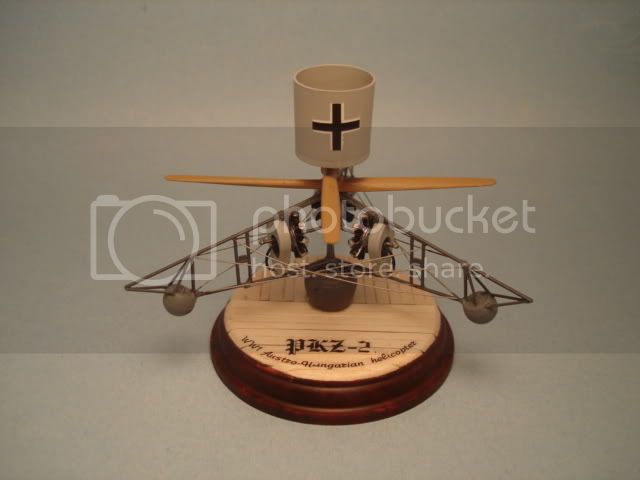
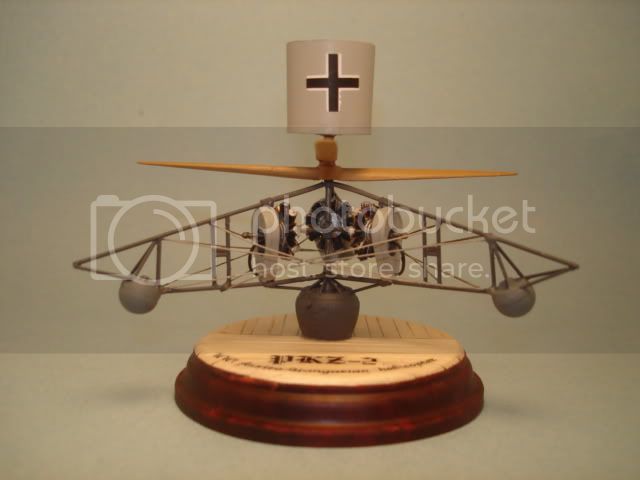
For such a small kit it took quite a bit of work and the engines had more detailing to paint than I realized. I thought that adding the support cables and adding the wood planking to the base helped make everything a little more realistic. I enjoyed this project as I like to model things that are not that well known.
Thank you for the campaign idea Justin, I enjoyed it.
Randy

Keeperofsouls2099
Joined: January 14, 2009
KitMaker: 2,798 posts
AeroScale: 2,443 posts
Posted: Sunday, October 16, 2011 - 09:33 AM UTC
thanks for taking part and good show fantastic model sir please dont forget to post in the gallery
fantastic model sir please dont forget to post in the gallery Red4
Joined: April 01, 2002
KitMaker: 4,287 posts
AeroScale: 1,164 posts
Posted: Monday, October 17, 2011 - 11:43 AM UTC
A little more progress on the hip. Painted, decaled, windows installed, landing gear legs installed, rotor's installed. Still need to do some minor paint touch up and add the fiddly bits. She should be complete here shortly. Thanks for looking. "Q"
ps. I attached a couple of pics of my new buddies. My wildlife photography class adopted them this past week end. Farah and Apollo. Both of them mugged me Sunday morning while playing. Seems they took a liking to me. Nothing like wolf slobber all over your head to make you feel loved.


ps. I attached a couple of pics of my new buddies. My wildlife photography class adopted them this past week end. Farah and Apollo. Both of them mugged me Sunday morning while playing. Seems they took a liking to me. Nothing like wolf slobber all over your head to make you feel loved.
Keeperofsouls2099
Joined: January 14, 2009
KitMaker: 2,798 posts
AeroScale: 2,443 posts
Posted: Monday, October 17, 2011 - 12:22 PM UTC
Nice shots on both the wolves are majestic
Red4
Joined: April 01, 2002
KitMaker: 4,287 posts
AeroScale: 1,164 posts
Posted: Tuesday, October 18, 2011 - 02:20 AM UTC
Thanks Justin. Well, the Hip is complete or as complete as it is going to be at this point. Seems my port side window grew legs and walked away  If I find it later I can attach it then. As she sits now, it''ll be a bit breezy during flight. Definitely not my best work, but she pairs nicely with her heavy armed brother the Hind. Thanks for a fun campaign. Onward! "Q"


If I find it later I can attach it then. As she sits now, it''ll be a bit breezy during flight. Definitely not my best work, but she pairs nicely with her heavy armed brother the Hind. Thanks for a fun campaign. Onward! "Q"Keeperofsouls2099
Joined: January 14, 2009
KitMaker: 2,798 posts
AeroScale: 2,443 posts
Posted: Tuesday, October 18, 2011 - 03:00 AM UTC
Good finish Q hope nobody falls out  Don't forget to post in the gallery sir
Don't forget to post in the gallery sir Red4
Joined: April 01, 2002
KitMaker: 4,287 posts
AeroScale: 1,164 posts
Posted: Tuesday, October 18, 2011 - 04:05 AM UTC
Thanks. Already taken care of in the gallery. "Q"
Keeperofsouls2099
Joined: January 14, 2009
KitMaker: 2,798 posts
AeroScale: 2,443 posts
Posted: Tuesday, October 18, 2011 - 04:16 AM UTC
Thank you for taking part sir don't forget pin-ups 2
HARV
#012
Joined: November 07, 2003
KitMaker: 3,098 posts
AeroScale: 79 posts
Posted: Tuesday, October 18, 2011 - 02:48 PM UTC
Quoted Text
thanks for taking part and good show fantastic model sir
You're welcome Justin and thank you for the kind words.
Randy
flyboy92187
Joined: March 30, 2011
KitMaker: 199 posts
AeroScale: 150 posts
Posted: Wednesday, October 19, 2011 - 04:09 AM UTC
... And I am ordering kristal klear
flyboy92187
Joined: March 30, 2011
KitMaker: 199 posts
AeroScale: 150 posts
Posted: Thursday, October 20, 2011 - 06:10 AM UTC
I am back in the saddle after a brief vacation up north. Matt; did you have a nasty gap by the top hatch? It would just not glue, and my clamps would not hold it as tightly as I wanted it. So, I just ca'd it as close as I could, and puttied it. Also, the Eduard Mask set does not include masks for the cabin windows, so as mentioned earlier I ordered Kristal Klear. It should be here tomorrow, and as tomorrow is a day off, more progress will certainly follow.


flyboy92187
Joined: March 30, 2011
KitMaker: 199 posts
AeroScale: 150 posts
Posted: Friday, October 21, 2011 - 10:04 AM UTC
I managed to get a bit more done today. Tomorrow I plan to finish the landing gear, and time permitting, hit it with a gloss coat.


Keeperofsouls2099
Joined: January 14, 2009
KitMaker: 2,798 posts
AeroScale: 2,443 posts
Posted: Friday, October 21, 2011 - 01:04 PM UTC
looking good nice job,love the camo.
Red4
Joined: April 01, 2002
KitMaker: 4,287 posts
AeroScale: 1,164 posts
Posted: Friday, October 21, 2011 - 05:14 PM UTC
Quoted Text
Matt; did you have a nasty gap by the top hatch? It would just not glue, and my clamps would not hold it as tightly as I wanted it.
No problem here, but then again I had several clamps, pieces of tape and rubber bands holding mine in place. Good luck with the Krystal Kleer, I'm sure you'll like how it comes out. Camo is looking good..
"Q"
flyboy92187
Joined: March 30, 2011
KitMaker: 199 posts
AeroScale: 150 posts
Posted: Saturday, October 22, 2011 - 05:32 AM UTC
Well I will need to get some more big clamps! More for future projects. Last weekend I went to a contest, entered some kits, and wound up buying the 1/35 Trumpy Chinook... Anyway, as promised, clearcoated, rotor assembled, and gear on.


 |

WEB HOSTING BY


Copyright ©2021 AeroScale and Kitmaker Network, a subsidiary of Silver Star Enterprises
All Rights Reserved. Please read our Conditions of Use and Privacy Policy.
All Rights Reserved. Please read our Conditions of Use and Privacy Policy.