

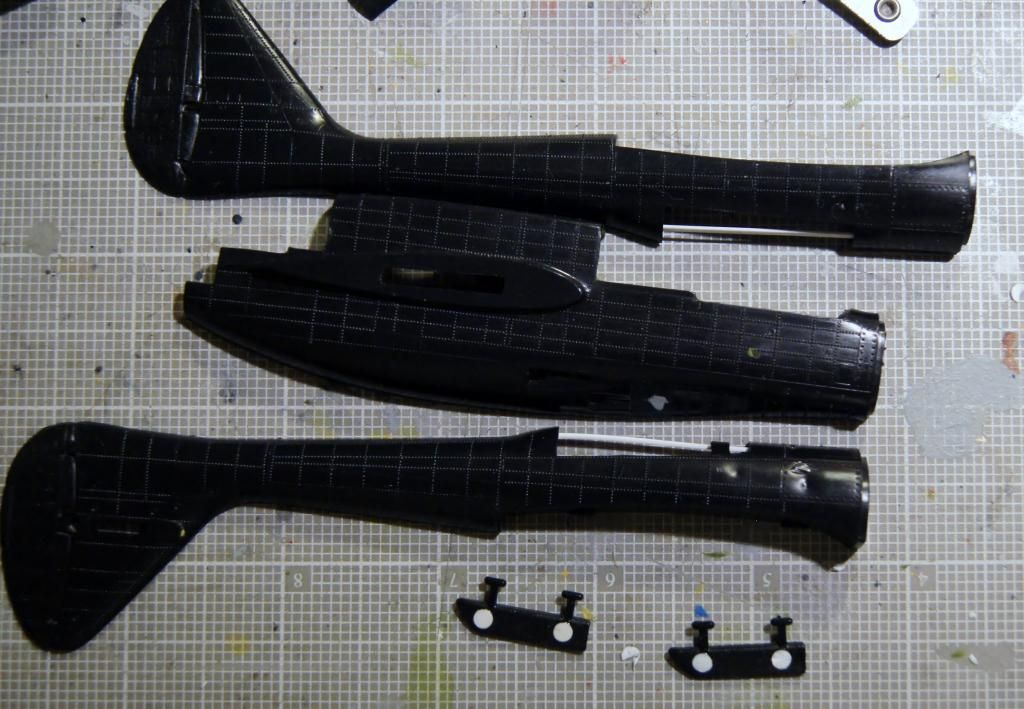
Lots of progress in this Campaign, not so much by me. I managed to get the interior green onto various subassemblies a couple of nights back, hopefully some detail painting this arvo then on to the major assembly.
Cheers, D
Air Campaigns
Want to start or join a group build? This is where to start.
Want to start or join a group build? This is where to start.
Hosted by Frederick Boucher, Michael Satin
OFFICIAL: Devils in the Dark: Nightfighters!

AussieReg

#007

Joined: June 09, 2009
KitMaker: 8,156 posts
AeroScale: 3,756 posts
Posted: Saturday, February 23, 2013 - 02:00 PM UTC


md72

#439

Joined: November 05, 2005
KitMaker: 4,950 posts
AeroScale: 3,192 posts

Posted: Monday, February 25, 2013 - 09:47 AM UTC
One step forward, 2 steps back. What fool places ejector pins on the TOP of the aileron? The rivets weren't going to be a problem, but all of the silly sinks are going to destroy rivets every everywhere.


amegan
#243

Joined: March 21, 2008
KitMaker: 996 posts
AeroScale: 915 posts

Posted: Tuesday, February 26, 2013 - 11:18 AM UTC
Hi All Finally got one of those tuits and opened the box, and for the second time in two posts it's a P-61, but this is the Great Wall P-61a Glass Nose and initially impressions are very favourable.


A quick count of the first cockpit unit parts shows more than in the whole Airfix DH 88 Comet and with crisp, flashless moulding. Looking forward to this one.
A quick count of the first cockpit unit parts shows more than in the whole Airfix DH 88 Comet and with crisp, flashless moulding. Looking forward to this one.
AussieReg
#007
Joined: June 09, 2009
KitMaker: 8,156 posts
AeroScale: 3,756 posts
Posted: Tuesday, February 26, 2013 - 11:24 AM UTC
Quoted Text
Hi All Finally got one of those tuits and opened the box, and for the second time in two posts it's a P-61, but this is the Great Wall P-61a Glass Nose and initially impressions are very favourable.
A quick count of the first cockpit unit parts shows more than in the whole Airfix DH 88 Comet and with crisp, flashless moulding. Looking forward to this one.
And I'm not jealous at all . . . . much

Really looking forward to watching this one come together Andrew.
Cheers, D

macotra4
Joined: January 25, 2010
KitMaker: 110 posts
AeroScale: 88 posts
Posted: Tuesday, February 26, 2013 - 03:58 PM UTC
and a small update from my build:
interior


and a build Beau with primer on:
and fully painted:


now it just needs a glossy coat, some weathering, decals and it will be done.
interior
and a build Beau with primer on:
and fully painted:
now it just needs a glossy coat, some weathering, decals and it will be done.

GhostHawk

Joined: January 27, 2011
KitMaker: 268 posts
AeroScale: 264 posts
Posted: Tuesday, February 26, 2013 - 11:35 PM UTC
hI,
WOW...!!! Cool paint job Tom...!!!
I'm looking forward to see the final weathering...
Diego
WOW...!!! Cool paint job Tom...!!!
I'm looking forward to see the final weathering...
Diego
Tailor

Joined: May 26, 2008
KitMaker: 1,168 posts
AeroScale: 199 posts

Posted: Wednesday, February 27, 2013 - 12:23 AM UTC
Great work and progress to see here!
Slowly but surely the 262 is coming together.
It's nice kit, but it does need filler in places.
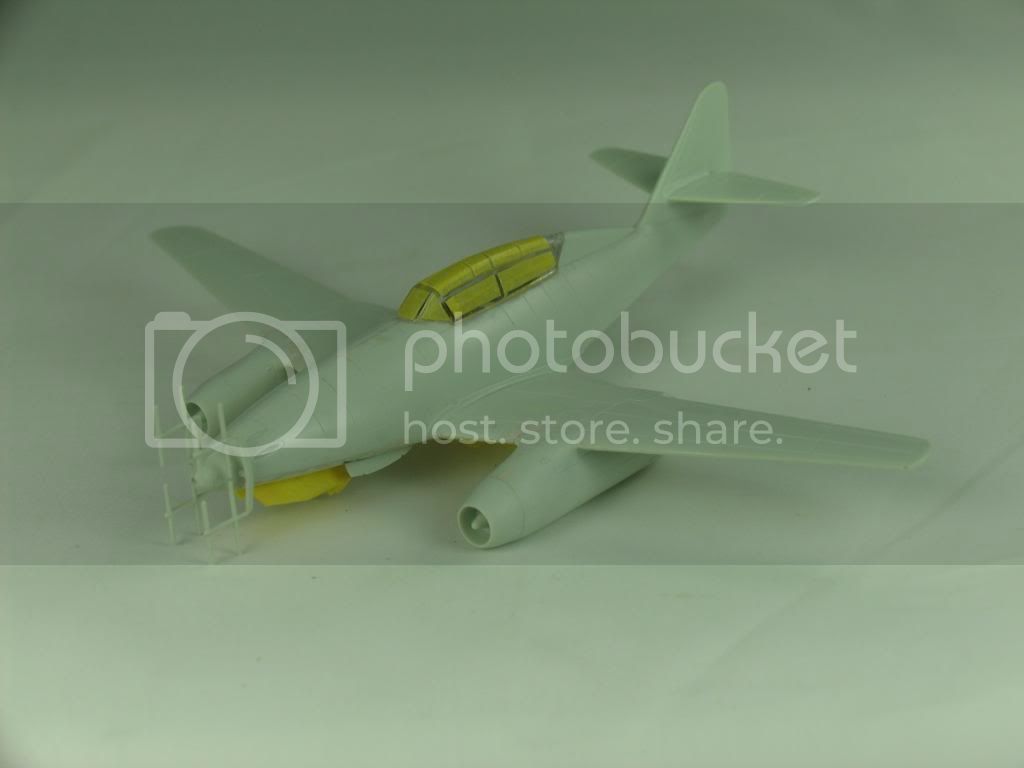
I was about ready to prime when I realised that the cockpit fairing doesn't really fit the cockpit.
So, more filler at this point. The gear is readily painted. With a bit of luck I'll finish Sunday.
Cheers,
Guido
Slowly but surely the 262 is coming together.
It's nice kit, but it does need filler in places.
I was about ready to prime when I realised that the cockpit fairing doesn't really fit the cockpit.
So, more filler at this point. The gear is readily painted. With a bit of luck I'll finish Sunday.
Cheers,
Guido

Jessie_C


Joined: September 03, 2009
KitMaker: 6,965 posts
AeroScale: 6,247 posts

Posted: Wednesday, February 27, 2013 - 06:11 PM UTC
I used some light gull grey as a primer, and to serve as the colour of the inspar area. I'll polish this coat down a bit to give it a nice sheen, then mask off the inspars for the silver.
AussieReg
#007
Joined: June 09, 2009
KitMaker: 8,156 posts
AeroScale: 3,756 posts
Posted: Saturday, March 02, 2013 - 12:44 AM UTC
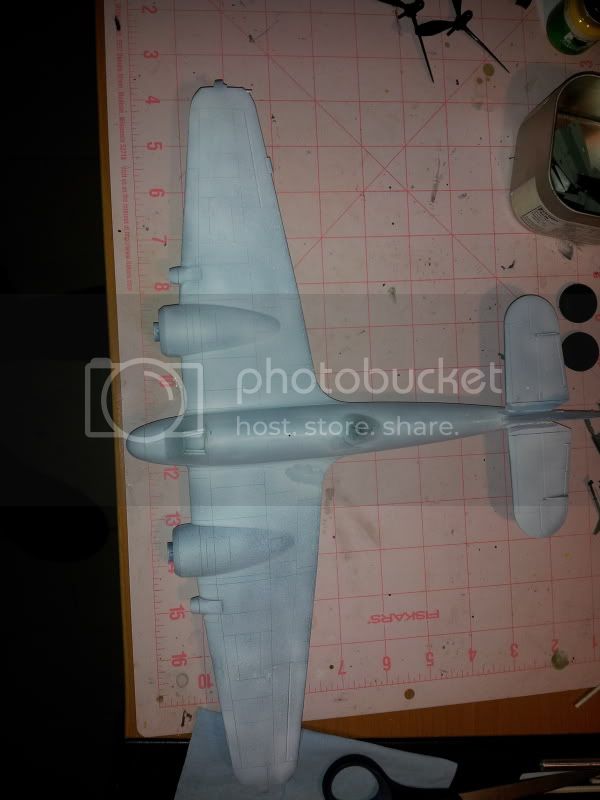
A little progress to report boss, basic assembly underway !

This kit is fitting together quite well, in fact no issues to report so far !
Cheers, D
This kit is fitting together quite well, in fact no issues to report so far !
Cheers, D
MichaelSatin
Joined: January 19, 2008
KitMaker: 3,909 posts
AeroScale: 2,904 posts
Posted: Saturday, March 02, 2013 - 03:01 AM UTC
Nice work everyone! I'm really pleased to see how this one has taken off!
Michael
Michael

bdanie6
Joined: November 09, 2008
KitMaker: 615 posts
AeroScale: 459 posts

Posted: Saturday, March 02, 2013 - 10:53 AM UTC
Sorry to say I got held up on my Mosquito build due to lack of paint, and then I got side-tracked by the EOD 2 campaign over at Armorama  As I am at a stopping point there, I figured I'd get back to work here.
I have been watching closely and everyone is doing just fantastic work, hopefully I'll have some pictures up soon.
Later
As I am at a stopping point there, I figured I'd get back to work here. I have been watching closely and everyone is doing just fantastic work, hopefully I'll have some pictures up soon.
Later
Tailor
Joined: May 26, 2008
KitMaker: 1,168 posts
AeroScale: 199 posts
Posted: Sunday, March 03, 2013 - 07:53 AM UTC
I am calling my bird done!
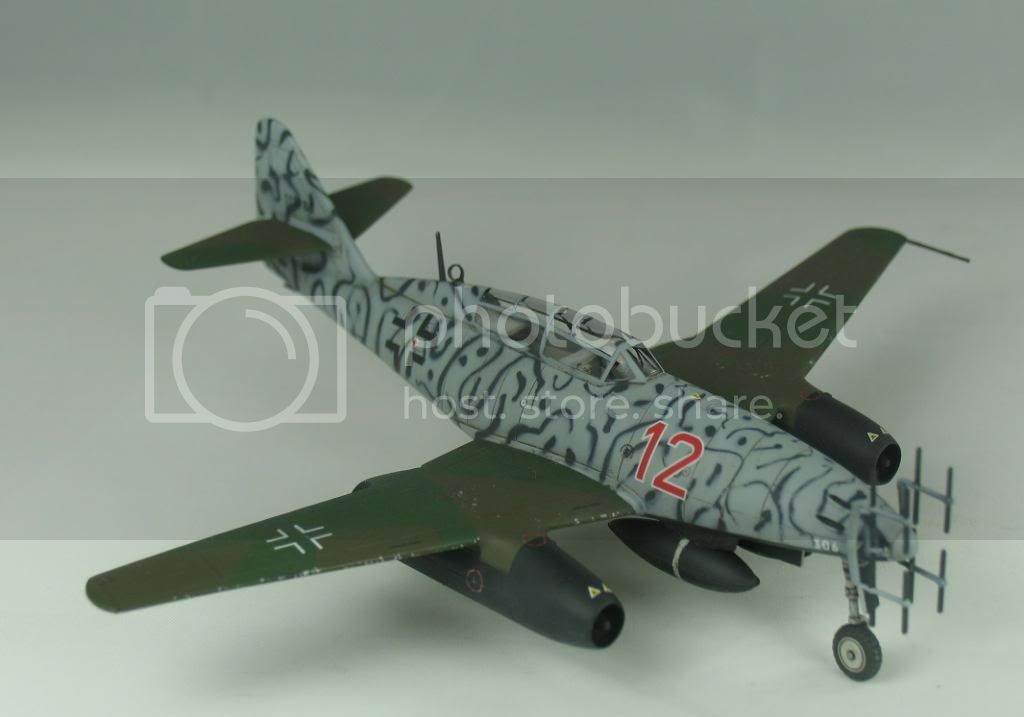
The camo isn't anything like the real thing, but hey, building airplanes is still new to me. I was sure I could not prompt a good result with my poor airbrush so I tried smurf-poop to mask the camo off. It came out quite differently from what I expected it to be, but I still like the effect.
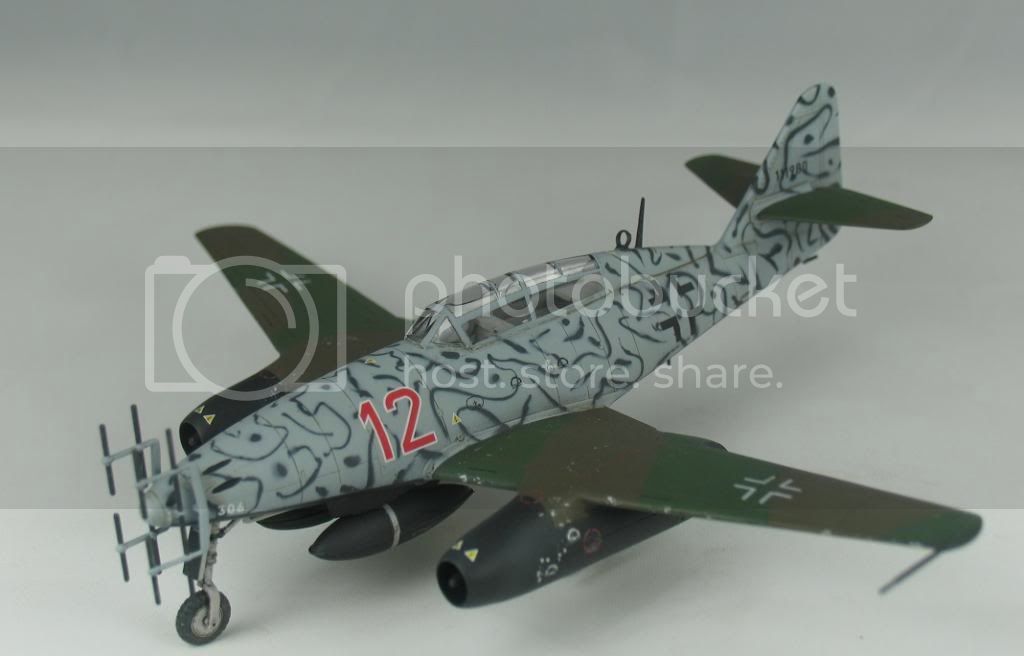
I learn a new thing with every build.
It was an honor flying with you!
Cheers,
Guido
The camo isn't anything like the real thing, but hey, building airplanes is still new to me. I was sure I could not prompt a good result with my poor airbrush so I tried smurf-poop to mask the camo off. It came out quite differently from what I expected it to be, but I still like the effect.
I learn a new thing with every build.
It was an honor flying with you!
Cheers,
Guido
MichaelSatin
Joined: January 19, 2008
KitMaker: 3,909 posts
AeroScale: 2,904 posts
Posted: Sunday, March 03, 2013 - 08:11 AM UTC
Quoted Text
I am calling my bird done!
I learn a new thing with every build.
It was an honor flying with you!
Cheers,
Guido
Nice work Guido! Learning something new is a great way to look at it, and it was a pleasure having you along!
Michael

Siderius
Joined: September 20, 2005
KitMaker: 1,747 posts
AeroScale: 1,673 posts
Posted: Sunday, March 03, 2013 - 08:18 AM UTC
Good job Guido, I really like the camoflauge effect you did. I think your bird looks great! Thanks for sharing it with us. Russell


tinbanger
Joined: February 04, 2008
KitMaker: 2,507 posts
AeroScale: 1,814 posts

Posted: Sunday, March 03, 2013 - 10:09 AM UTC
Hi All
I needed a jig to get the tail on square!
Off to Walmart and came back with this!:-

and built this:-


I needed a jig to get the tail on square!
Off to Walmart and came back with this!:-
and built this:-

MichaelSatin
Joined: January 19, 2008
KitMaker: 3,909 posts
AeroScale: 2,904 posts
Posted: Sunday, March 03, 2013 - 10:21 AM UTC
Where's the "love" button?
Great job Richard!
Michael
Great job Richard!
Michael
raypalmer
Joined: March 29, 2010
KitMaker: 1,151 posts
AeroScale: 985 posts

Posted: Sunday, March 03, 2013 - 10:40 AM UTC
Rich I'm burgling that idea off you for my venom.
tinbanger
Joined: February 04, 2008
KitMaker: 2,507 posts
AeroScale: 1,814 posts
Posted: Sunday, March 03, 2013 - 11:26 AM UTC
Thank's Guys!
I had played around with the idea of gluing a flat stock jig together but needed a more adjustable jig,I first saw Lego used in the KOTS-2012 campaign.
The Lego set was just over $29 and I also picked up a 10" x 10" base for larger jigs for $8.
Should last for years as long as I keep it hidden our grand daughter.
bdanie6
Joined: November 09, 2008
KitMaker: 615 posts
AeroScale: 459 posts
Posted: Tuesday, March 05, 2013 - 12:51 AM UTC
Hello everyone...I'm back 
The last time I posted pictures here was back on page one, I think, so I guess I'll just start again.
For this campaign I wanted to do the aircraft of one of the people I looked up to. In this instance Flt Lt C.J. Rawnsley. Jimmie (as he called himself) was the air gunner/ radar operator to Wing Commander John Cunningham, who was credited with the most air to air night kills by the RAF during WWII.
When Wg Cdr Cunningham was commanding officer of 85 Group his personal Mosquito was an NF Mk XII coded VX-R #DZ 302/G.
My starting point is the new release by Revell on the old Monorgam kit. ( I found the old copyright print inside a top wing, dated 1966). Molds this old due have some wear on them but I only found flash on 2 or 3 parts, admittedly that flash was pretty thick tho!
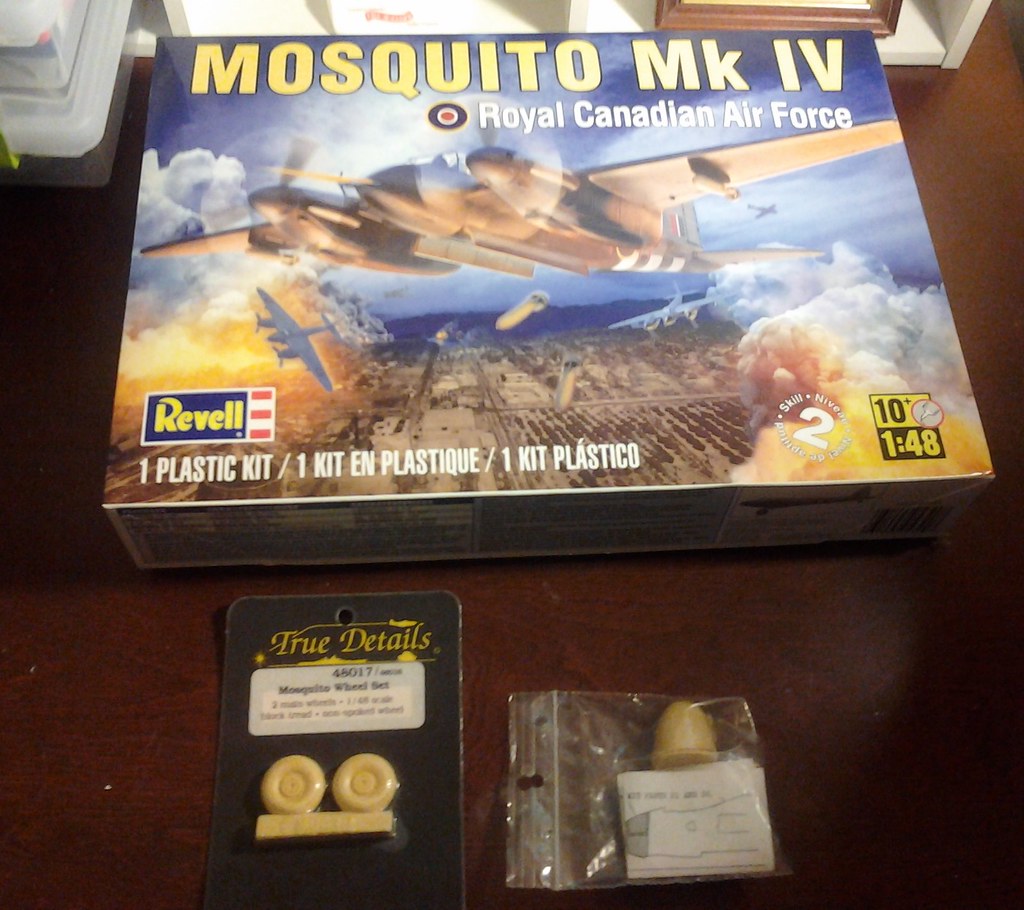
The last time I built this kit was in 1998, when I bought it, I also purchased the Paragon conversion set to change the Airfix FB Mk IV into an NF Mk XII and the True Details wheel set.
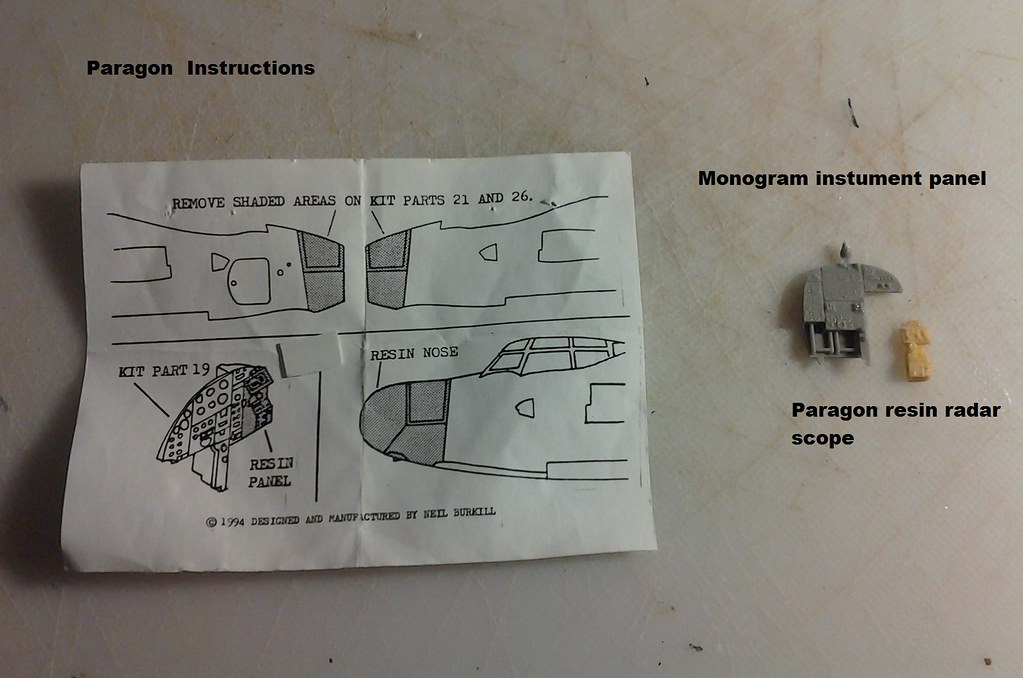
The Paragon kit with the kit instrument panel.

Since the instrument panel is different between the Airfix kit and the Monogram kit I had to place a plastic card piece to the panel in order to get the resin radar scope mounted.
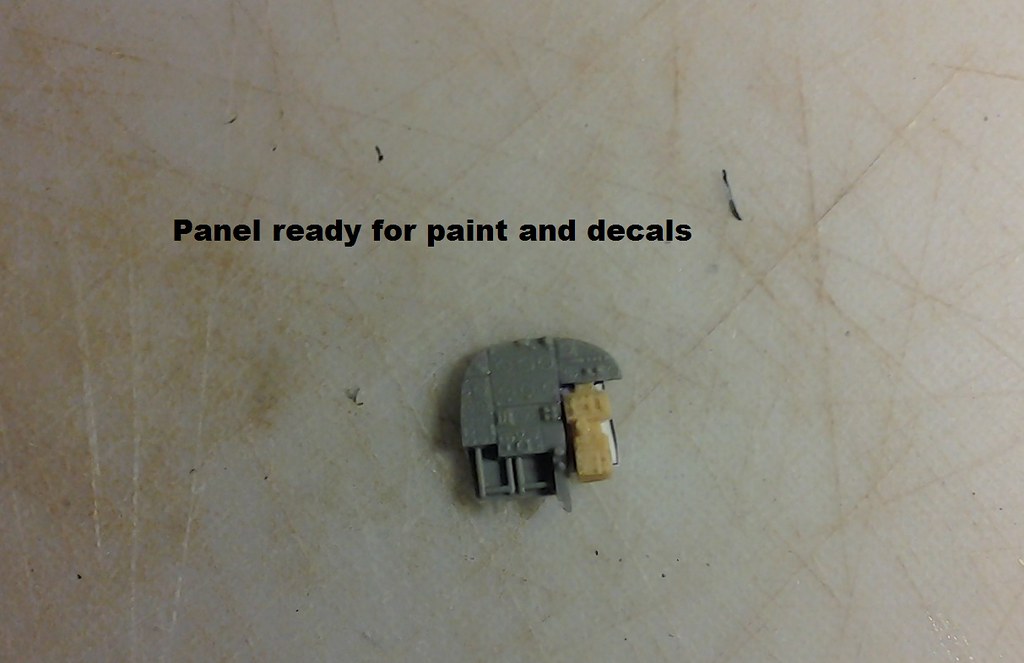
new panel ready to paint and decal.
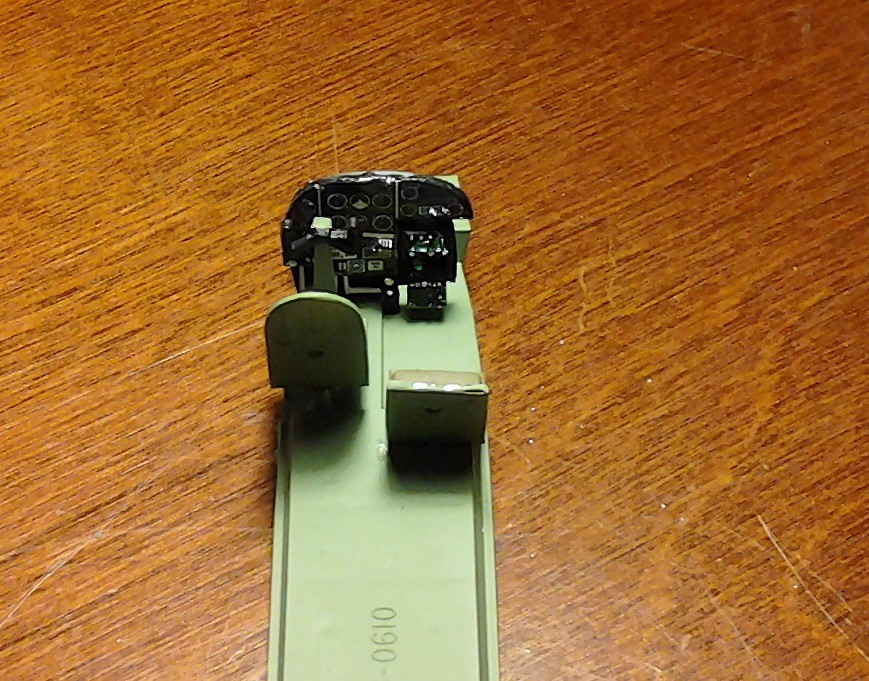
And the finished panel mounted to the cockpit floor. Sorry about the lack of intermediate photos, but I finished the cockpit before I checked the photo's I did take, and of course, they where all out of focus
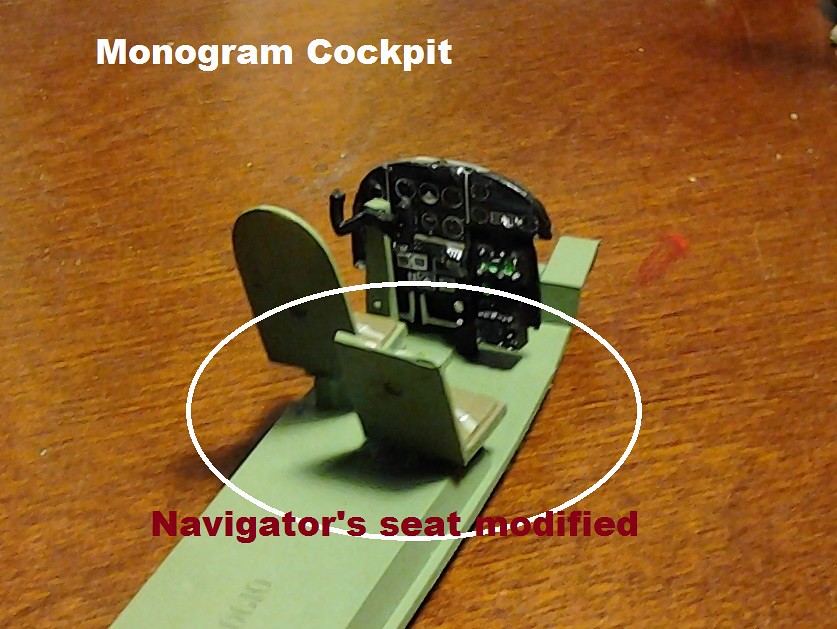
The main problem with the old Monogram Mosquito was it's cockpit, which is why the Tamyia kit was so popular even tho it was 3x the price. Lack of detail was only a part of it. Accuracy was poor also, the best example of this is the fact the pilot seat and the navigators seat are the same, whereas actually the pilot had an armoured seat and the navigator sat on a pad on the main wing spar. Easiest fix for this is just to cut down the navigators seat. Thing is, on either kit, when the fuselage is closed up, who can tell what's in there?
Anyway, That's where I am right now, more to come!
Later
The last time I posted pictures here was back on page one, I think, so I guess I'll just start again.
For this campaign I wanted to do the aircraft of one of the people I looked up to. In this instance Flt Lt C.J. Rawnsley. Jimmie (as he called himself) was the air gunner/ radar operator to Wing Commander John Cunningham, who was credited with the most air to air night kills by the RAF during WWII.
When Wg Cdr Cunningham was commanding officer of 85 Group his personal Mosquito was an NF Mk XII coded VX-R #DZ 302/G.
My starting point is the new release by Revell on the old Monorgam kit. ( I found the old copyright print inside a top wing, dated 1966). Molds this old due have some wear on them
but I only found flash on 2 or 3 parts, admittedly that flash was pretty thick tho! The last time I built this kit was in 1998, when I bought it, I also purchased the Paragon conversion set to change the Airfix FB Mk IV into an NF Mk XII and the True Details wheel set.
The Paragon kit with the kit instrument panel.
Since the instrument panel is different between the Airfix kit and the Monogram kit I had to place a plastic card piece to the panel in order to get the resin radar scope mounted.
new panel ready to paint and decal.
And the finished panel mounted to the cockpit floor. Sorry about the lack of intermediate photos, but I finished the cockpit before I checked the photo's I did take, and of course, they where all out of focus
The main problem with the old Monogram Mosquito was it's cockpit, which is why the Tamyia kit was so popular even tho it was 3x the price. Lack of detail was only a part of it. Accuracy was poor also, the best example of this is the fact the pilot seat and the navigators seat are the same, whereas actually the pilot had an armoured seat and the navigator sat on a pad on the main wing spar. Easiest fix for this is just to cut down the navigators seat. Thing is, on either kit, when the fuselage is closed up, who can tell what's in there?
Anyway, That's where I am right now, more to come!
Later
SGTJKJ
#041

Joined: July 20, 2006
KitMaker: 10,069 posts
AeroScale: 3,788 posts

Posted: Tuesday, March 05, 2013 - 08:15 AM UTC
Nice swalbe, Guido.
Good progress, Bruce. It will be a cool looking mossie.
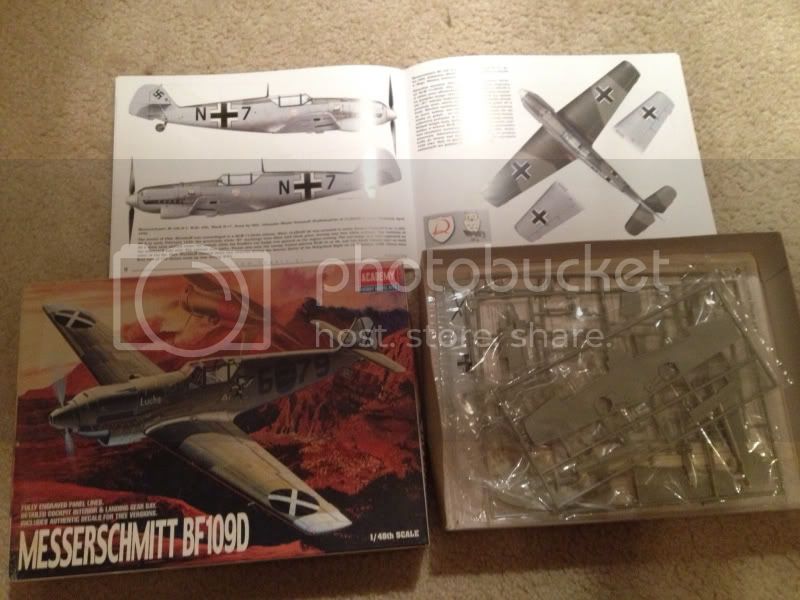
I have decided to build a Bf 109D for this campaign. The crude beginnings of the night fighter force and one of the night fighter aces.
It will be some time before I can actually start my build, but at least I have made up my mind on what to build.

Good progress, Bruce. It will be a cool looking mossie.
I have decided to build a Bf 109D for this campaign. The crude beginnings of the night fighter force and one of the night fighter aces.
It will be some time before I can actually start my build, but at least I have made up my mind on what to build.

J8kob_F

Joined: October 24, 2012
KitMaker: 202 posts
AeroScale: 92 posts
Posted: Tuesday, March 05, 2013 - 12:51 PM UTC
Hi again!
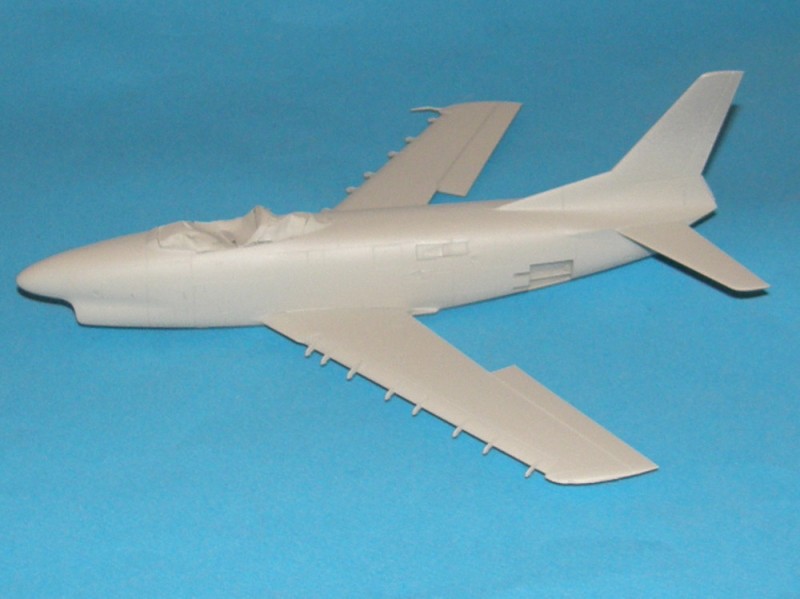
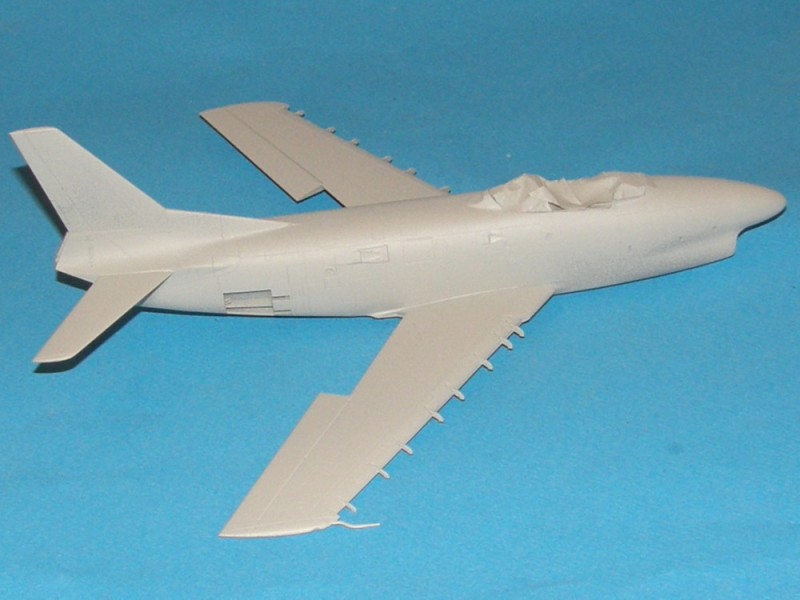
First of nice builds everyone! I have finally been able to do some more work on my J30. At the moment i have installed the cockpit closed it up and added the wings. This is my first Tamiya and I must say Wow the thing practically falls together by itself. The putty that you can see is due to the cockpit not quite fitting into the airframe. Some pics:
The office, weathered it after I took this picture.

And the outside:

I decided to have the door open so you can see some of the effort put into the cockpit:D.


Hope you like it, comments and suggestions are welcome.
Jakob
First of nice builds everyone! I have finally been able to do some more work on my J30. At the moment i have installed the cockpit closed it up and added the wings. This is my first Tamiya and I must say Wow the thing practically falls together by itself. The putty that you can see is due to the cockpit not quite fitting into the airframe. Some pics:
The office, weathered it after I took this picture.
And the outside:
I decided to have the door open so you can see some of the effort put into the cockpit:D.
Hope you like it, comments and suggestions are welcome.
Jakob
bdanie6
Joined: November 09, 2008
KitMaker: 615 posts
AeroScale: 459 posts
Posted: Wednesday, March 06, 2013 - 11:03 PM UTC
now ready to do the major surgery on the nose of this beastie. Because the resin nose was designed for a different kit I am going to have make the cut a little forward of where I think it should be. That way I can cut the plastic back until I get an acceptable fit. Here you can see I marked the initial cut line on the fuselage half in the lower right hand side of the picture. I see a lot super glue and putty in my future

Later
Later
bdanie6
Joined: November 09, 2008
KitMaker: 615 posts
AeroScale: 459 posts
Posted: Friday, March 08, 2013 - 09:46 AM UTC
I have to tell ya' I hate it when I have a post all written and ready to go and for some reason (probably operator error) the whole dang thing just disappears
So let's try this again.
I finally got the fuselage together, after having to pry the tail apart and put in the tail-wheel that I forgot the first time
I then sanded down the front of the fuselage as best I could to give the resin nose a bit of firm base to sit on. However, I'm afraid I couldn't get it quite perfect.
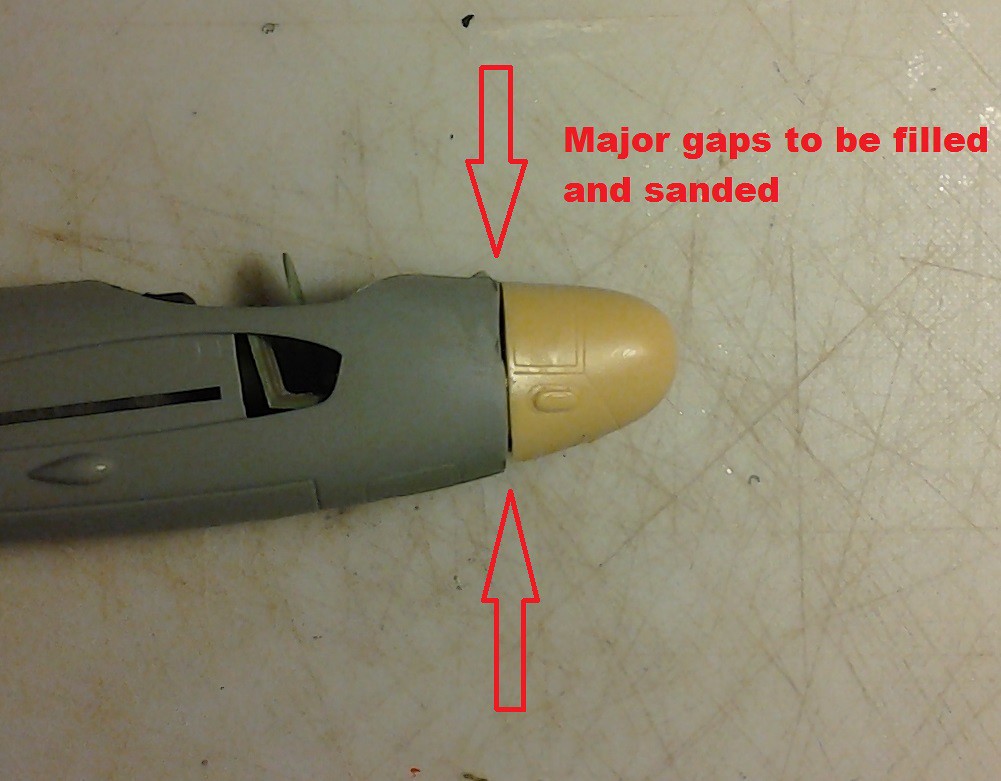
The worst place tho, was under the nose where the difference between the Airfix kit and the Revell really show up.

Now, where is that tube of putty?
Later
So let's try this again.
I finally got the fuselage together, after having to pry the tail apart and put in the tail-wheel that I forgot the first time
I then sanded down the front of the fuselage as best I could to give the resin nose a bit of firm base to sit on. However, I'm afraid I couldn't get it quite perfect.
The worst place tho, was under the nose where the difference between the Airfix kit and the Revell really show up.
Now, where is that tube of putty?
Later
bdanie6
Joined: November 09, 2008
KitMaker: 615 posts
AeroScale: 459 posts
Posted: Saturday, March 09, 2013 - 12:22 AM UTC
uh...Holy screw-ups Batman!! Where are the guns?  Oh crap...time to rethink this one
Check out the difference between J8kob_F's picture of the underside of his J30. See the 4 cannon? Now look at the picture of the underside of my Mk XII. See the cannon? Nope, ya don't! Nuts
Later
Oh crap...time to rethink this one Check out the difference between J8kob_F's picture of the underside of his J30. See the 4 cannon? Now look at the picture of the underside of my Mk XII. See the cannon? Nope, ya don't! Nuts
Later
Jessie_C
Joined: September 03, 2009
KitMaker: 6,965 posts
AeroScale: 6,247 posts
Posted: Saturday, March 09, 2013 - 04:31 AM UTC
That's easy enough to solve. Get some plastic tube and drill 4 holes for it to slip into. Glue the tubes firmly in place, then trim them back flush with the underside profile. Voilà! your night-fighter gets its teeth 
In the process, you're going to wipe out the bomber hatch, but that's okay because you'll need to scribe a fighter hatch on the side of the nose anyway. Here's what it looked like.
You'll then need to turn your attention to the canopy, because the fighters had a flat-front windscreen instead of the bomber's V-shape. Luckily, the aftermarket has us well supplied.
 |

WEB HOSTING BY


Copyright ©2021 AeroScale and Kitmaker Network, a subsidiary of Silver Star Enterprises
All Rights Reserved. Please read our Conditions of Use and Privacy Policy.
All Rights Reserved. Please read our Conditions of Use and Privacy Policy.