OFFICIAL: Hangar Queen III Campaign
Ontario, Canada
Joined: March 23, 2008
KitMaker: 2,847 posts
AeroScale: 144 posts
Posted: Wednesday, May 15, 2013 - 07:15 AM UTC
Greetings gang!

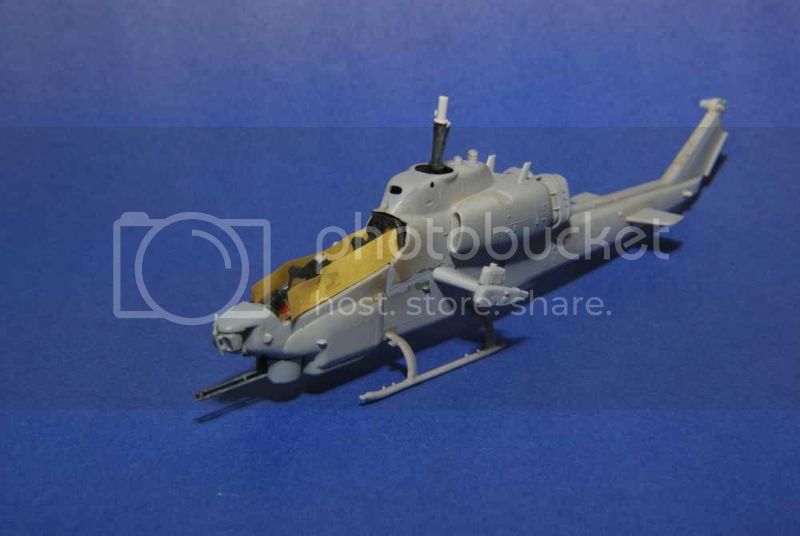
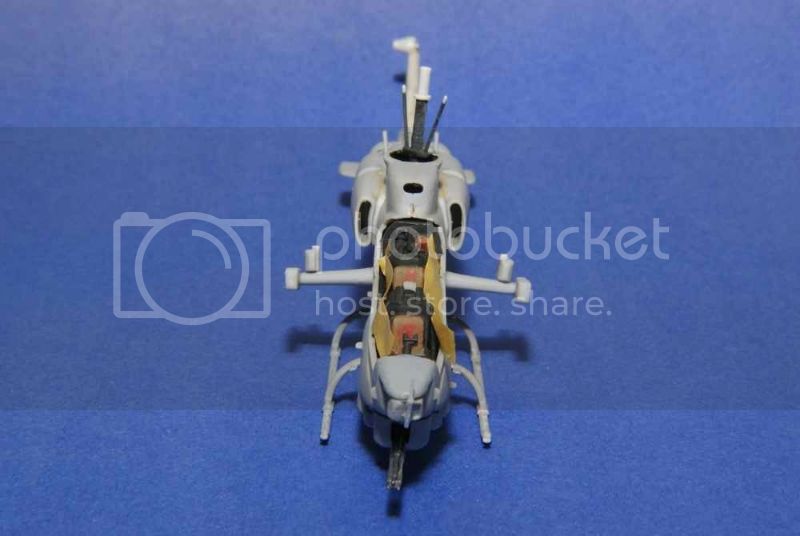
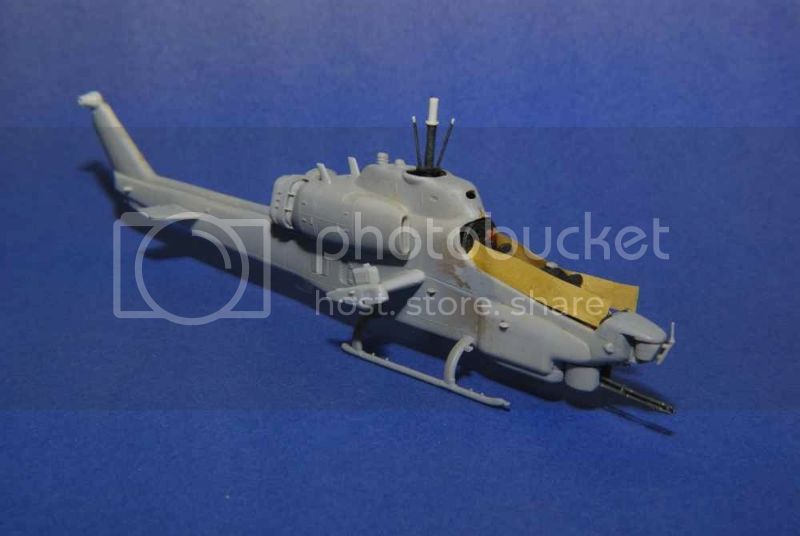
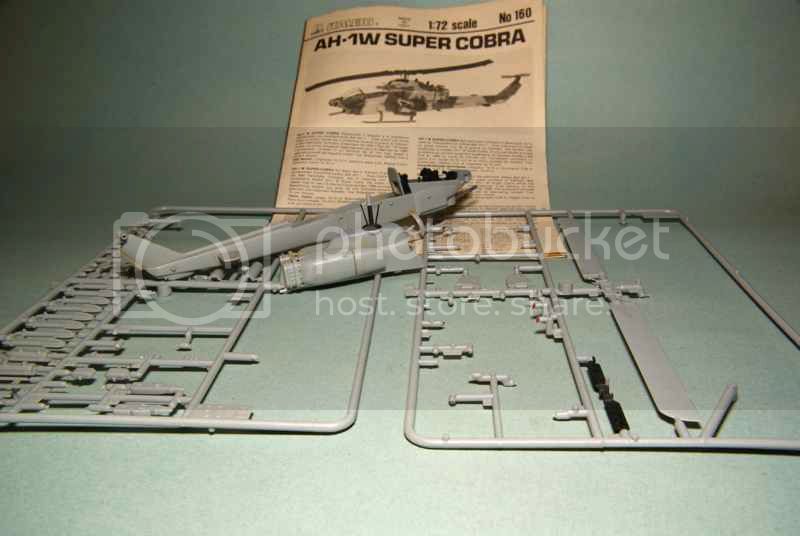
Well, here it is Hangar Queen III, the third time that I'm enlisting in an HQ campaign, the third time my Italeri 1/72 AH-1W is entered and hoping the old adage of "Third Times a Charm" ends up true. :-)
Here's where it all began when I pulled it out of it's box for HQ I.
At the end of HQ II it was to this point.
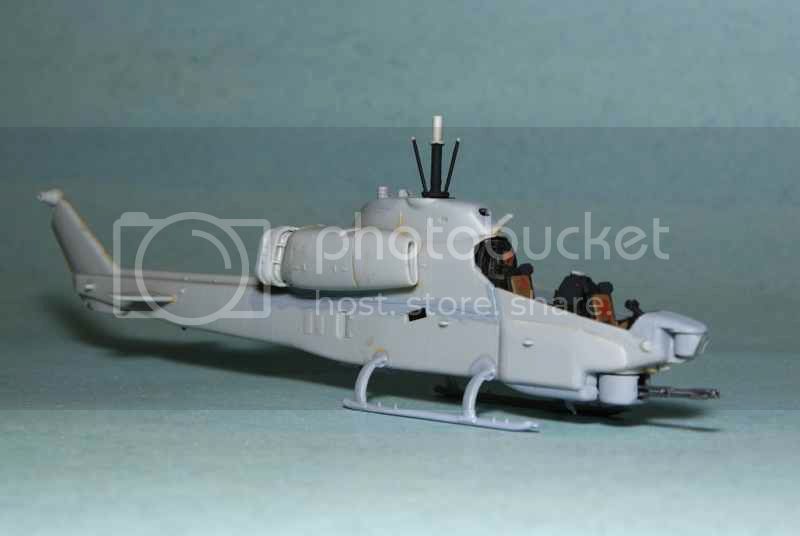
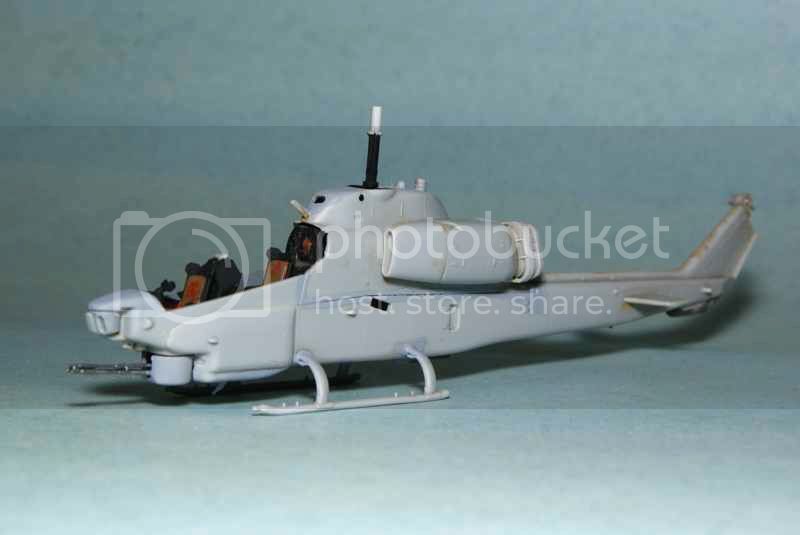
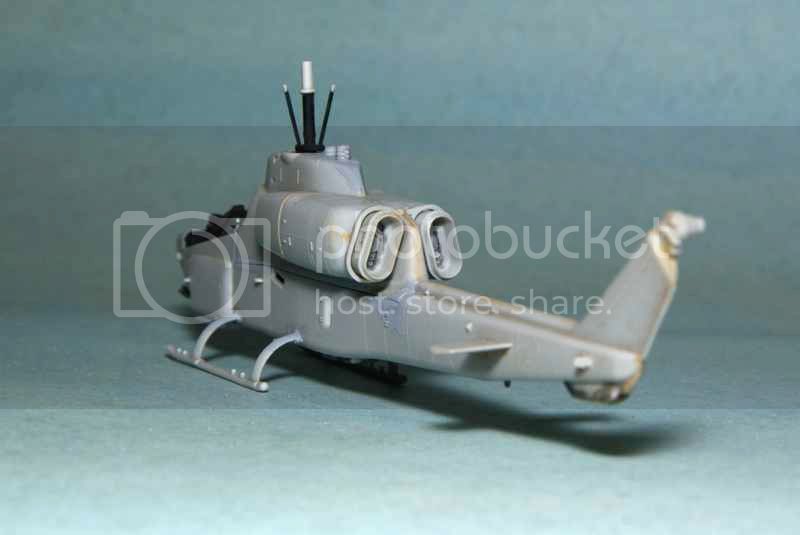
These last three pictures are where it still was after I again allowed it to see the light of day for this campaign. To me this thing has been a royal pain, a PIG of a kit and I often wonder why it didn't "accidently" have a high speed meeting with a concrete wall!

Let the annoyance and aggravation begin!

Cheers,
Jan


Texas, United States
Joined: February 22, 2008
KitMaker: 5,026 posts
AeroScale: 2,811 posts
Posted: Thursday, May 16, 2013 - 03:11 AM UTC
Hello and Welcome Jan,
Sorry about your experience with the PIG

, but maybe you can finish it this time and get it off the bench and out of your reach. And still maybe a good hard discus throw is still in its future

Glad to see ya.
Bob
If it aint broke dont fix it.
Ontario, Canada
Joined: March 23, 2008
KitMaker: 2,847 posts
AeroScale: 144 posts
Posted: Thursday, May 16, 2013 - 04:20 AM UTC
Hey Bob,
Nice to interact with you again, it's been a while.

Well, I haven't been totally sitting on this project since joining. There were a few nasty seams around the engine area (as well as other places) that were refusing to respond to my ministrations of the past. I used some DecoArt Acrylic Texture Medium called "Stucco" to attempt a fix. These "mediums" come with different names that imply the "coarseness" of the finished or dried finish. They are water soluble and therefor can be thinned down to a soupy or watery consistency. In this form I hoped that it would flow into the gaps and unlike model putties, not require much sanding (most panel lines are raised on this kit). It required a few applications but it worked.

Also, with painting in mind, I decided to try to add most of the antenna that adorn this bird. Here's where another annoyance raised it's ugly head. While the instructions show these parts having pins on the bottom that fit into locating holes, there aren't any pins on the parts and only a couple of locating holes. Had to look at scores of pictures of this bird to get a better idea of their locations as the instructions are almost as bad as Dragon's. :-P
Here's pictures of all but two of the "antenna" in place (also started to mask off the cockpit in preparation for some base coating).
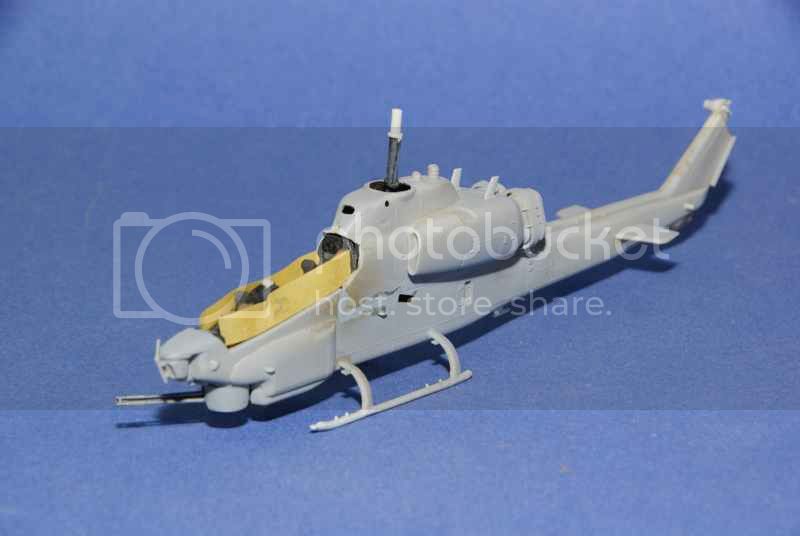
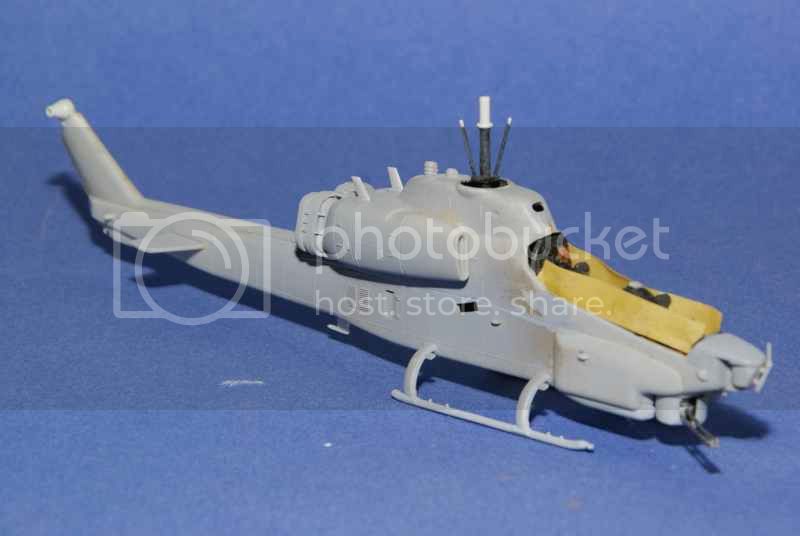
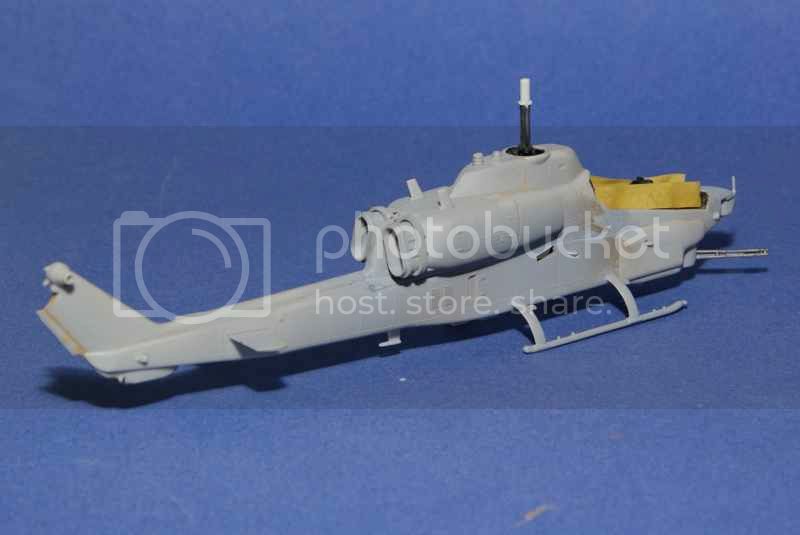
Still a few more parts to add before paint hits plastic along with maybe the stub wings and tail skid. Oh, I also need to find the clear parts sprue with the canopy parts and HUDs, one missing rocket pod, decals...alas, no treads on this sucker.

Cheers,
Jan


Texas, United States
Joined: February 22, 2008
KitMaker: 5,026 posts
AeroScale: 2,811 posts
Posted: Thursday, May 16, 2013 - 06:26 PM UTC
Jan,
I am familar with Stucco, but only for paint never thought of its use as a filler I will give it a test. Glad to see your progress and since you have 7 and a half months to finish I think that it is good bet that you will finish.
Bob
If it aint broke dont fix it.
Ontario, Canada
Joined: March 23, 2008
KitMaker: 2,847 posts
AeroScale: 144 posts
Posted: Monday, May 20, 2013 - 05:53 AM UTC
Quoted Text
I am familar with Stucco, but only for paint never thought of its use as a filler I will give it a test. Glad to see your progress and since you have 7 and a half months to finish I think that it is good bet that you will finish.
Bob,
Stucco for paint? Are we talking about the same material? All the DecoArt texture materials have pretty much a thicker toothpaste like material out of the bottle. The coarser ones can even be used as a ground cover but you need to use a palette knife to spread it.
On with the show! A few more little fiddley bits added and especially the stub wings and flare pods. The wings needed some fair sanding to remove the rather prominent mould seam lines so they'd fit flush to the fuselage. The hole in the wing top for the flare pods was a bit too large so needed a bit more care. Here's where it stands at the moment.
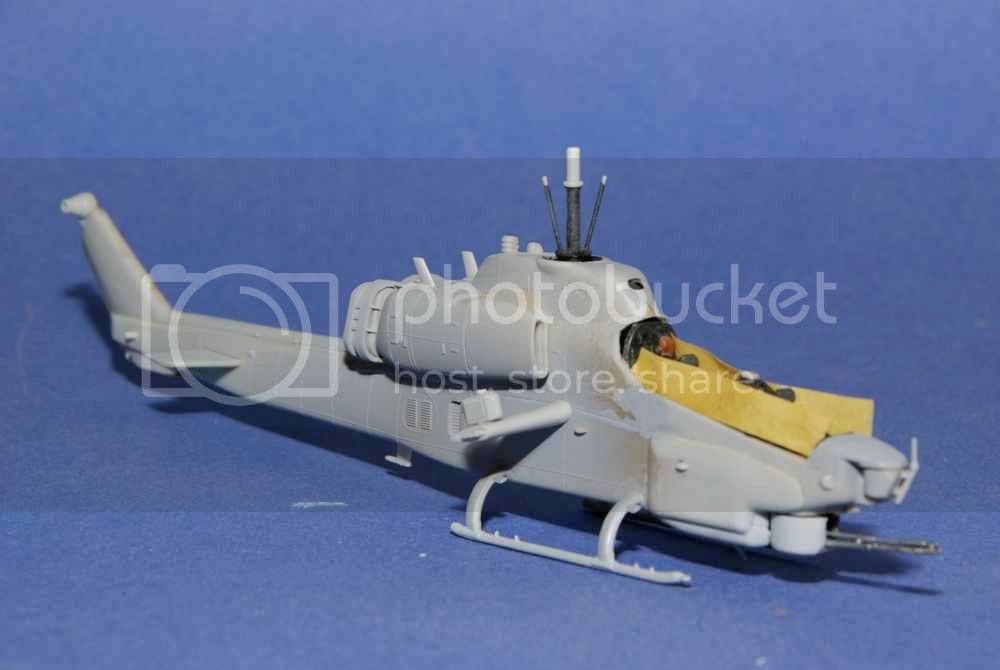
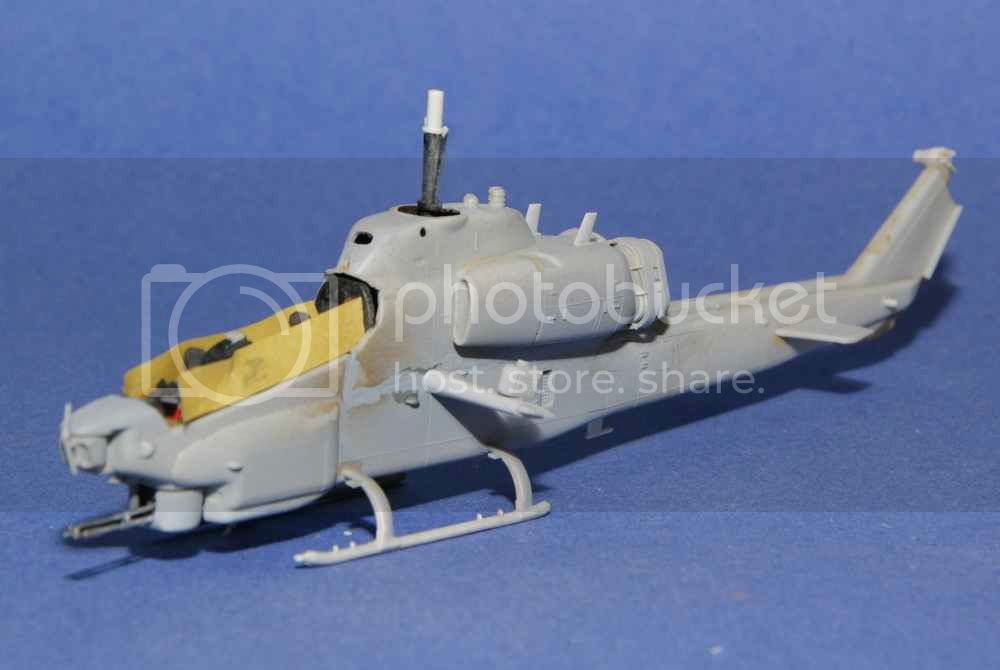
In a win some, lose some case, I found the canopy and HUD clear parts!

However, the decals and one assembled rocket pod are still MIA.

I can't even count the number of boxes and other containers that I've looked in during the search. I remember after the last time tackling this monster that I put them away for safe keeping in a "place" that I'd be sure to find them.

I'll just have to keep my eyes open for them. A few more parts and then I can at least basecoat this thing (fingers crossed).
Cheers,
Jan


California, United States
Joined: December 06, 2004
KitMaker: 3,694 posts
AeroScale: 163 posts
Posted: Monday, May 20, 2013 - 09:22 AM UTC
Quoted Text
I remember after the last time tackling this monster that I put them away for safe keeping in a "place" that I'd be sure to find them. 
I did the same thing with my Flex-i-File when I packed to move. It's been over a year that I've seen it. I finally ordered a new one, which means the old one will probably turn up.
Texas, United States
Joined: February 22, 2008
KitMaker: 5,026 posts
AeroScale: 2,811 posts
Posted: Tuesday, May 21, 2013 - 03:56 AM UTC
@ Jan: If we were talking about the same item it is Stucco medium that comes in a tube which I use to prep the canvas. Or are you talking about another Stucco

any way I hope that you find those MIA parts. Everytime I put some away for safe keeping until I need them again they show up in some box other than where I thought they were.
@ Gary: I tried the flex file, but could not get the technique down and just tossed it.
Bob
If it aint broke dont fix it.
Ontario, Canada
Joined: March 23, 2008
KitMaker: 2,847 posts
AeroScale: 144 posts
Posted: Tuesday, May 21, 2013 - 04:33 AM UTC
@GaryKato - Gary,
I feel that this is a similar curse to where you are 90% through building a scratch built model and then some manufacturer releases it in styrene!

Or the time I was in a hurry and put away $200 for safe keeping only to forget where it was. In that case I had the pleasant surprise of finding it, a little over a year later!
@Bigrip74 - Bob,
Obviously we were talking about a similarly named product but not the same. The DecoArt mediums come in larger jars. Picture is worth...

You can read more about the product and they even have a video of one use at the
DecoArt Site As I mentioned above, these mediums come with various sized aggregate suspended in them and I believe that there are six or eight variations. So far it appears that the "Stucco" has the finest aggregate that I've tried. It seems to adhere really well to most materials, is thin-able, can be coloured with acrylic paint, doesn't shrink, is sand-able and best of all, cleans up with plain water. Now back to searching for that darn rocket pod.
Cheers,
Jan


British Columbia, Canada
Joined: September 03, 2009
KitMaker: 6,965 posts
AeroScale: 6,247 posts
Posted: Tuesday, May 21, 2013 - 05:30 AM UTC
Quoted Text
Now back to searching for that darn rocket pod.
If it's still AWOL, remember that I have some spare pods plus photo-etch that I won't be using. They're yours if you want them

When once you have tasted flight you will walk the Earth with your eyes turned skyward.
For there you have been, and there you will always long to return.
-Leonardo Da Vinci
Ontario, Canada
Joined: March 23, 2008
KitMaker: 2,847 posts
AeroScale: 144 posts
Posted: Tuesday, May 21, 2013 - 03:30 PM UTC
YIPPEE!!!!! I just found the rocket pod this evening, partly by accident. I was looking for a Russian 12.7 mm MG and pulled out a box of the Trumpeter M26A1 (don't ask).

I opened the box and in a small bag with some Stalin III fuel drums was the pod! Now will the decal search end up successfully?
@Jessie_C - Jessica,
For the second time, may I offer you my sincere thanks for your kind offer. As I mentioned in a previous HQ campaign, I doubt I could do justice to any PE for this build. However, if I hadn't just found the errant pod, I might have taken you up on the pod offer.

Prior to these developments I was thinking of seeing if I could utilize any Soviet/Russian rocket pods from the two sets of Hasegawa air to ground weapon sets that I have.

Now I can breathe easier for a few hours until the next Gremlin raises its ugly snout!

Thanks and Cheers,
Jan


Bayern, Germany
Joined: January 02, 2011
KitMaker: 279 posts
AeroScale: 239 posts
Posted: Friday, May 24, 2013 - 07:52 AM UTC
Hi all

,
I am in with my Revell 1-72 Breguet Atlantic, a non-finished veteran of Hangar Queen 1 campaign. Hope to finish it this time...
Regards,
Sebastian
LtCol Henry Blake: "Radar, whatever it is: sign it, cancel it or order five more!"
Texas, United States
Joined: February 22, 2008
KitMaker: 5,026 posts
AeroScale: 2,811 posts
Posted: Friday, May 24, 2013 - 05:58 PM UTC
Welcome aboard Sebastian, maybe this time will be successful.
@ Jessica: your generostiy is as always a part of what makes this community and you special.
Bob
If it aint broke dont fix it.
Ontario, Canada
Joined: March 23, 2008
KitMaker: 2,847 posts
AeroScale: 144 posts
Posted: Monday, May 27, 2013 - 04:24 AM UTC
England - West Midlands, United Kingdom
Joined: August 01, 2012
KitMaker: 960 posts
AeroScale: 391 posts
Posted: Monday, May 27, 2013 - 05:53 AM UTC
"A helicopter does not fly through the air like an airplane, it beats the air into submission."
Here is an update on my HQ III - 2012 "Sands of Israel Campaign". I managed to glue a few of the parts together in order to paint. The 'stick on decals' are the reason it will be an Israeli bird.
I need to do some more filling, sanding and wire handrail bits. I don't plan to rework the tail rotor with this kit.


Maryland, United States
Joined: February 25, 2013
KitMaker: 209 posts
AeroScale: 138 posts
Posted: Wednesday, May 29, 2013 - 01:08 AM UTC
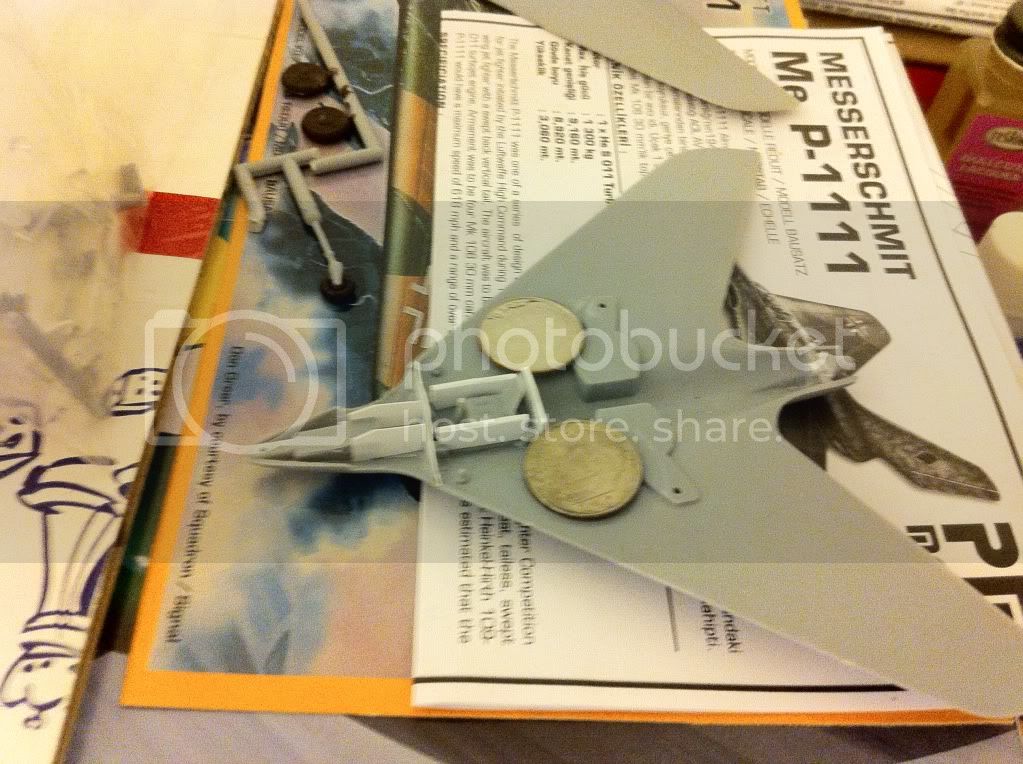
So I think I solved the tailsitting problem with my PM Model Messerschmitt P-1111. I weighed the plastic on a scale and it came out to approximately 15g, so I added about 7g next to the cockpit. How did I do that on such a thin cross section? Dimes, of course... Test fitted like a charm so I glued the coins in place. A quick check balancing the airframe on my finger about main landing gear and it fell forward toward the nose just slightly. Problem solved, thank you FDR! Additional plus is that the model is worth $.20 more than when I started.
England - West Midlands, United Kingdom
Joined: August 01, 2012
KitMaker: 960 posts
AeroScale: 391 posts
Posted: Wednesday, May 29, 2013 - 01:54 AM UTC
Dimes, I had the same problem with my B2. I had to add weight post assembly via the cockpit to the 1/200 scale model.

Texas, United States
Joined: February 22, 2008
KitMaker: 5,026 posts
AeroScale: 2,811 posts
Posted: Wednesday, May 29, 2013 - 03:11 AM UTC
@ Jan: Your Cobra is looking good.
@ Brent: Your progress is duely noted and I like the stand shown in the photos.
@ Van: Now that little plane is worth real $. Great progress now you figured out the CG problem.
Bob
If it aint broke dont fix it.
Ontario, Canada
Joined: March 23, 2008
KitMaker: 2,847 posts
AeroScale: 144 posts
Posted: Wednesday, May 29, 2013 - 07:31 AM UTC
@North400. - Brent,
Nice to see another helicopter being finished.

Some of these "fast build or snap kits aren't too bad. However, I have yet to see one that doesn't need a touch of glue here and there.
 @vdejarnette -
 Van,
Now that's what I call adding value to a kit!
 @Bigrip74 -
 Bob,
Thanks for the kind comment and I haven't "yet" gotten to the point where I want to see how it makes out in an uncontrolled dive. However, its come close a few times!

I've put the second rocket pod together and compared to the first it was a charm. Painted the Hellfire missiles but felt the limited progress wasn't worth a picture.

Cheers,
Jan


Maryland, United States
Joined: February 25, 2013
KitMaker: 209 posts
AeroScale: 138 posts
Posted: Wednesday, May 29, 2013 - 07:48 AM UTC
I figure I already sink enough money into the hobby, time to start doing it literally.
England - West Midlands, United Kingdom
Joined: August 01, 2012
KitMaker: 960 posts
AeroScale: 391 posts
Posted: Wednesday, June 05, 2013 - 01:25 AM UTC
A lot of good progress being made on the HQ's.

Nordrhein-Westfalen, Germany
Joined: June 21, 2007
KitMaker: 45 posts
AeroScale: 23 posts
Posted: Thursday, June 06, 2013 - 03:16 AM UTC
Hi everybody,
I join with an Airbus A319, 1:144, by Revell. Pictures are following.
See you, HP
On da bench:
Bf 109 E-4, 1:72, Airfix
Spitfire Mk.Vb, 1:48, Airfix
Bf 109 G-6 early, 1:32, Revell
and some 20 or so more
Ontario, Canada
Joined: March 23, 2008
KitMaker: 2,847 posts
AeroScale: 144 posts
Posted: Thursday, June 06, 2013 - 06:25 AM UTC
Greetings all!

Seems to have been a bit slow here as of late but I see a couple of new people have joined so Welcome!.

I hope that everyone else doesn't wait too long to get started, like I did in the first two HQ's.

Anyway, I've been working on trying to get the rocket pod pylons on and it's been a challenge. Partly to blame is my lack of familiarity with flying things.

The problem with the pylons is that there are no clear illustrations in the instructions of exactly how they are supposed to fit nor any prominent locating features (ie-pegs into holes etc). all there is is these raised lined squares that look about the size of the feet of the pylon. Perhaps it would have been best to glue them before the stub wings were attached as I had the dickens of the time trying to position them with tweezers as the wings and especially the skids restrict access to the area.

After looking a literally hundreds of pictures of this kit on the 'Net I finally felt confident enough to try to fit them. Well, at least they are now on!
Here's a general shot of the starboard side.
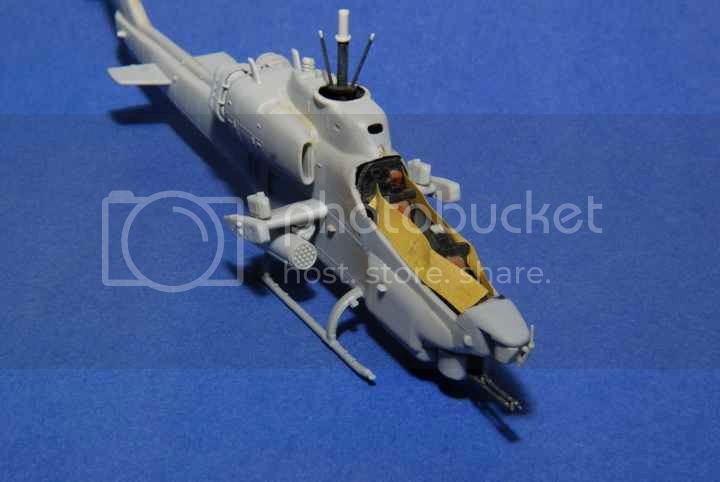
Viewed from the bottom
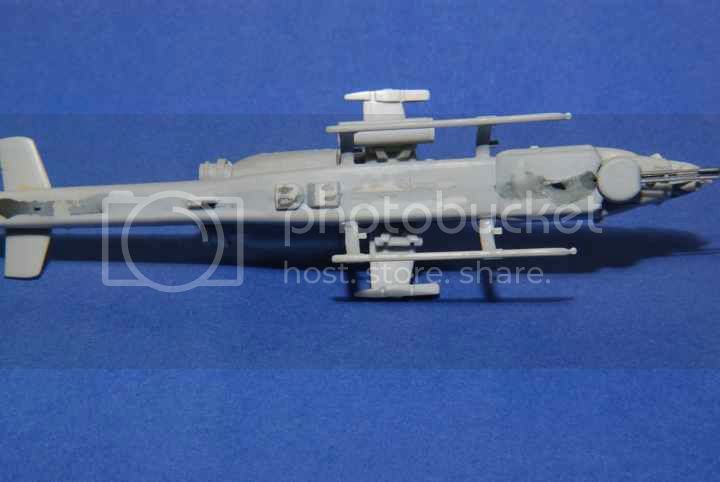
A couple of closer and lower angle images. The rocket pod is just press fit on the pylon for the pictures.
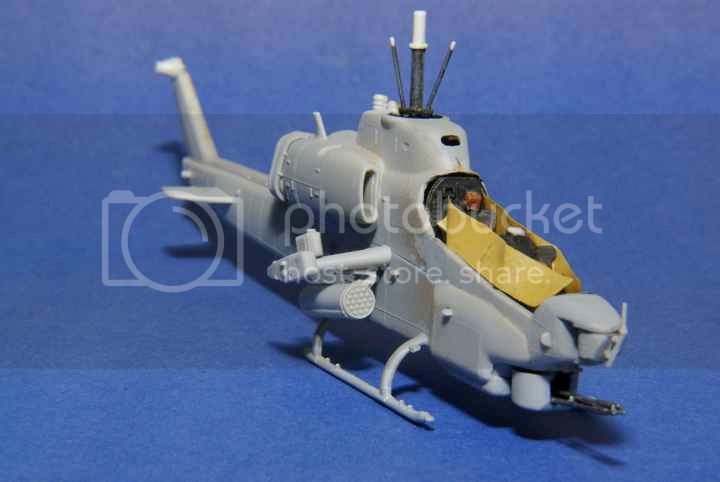
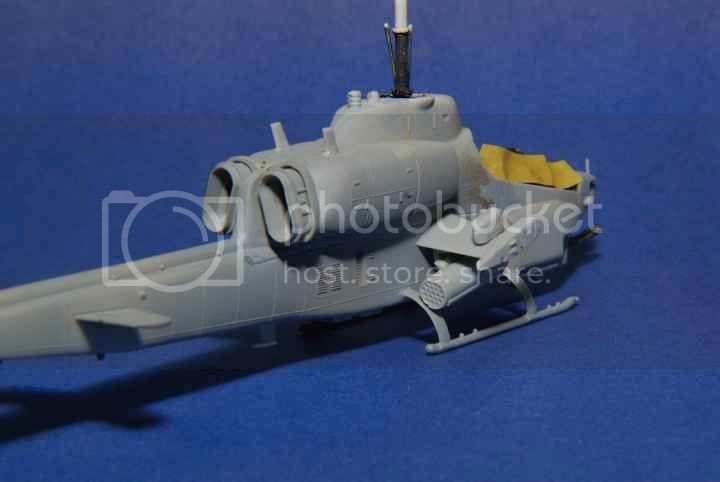
A couple of more antennas and I think it might be ready for a base coat. We'll just have to wait and see what new Gremlins are waiting to surface.
Cheers,
Jan


Texas, United States
Joined: February 22, 2008
KitMaker: 5,026 posts
AeroScale: 2,811 posts
Posted: Thursday, June 06, 2013 - 04:11 PM UTC
@ HP: welcome aboard and I will look forward to view those photos of your Airbus A319.
@ Jan: I notice those found weapons pods and looks like your progress is picking up since you outwitted that carpet monster. Cannot wait to see the finished project since it is of my favorite chopper.
Bob
If it aint broke dont fix it.
Ontario, Canada
Joined: March 23, 2008
KitMaker: 2,847 posts
AeroScale: 144 posts
Posted: Thursday, June 06, 2013 - 04:58 PM UTC
Quoted Text
@ Jan: I notice those found weapons pods and looks like your progress is picking up since you outwitted that carpet monster. Cannot wait to see the finished project since it is of my favorite chopper.
Bob
- Bob,
Thanks, but I still haven't found the decals for this beast. I know I had them but they are being evasive.

I've always liked the Cobra family and my first chopper kit was the old Monogram AH-1 twin kit, way back when. It's astounding that these machines are still so powerful yet so compact when compared to more modern machines.
I'm still debating the colour scheme but I'm leaning toward the three colour one. However, I still need to get the thing to the point where at least the base coat can be applied. Then I'll have to worry about the camo application.

Cheers,
Jan


Nordrhein-Westfalen, Germany
Joined: June 21, 2007
KitMaker: 45 posts
AeroScale: 23 posts
Posted: Saturday, June 08, 2013 - 02:07 AM UTC
Hi everybody,
today I'm only adding one photo of my A319. It'll be in flight-mode and I will make the British Airways version. The first thing to correct is the broken glass part for the pilots (you can't see it in the picture) and then going on.
With luck here's the photo:
http://gallery3.kitmaker.net/data/500/A319_2013-06-07.jpgBob, thanks a lot for your welcome, but you have to be patient, because I'm a very slow modeller.
That's it for today. See you again folks, HP.
On da bench:
Bf 109 E-4, 1:72, Airfix
Spitfire Mk.Vb, 1:48, Airfix
Bf 109 G-6 early, 1:32, Revell
and some 20 or so more


 Let the annoyance and aggravation begin!


