OFFICIAL: Anything Goes Campaign
Kuwait / لعربية
Joined: February 09, 2009
KitMaker: 467 posts
AeroScale: 60 posts
Posted: Friday, July 12, 2013 - 07:39 AM UTC
need to play catch up !! I need to check in more often some really great builds here -
quick round up -
starting glueing plastic months ago and then stopped !

oh this is a dry fit - says something about the fit of this excellent kit --

i started again a few days ago -
coloured in the instructions to show what needs to be interior green


started cutting pieces of the sprue up and putting them in piles - i need to paint interior green, grey black, semi-gloss black and silver.

got the airbrush out -


more soon
best Mark
http://krasnyaarme.blogspot.com/
"In the Soviet army it takes more courage to retreat than advance"
Joseph Stalin
Istanbul, Turkey / Türkçe
Joined: December 22, 2004
KitMaker: 1,241 posts
AeroScale: 616 posts
Posted: Friday, July 12, 2013 - 10:48 AM UTC
Aaaand it's done...wait, is everyone building Mustangs???
Anyways, here is a little bir of background to my alteration of history:
Late 1952, as the combats come to a clenching bowl of blood UN forces require more and more air support. Two squadrons of Turkish Air Force volunteer pilots finally recieve their new toys. Ex-Michigan ANG F-51Ds are delivered to two squadrons, Sarıbaş(Yellow Heads, which out bird belongs) and Karabaş(Black Heads). Being trained in and flying P-47s back home the pilots shortly familiarize with the well handling Mustangs and resume close ground support missions around Choshin. No need to say they soon start to stack up both havoc against Communist forces and heavy losses as in the traditional Turkish idiom.
While thinking about a paint scheme immense possibilities came to mind but I decided to settle with this one since the lack of imeginative painting and sence of fun in the TuAF and the general tastelessness in allied air forces of the period..enough blabber!


NVNC ID VIDES NVNC NE VIDES

">
Tennessee, United States
Joined: September 20, 2005
KitMaker: 1,747 posts
AeroScale: 1,673 posts
Posted: Friday, July 12, 2013 - 01:50 PM UTC
Way to go Jollyroger!! Good work on that Mustang. Russell

To Thine Own Self Be True
Siderius
A.K.A., RTA
Kuwait / لعربية
Joined: February 09, 2009
KitMaker: 467 posts
AeroScale: 60 posts
Posted: Saturday, July 13, 2013 - 11:26 PM UTC
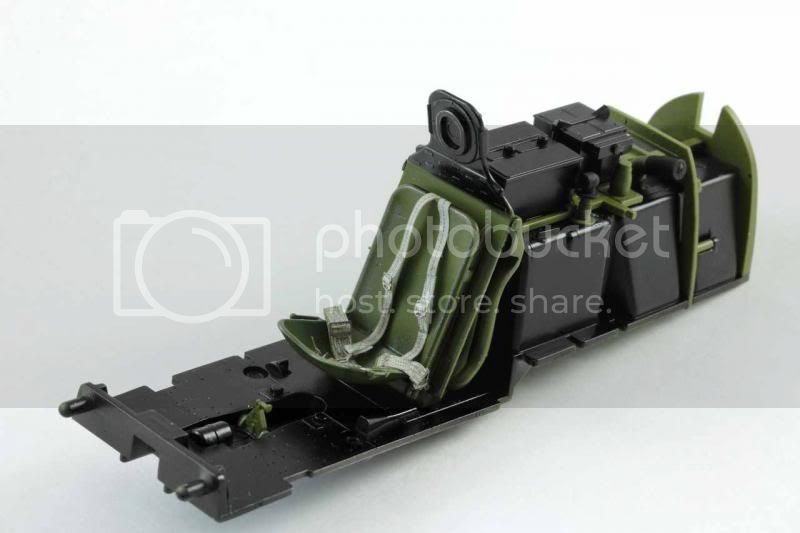
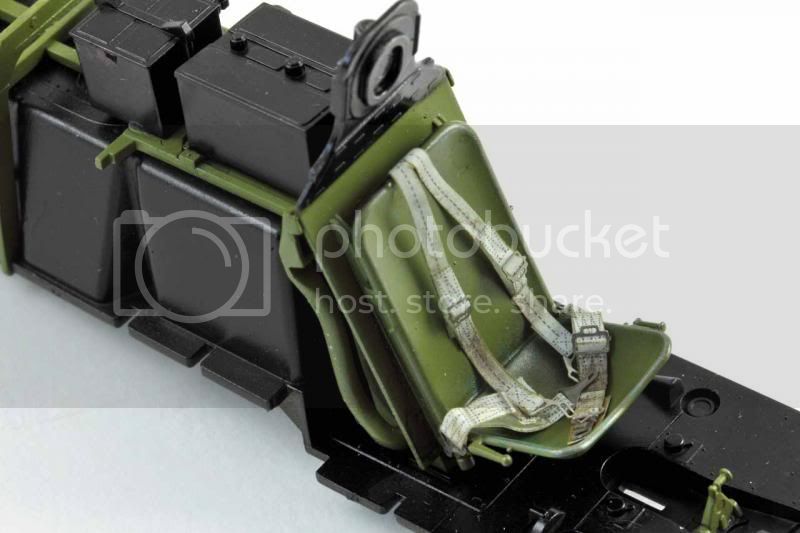
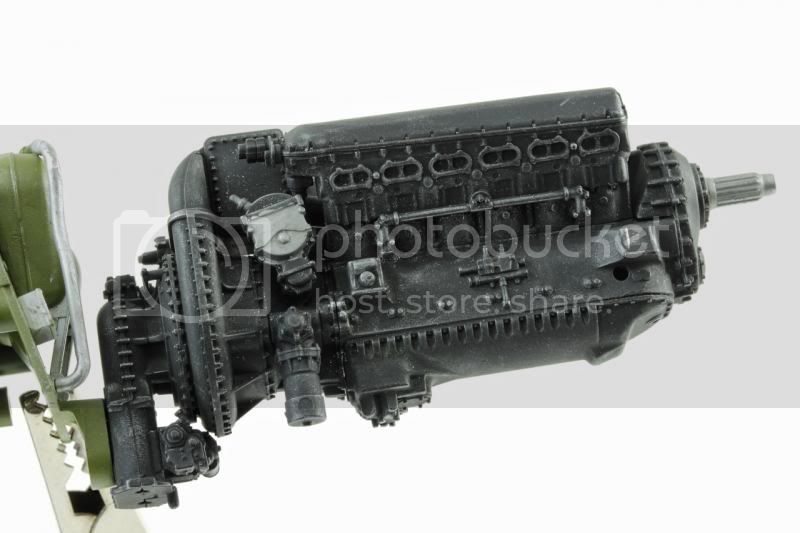
cockpit detailed up

used the fabric harness set

merlin packard lump

controls/ instruments

nose art choices


http://krasnyaarme.blogspot.com/
"In the Soviet army it takes more courage to retreat than advance"
Joseph Stalin
Pennsylvania, United States
Joined: June 17, 2009
KitMaker: 566 posts
AeroScale: 507 posts
Posted: Sunday, July 14, 2013 - 04:47 AM UTC
Ive had my dora in the paint shop off and on all week and here is the initial "draft" I sprayed the bottom and sides with MM RLM 76. On the top side I used aeromaster RLM 82 light green and MM RLM 83 dark green. I initially wanted to used floquil pulman green for RLM 83 but was having problems getting it to work in my airbrush so I went with MM. It looks much better on the model than in the bottle, hopefully the successive clear coats will darken them both to my liking.
Under the Tamiya tape are the JG26 Black and white ID bands. Initially I had the black portion to narrow but everything masked perfectly. During correction I got the proportions closer to correct but with some touch ups now needed.
I got carried away with mottling but some touch ups will fix that, hopefully in another day or so. Next will be some attempts at some post shading. My goal is to have that, the yellow tail and cowling, gloss coat and be ready for decals by next weekend...we'll see about all that

"...Fat, drunk, and stupid is no way to go through life son"
Istanbul, Turkey / Türkçe
Joined: December 22, 2004
KitMaker: 1,241 posts
AeroScale: 616 posts
Posted: Sunday, July 14, 2013 - 04:52 AM UTC
Wooohooo! At last a Dora!!!!
NVNC ID VIDES NVNC NE VIDES

">
Ontario, Canada
Joined: March 29, 2010
KitMaker: 1,151 posts
AeroScale: 985 posts
Posted: Sunday, July 14, 2013 - 05:25 AM UTC
Looking good rocky. I recently finished a BMW 190 with similar factory camouflage. I too felt my mottling was a bit strong. My solution involved successive coats of ultra_thinned rlm76 over the mottling area. The result was pleasing. I ran some of the mixture over the whole bird to tone down the greens as well.
Pennsylvania, United States
Joined: June 17, 2009
KitMaker: 566 posts
AeroScale: 507 posts
Posted: Sunday, July 14, 2013 - 08:42 AM UTC
Quoted Text
Looking good rocky. I recently finished a BMW 190 with similar factory camouflage. I too felt my mottling was a bit strong. My solution involved successive coats of ultra_thinned rlm76 over the mottling area. The result was pleasing. I ran some of the mixture over the whole bird to tone down the greens as well.
That's along the lines of what ive been thinking, im just not sharp enough yet to get the wispy look right, definitely need more practice. Thankfully my closet is full of options, many of them Luftwaffe.
"...Fat, drunk, and stupid is no way to go through life son"
Pennsylvania, United States
Joined: June 17, 2009
KitMaker: 566 posts
AeroScale: 507 posts
Posted: Sunday, July 14, 2013 - 10:51 AM UTC
Quoted Text
Wooohooo! At last a Dora!!!!
My first Dora ever actually. Probably weird to most people that I have a big expensive stack of books on Doras and have never built one before.
"...Fat, drunk, and stupid is no way to go through life son"
Istanbul, Turkey / Türkçe
Joined: December 22, 2004
KitMaker: 1,241 posts
AeroScale: 616 posts
Posted: Monday, July 15, 2013 - 02:09 AM UTC
Quoted Text
Quoted Text
Wooohooo! At last a Dora!!!!
My first Dora ever actually. Probably weird to most people that I have a big expensive stack of books on Doras and have never built one before.
I only did one in 1/144 yet. I do A's and F's generally but it is surely a splendid bird. I have one Tamiya in 1/72 in my stash waiting for its time of torture:}
NVNC ID VIDES NVNC NE VIDES

">
Kuala Lumpur, Malaysia
Joined: September 05, 2010
KitMaker: 160 posts
AeroScale: 15 posts
Posted: Monday, July 15, 2013 - 03:41 AM UTC
Hi guys
Some very impressive progress with the builds

. Below are some photos of my build so far
Decal placement, matt varnished with weapons added


Hopefully in the next few days I'll be applying some highlights, chippings and possible light weathering. More photos to follow

I've got my MOJO working......or maybe not

#259
Massachusetts, United States
Joined: October 23, 2011
KitMaker: 2,265 posts
AeroScale: 1,715 posts
Posted: Monday, July 15, 2013 - 05:05 AM UTC
That's a nice looking model. I want to see it better, you need to get some bright light to help with your photographs please.
Lisboa, Portugal
Joined: March 04, 2008
KitMaker: 5,386 posts
AeroScale: 635 posts
Posted: Monday, July 15, 2013 - 06:43 AM UTC
Damn.. awsome work guys..
Didn't come to this thread for a few days and what a nice surprise...
Great Mustangs !!!!
Cool Chopper Mojo72 !!

Active Builds: 0
Active Campaigns: 0

#372
United Kingdom
Joined: March 10, 2010
KitMaker: 2,568 posts
AeroScale: 1,619 posts
Posted: Monday, July 15, 2013 - 07:05 AM UTC
Yalym: Great looking Mustang and I like your back story. Korea has some great what-if scenario's that can be thought up.
Mark: Looking great so far and I like your choice of decals. I take it your building the Tamiya 1:32?
Muhammad: The Huey is coming along nicely. Looking forward to seeing the finished model.
As for my efforts, the decaling is now complete on the Camel. I used the kits decals as I have nothing in my spares that would work. They were the usual Academy c**p. Thin, stubborn, translucent and easy to tear. Its also at this point that I'm uploading photo's that I realised that the rudder flash is the wrong way around. It should be blue, white and then red at the trailing edge. Oh well, we live and learn. The white stripe came from a generic set of stripes. I also managed to break off another set of struts.

All going well I should have it finished soon.
On the bench: 1/72 Mosquito, Lightning F.6, DH.2,
AMT Vulcan Shuttle Surak.
Cyber-Hobby 1:35 Sherman Firefly IC - still stalled.
British Columbia, Canada
Joined: September 03, 2009
KitMaker: 6,965 posts
AeroScale: 6,247 posts
Posted: Monday, July 15, 2013 - 07:16 AM UTC
Quoted Text
Its also at this point that I'm uploading photo's that I realised that the rudder flash is the wrong way around. It should be blue, white and then red at the trailing edge.
It shouldn't be terribly difficult to paint the proper colours on given that it's all straight lines

When once you have tasted flight you will walk the Earth with your eyes turned skyward.
For there you have been, and there you will always long to return.
-Leonardo Da Vinci

#372
United Kingdom
Joined: March 10, 2010
KitMaker: 2,568 posts
AeroScale: 1,619 posts
Posted: Monday, July 15, 2013 - 08:01 AM UTC
I was thinking that. I'll strip it off tomorrow and see what I can do. I'm pretty sure I've got some red and blue decal stripes thinking about it.
On the bench: 1/72 Mosquito, Lightning F.6, DH.2,
AMT Vulcan Shuttle Surak.
Cyber-Hobby 1:35 Sherman Firefly IC - still stalled.
Maryland, United States
Joined: February 25, 2013
KitMaker: 209 posts
AeroScale: 138 posts
Posted: Tuesday, July 16, 2013 - 01:05 AM UTC
It's becoming apparent that I will not finish the BV-141 on time (and to my satisfaction) for this campaign due to delays in the Nightfighter campaign, so I am taking a step back to go forward and throwing this thing together in an attempt at a speed build (two weeks for me would be speedy).

It's the old Convair XF-92A from Hawk Models. It came to me bagged secondhand. Only ~15 pieces... No cockpit, in-flight display only, but the panel lines on the fuselage are engraved which is rare for a kit dated 1966. If I were more ambitious I would attempt to maybe detail this thing, but you know the rest.
The decals are a little yellowed so they got taped to the window facing the afternoon sun for a couple days.

As you can see it went together very quickly. The only parts left to attach are the canopy and the pitot tube. The wing roots were a disaster and required a lot of Mr Surfacer. Just need to throw some black in the cockpit and a dab of color on the sloppy looking pilot head that was moulded into the fuselage. What color were the test pilot's helemts in the 1940's and 50's?

As the real aircraft was painted gloss white, I will not have much painting to do after the Tamiya Extra Fine white primer goes on. If I am happy enough with it I might just gloss over the primer.

Kuala Lumpur, Malaysia
Joined: September 05, 2010
KitMaker: 160 posts
AeroScale: 15 posts
Posted: Tuesday, July 16, 2013 - 06:31 PM UTC
I've got my MOJO working......or maybe not
Kuwait / لعربية
Joined: February 09, 2009
KitMaker: 467 posts
AeroScale: 60 posts
Posted: Tuesday, July 16, 2013 - 08:19 PM UTC
Hi John !! thanks great to see you on another GB. I need to find your build now. or give us a quick update

Stephen - ace work on something that frightens the life out of me - anything with rigging. But really does look the part ! Yes its the Tamiya one.
Van - great choice - i like seeing things away from the norm, and a resin kit to boot. I looked at the bottom photo and thought wow great result - it took me a while to realise it was a real jet not a model ! If the primer is smooth why not just gloss it? primer is just paint in any case.
Muhammed = excellent result with the Huey !
best
Mark
http://krasnyaarme.blogspot.com/
"In the Soviet army it takes more courage to retreat than advance"
Joseph Stalin
WARLORD
 Associate Editor
Warszawa, Poland
Joined: April 23, 2003
KitMaker: 1,923 posts
AeroScale: 100 posts
Posted: Tuesday, July 16, 2013 - 11:09 PM UTC
Maryland, United States
Joined: February 25, 2013
KitMaker: 209 posts
AeroScale: 138 posts
Posted: Tuesday, July 16, 2013 - 11:41 PM UTC
Quoted Text
Van - great choice - i like seeing things away from the norm, and a resin kit to boot. I looked at the bottom photo and thought wow great result - it took me a while to realise it was a real jet not a model ! If the primer is smooth why not just gloss it? primer is just paint in any case.
Thanks Mark, but it's actually an old injection kit from Hawk Models. I'm not bold enough to tackle resin yet. I have been working in plastic for only about 10 months now and still improving my craft, hence why to date I have generally been picking alot of simpler kits for my campaign builds (to focus on finishing skills).
The wing roots are smooth enough now to consider hitting it with a layer of primer tonight.
England - North West, United Kingdom
Joined: August 05, 2011
KitMaker: 376 posts
AeroScale: 348 posts
Posted: Wednesday, July 17, 2013 - 05:13 AM UTC
Nice Hawkeye Marcin !!

iv just started that very same kit but ill be making my own decals for it

... On The Workbench ..
Tamiya JACCS Honda Accord
Uusimaa, Finland
Joined: March 30, 2004
KitMaker: 2,845 posts
AeroScale: 1,564 posts
Posted: Wednesday, July 17, 2013 - 05:52 AM UTC
Just a quick update - First parts primed!


Under the the parts are bagged kit decals and replacement roundels, but more of those when I get to that stage.

California, United States
Joined: July 07, 2013
KitMaker: 219 posts
AeroScale: 136 posts
Posted: Wednesday, July 17, 2013 - 06:41 AM UTC
Go with the natural metal...
Maryland, United States
Joined: February 25, 2013
KitMaker: 209 posts
AeroScale: 138 posts
Posted: Wednesday, July 17, 2013 - 07:33 AM UTC
Guys, when posting updates could you please do everyone a favor and quickly identify what it is you are building?.. Just a quick "some shots of my F-XYZ-N", especially when it is just a random collection of parts with primer on them... because from the shots eetu posted I have no idea what I'm supposed to be looking at without trudging through the other 18 pages looking for his previous posts.
Not trying to pick on you anyone specifically, it is something I see with a lot of people's updates.


