Awesome looking work on the Sea King, Joe. I've got to get that for my next Sikorsky kit.
Nice work on the interior ribbing. Have you ever simulated the padded coverings for the interior walls used in some helicopters?
Air Campaigns
Want to start or join a group build? This is where to start.
Want to start or join a group build? This is where to start.
Hosted by Frederick Boucher, Michael Satin
"The Guardian Angel" Helicopter Campaign '07
Posted: Thursday, February 08, 2007 - 10:41 PM UTC

mother

Joined: January 29, 2004
KitMaker: 3,836 posts
AeroScale: 1,036 posts

Posted: Friday, February 09, 2007 - 12:23 AM UTC
Thanks guys 
Andy Öwell for the bleaching Iíll take my base colors, lighten them up and thin them 10% paint to 90% thinner (rubbing alcohol). Then load my airbrush and turning the pressure down to 15-20 lbs. Then spray in the centers of the panels and where ever I feel best. Itís not that dramatic but it convincing.
MikeÖI really didnít spend the time on the interior as Iíd like. You will not see with all the doors shut. Even looking threw the windows your unable. I have the photo etch set for it and someday will attempt to cut open all the opening and detail most. The sliding cargo door will require most of the work. As for interior wall padding, well yes. I sometime use a thick paper towel. This is done by mixing 30% white school glue to 70% water. Paint on a light coat to where the padding goes then place the paper towel on. Once dry, paint.
This also can be done by using simple white computer paper. Cut pieces to size, and to get the pattern need on pad, just take a tooth pick, sand it round and blunt. Using a small metal ruler scribe the pattern needed. Then just lightly glue them down, you donít want to get them soaked or they will lose their pattern and wrinkle. This requires more work but looks much better, especially in an open cargo bay.
Joe
Posted: Friday, February 09, 2007 - 03:13 PM UTC
hi all! joe, if i had know you were building a sea king too i might have thought twice about building mine in this!  as i'm building mine oob, seeing the detail you put into your interior makes me feel guilty :-) heres my update on this build, found one slight problem, in that the instructions show the pilots with open legs, so the control column can go between, however the actual pilot figures have legs moulded together, so one will be sitting at a slightly odd angle. also i cut the head off one and re-attached it to make the two cloned pilots look different


 as i'm building mine oob, seeing the detail you put into your interior makes me feel guilty :-) heres my update on this build, found one slight problem, in that the instructions show the pilots with open legs, so the control column can go between, however the actual pilot figures have legs moulded together, so one will be sitting at a slightly odd angle. also i cut the head off one and re-attached it to make the two cloned pilots look different


HeavyArty


Joined: May 16, 2002
KitMaker: 17,694 posts
AeroScale: 1,728 posts

Posted: Sunday, February 11, 2007 - 03:23 AM UTC
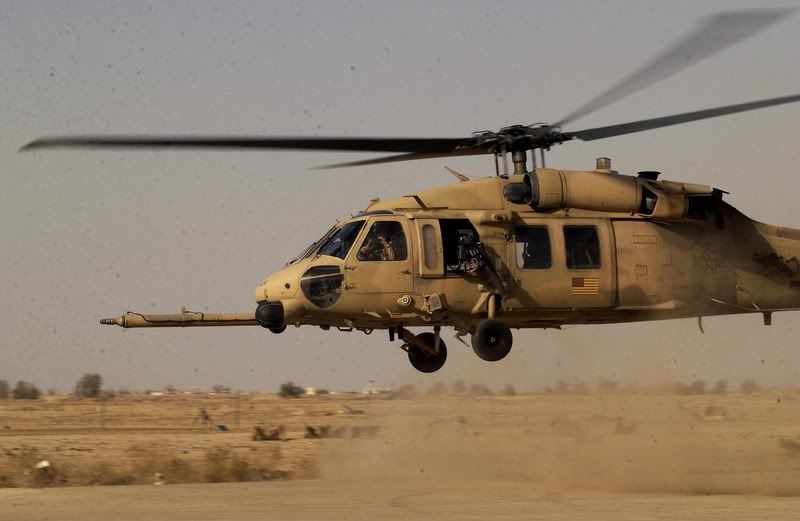
I have begun work on my 1/35 HH-60G from Davis-Monthan AFB in OIF in a 3-tone sand scheme. It started life as the Academy MH-60G kit. I am super-detailing this one inside and out. I am using the Cobra Company MH/HH-60 upgrade set, along with a bunch of scratch-building and some items I have received from other modelers.
Here is how I intend on it looking.
CC MH/HH-60 set:

The cream colored parts are from the CC set. The white parts are scratch from sheet styrene. Here are the pics on progress so far. I hope to start painting it later this week.
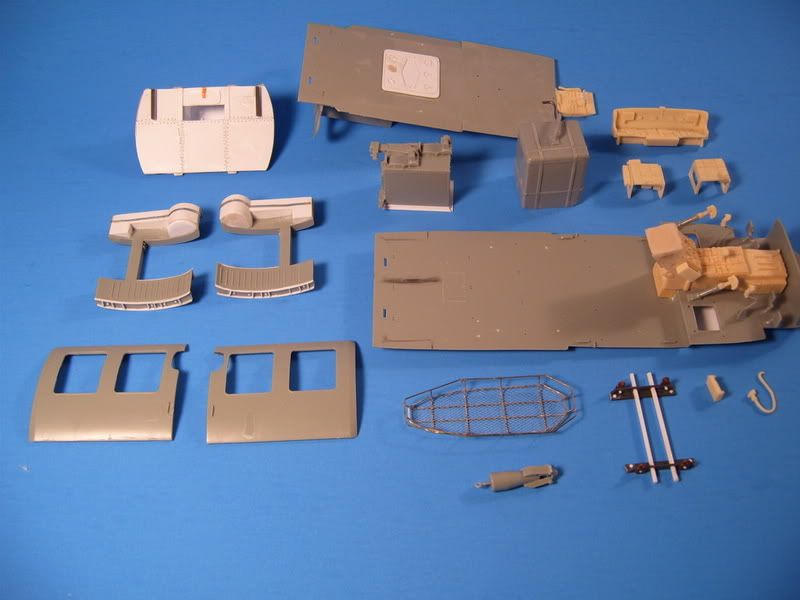
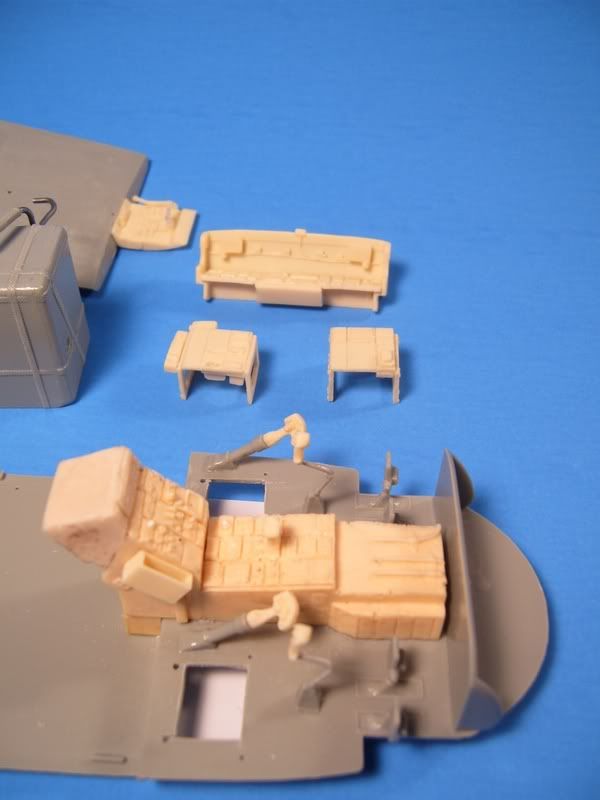
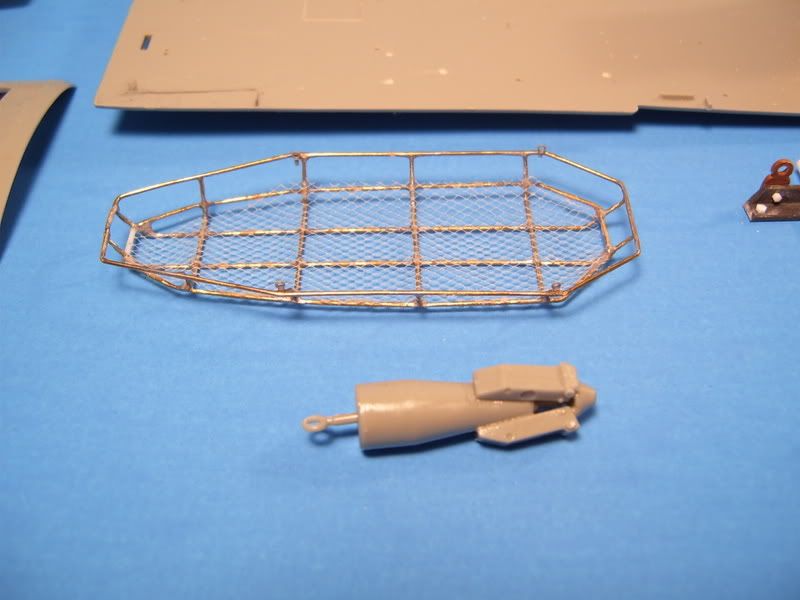
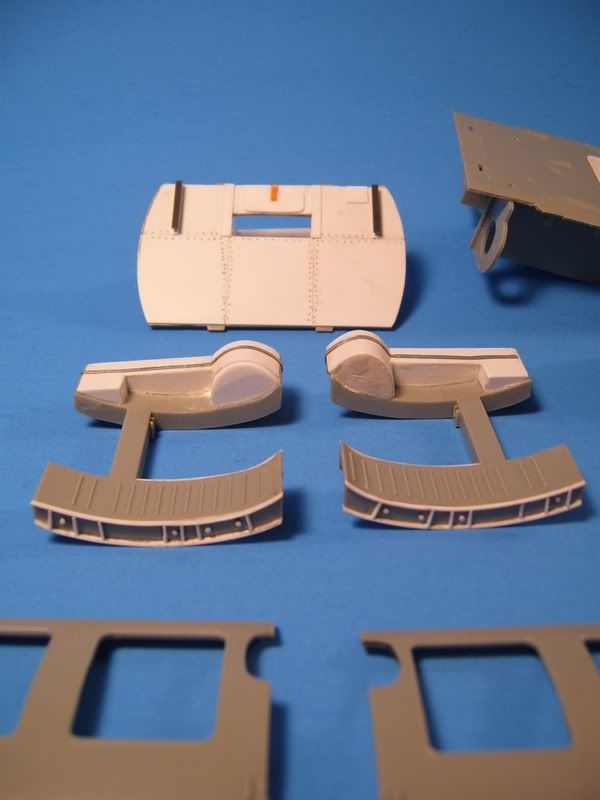
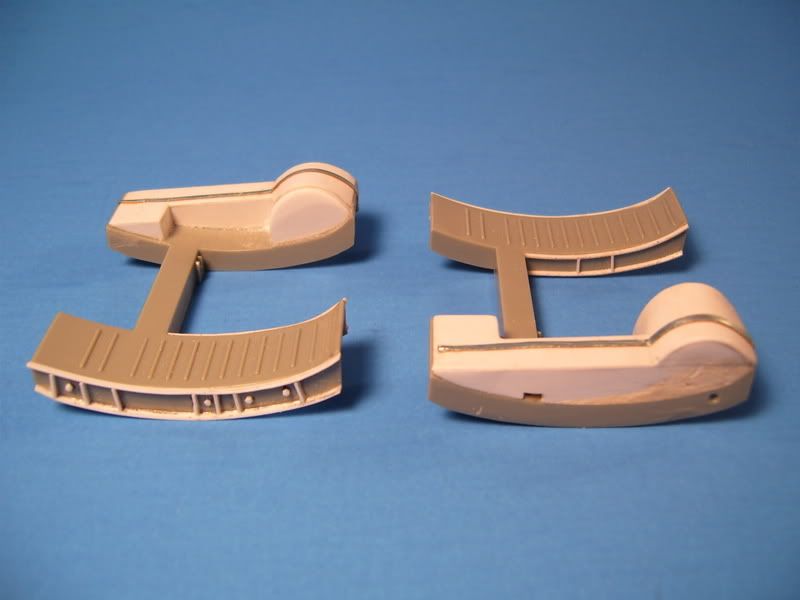
I'll post more as I get it done.
Here is how I intend on it looking.

CC MH/HH-60 set:

The cream colored parts are from the CC set. The white parts are scratch from sheet styrene. Here are the pics on progress so far. I hope to start painting it later this week.


I'll post more as I get it done.
TreadHead

Joined: January 12, 2002
KitMaker: 5,000 posts
AeroScale: 370 posts

Posted: Sunday, February 11, 2007 - 06:37 AM UTC
Wait, wait.....wait a minute. Very nice work ya got going there Gino, looks like you've got another winner on the way, but.......did I miss a build-up article on your nicely done soldered-up EMT cage? Or, did you just think we'd all just skip on right by that?.......sheesh!


Tread.

HeavyArty


Joined: May 16, 2002
KitMaker: 17,694 posts
AeroScale: 1,728 posts

Posted: Sunday, February 11, 2007 - 07:15 AM UTC
Quoted Text
but.......did I miss a build-up article on your nicely done soldered-up EMT cage? Or, did you just think we'd all just skip on right by that?.......sheesh!
Thanks Gordo. I can't take credit for the Stokes litter though. You need to ask the good Mother about that. He is the master of solder for that item.

VonCuda

Joined: November 28, 2005
KitMaker: 2,216 posts
AeroScale: 1,080 posts

Posted: Sunday, February 11, 2007 - 09:49 AM UTC
That Stokes basket is freakin' SICK! 
Hmmm............................the wheels in my head are starting to spin. Wonder if I could do something like that and rig up a water bladder to hang under my Huey?

Hmmm............................the wheels in my head are starting to spin. Wonder if I could do something like that and rig up a water bladder to hang under my Huey?

Posted: Sunday, February 11, 2007 - 03:20 PM UTC
Great work, Gino! Looking forward to see the finished result. 

Posted: Monday, February 12, 2007 - 04:29 PM UTC
Hi guys
I need a little help with my KA-52. This is my first rotary aircraft in many years.
I have finished the camouflage scheme, painted details, finished the markings, and given it a layer of flat varnish.
However, what about weathering? I have looked of pictures of this one, but the real thing is only in overall black and is a display aircraft so not much weathering there. I have made mine as a production aircraft in camouflage.
I am planning to give it a black heavily thinned wash tonight, some exhaust stains and muzzle fumes from the 30mm cannon which is very close to the fuselage.
What else can/need I do?
Busybeas

Joined: January 26, 2007
KitMaker: 102 posts
AeroScale: 96 posts

Posted: Monday, February 12, 2007 - 09:24 PM UTC
Hi Guys
Some great models and posts here, that continue to inspire me
I have made a little progress on the Rega, cockpit dashboard, control systems and seats now in situ.
I really must "brush up" on my painting skills, and get some finer brushes too, the seatbelts need re-painting

and here is an overview of work so far.

thanks for all the encouragement guys
Cheers
Steve
Some great models and posts here, that continue to inspire me

I have made a little progress on the Rega, cockpit dashboard, control systems and seats now in situ.
I really must "brush up" on my painting skills, and get some finer brushes too, the seatbelts need re-painting


and here is an overview of work so far.

thanks for all the encouragement guys

Cheers
Steve

mother

Joined: January 29, 2004
KitMaker: 3,836 posts
AeroScale: 1,036 posts

Posted: Tuesday, February 13, 2007 - 12:37 AM UTC
Hey Phil I'm sure your Sea King will turn out great, as for the Pilots, well I would have drilled through the center of the legs and brought the collective pitch lever through. Figures are looking good, waiting for more 
Joe

Joe

mother

Joined: January 29, 2004
KitMaker: 3,836 posts
AeroScale: 1,036 posts

Posted: Tuesday, February 13, 2007 - 12:43 AM UTC
Starting to take shape Gino, nice work with the scratchbuilding. I canít wait to see the paint on the fuselage. Looking at yours has me itching to finish one of many started, somedayÖ.someday 
Joe

Joe
MadMeex

Joined: August 07, 2002
KitMaker: 424 posts
AeroScale: 73 posts

Posted: Tuesday, February 13, 2007 - 01:03 AM UTC
OK. It's been years, but I think I've got the building bug again. Sign me up to build some unknown air-beater.
Mika
Mika

mother

Joined: January 29, 2004
KitMaker: 3,836 posts
AeroScale: 1,036 posts

Posted: Tuesday, February 13, 2007 - 01:08 AM UTC
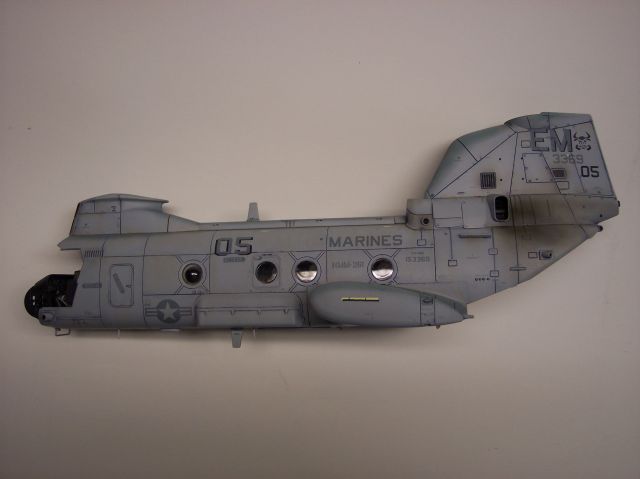
Hey Jesper sounds like you have it all covered. Itís pretty much all I do, after paint clear coat then decal followed by a wash and a dull coat. Most Helicopter are clean for the most, but there are a few exceptions of a few that do get dirty, mostly from exhaust.
For a convincing exhaust stain, I suggest using Tamiyas clear smoke(X19). Thin 10% paint to 90% thinner. When you first start spraying itÖit doesnít show at first, and as you build up layers it starts to show. I like using the smoke over just plain black paint. The smoke is transparent and allows the model and work show through.
Joe
For a convincing exhaust stain, I suggest using Tamiyas clear smoke(X19). Thin 10% paint to 90% thinner. When you first start spraying itÖit doesnít show at first, and as you build up layers it starts to show. I like using the smoke over just plain black paint. The smoke is transparent and allows the model and work show through.

Joe

mother

Joined: January 29, 2004
KitMaker: 3,836 posts
AeroScale: 1,036 posts

Posted: Tuesday, February 13, 2007 - 01:31 AM UTC
Nice work on the cockpit Steve, yeah I know what you mean about painting seatbelts. My I suggest doing a wash of the same colors of the belts. The wash will define the outline and help when painting in those tight areas.
Joe
Joe

mother

Joined: January 29, 2004
KitMaker: 3,836 posts
AeroScale: 1,036 posts

Posted: Tuesday, February 13, 2007 - 09:25 AM UTC
This is pretty much the end, just a few things left. It was painted in Model Masters dark gull gray over Model Masters white. Certain sections had to be painted orange to match the decals, so I mixed Model Masters guards red with yellow followed by Testors dull coat.
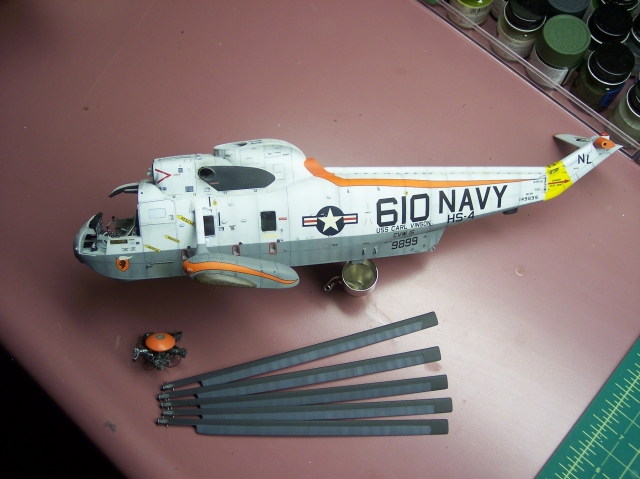
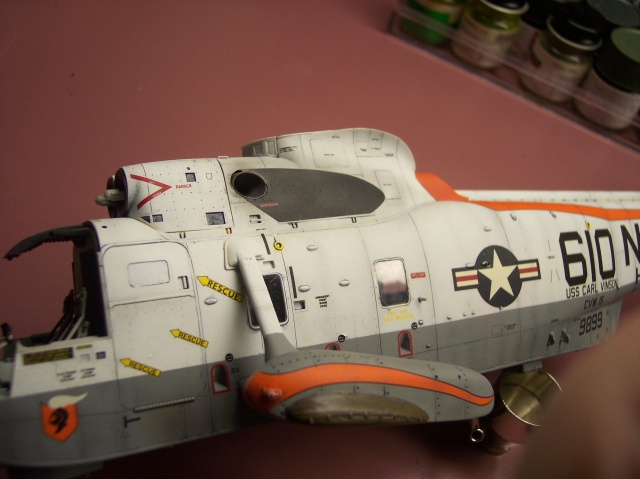
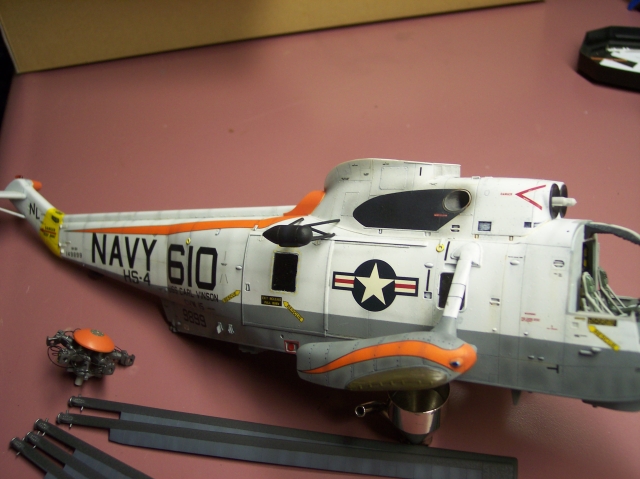
As of this posting I just finished her up. So you'll be able to see her in the finished campaign post.
Joe


As of this posting I just finished her up. So you'll be able to see her in the finished campaign post.
Joe
Busybeas

Joined: January 26, 2007
KitMaker: 102 posts
AeroScale: 96 posts

Posted: Tuesday, February 13, 2007 - 11:31 AM UTC
Wow ! 
Another amazing helo build from you Joe, fantastic inspiration for us beginners
I spent sometime last night, viewing your photo gallery, and am stunned by your consistantly high quality builds, in whatever you make.
Keep up the good work... its a treat to watch & sooo inspiring !
Cheers
Steve

Another amazing helo build from you Joe, fantastic inspiration for us beginners

I spent sometime last night, viewing your photo gallery, and am stunned by your consistantly high quality builds, in whatever you make.
Keep up the good work... its a treat to watch & sooo inspiring !
Cheers
Steve
Posted: Tuesday, February 13, 2007 - 12:09 PM UTC
Hi group
Here is my finished entry for the helicopter campaign. I am pretty satisfied with the result. At least when I do not compare with Mother When I get my airbrush up and working again I might touch up the exhaust stains. However, overall it turned out pretty much as I wanted.
I think it is also time to get some firepower into this campaign. :-) :-)
The KA-52 is only at the prototype stage and not yet in series production or operational use. Plans/rumours are that Yemen and Russia will buy some of these aircraft in the future and use them in teams of KA-52s and KA-50s.
Instead of just painting the whole aircraft overall black as the prototype I took the liberty of using markings and camouflage of how the aircraft might look in operational service.
The camouflage scheme is loosely made up based on the camouflage of operational KA-50s.
I will post some pictures in the tread for finished entries for the helicopter campaign as well.
EDIT: seeing the pictures here on the forum, they does not look as good as when I viewed them on my private computer. They seem a bit dark here. I will try to take some new pictures tonight for the finished gallery.


Here is my finished entry for the helicopter campaign. I am pretty satisfied with the result. At least when I do not compare with Mother
 When I get my airbrush up and working again I might touch up the exhaust stains. However, overall it turned out pretty much as I wanted.
I think it is also time to get some firepower into this campaign. :-) :-)
The KA-52 is only at the prototype stage and not yet in series production or operational use. Plans/rumours are that Yemen and Russia will buy some of these aircraft in the future and use them in teams of KA-52s and KA-50s.
Instead of just painting the whole aircraft overall black as the prototype I took the liberty of using markings and camouflage of how the aircraft might look in operational service.
The camouflage scheme is loosely made up based on the camouflage of operational KA-50s.
I will post some pictures in the tread for finished entries for the helicopter campaign as well.
EDIT: seeing the pictures here on the forum, they does not look as good as when I viewed them on my private computer. They seem a bit dark here. I will try to take some new pictures tonight for the finished gallery.


Busybeas

Joined: January 26, 2007
KitMaker: 102 posts
AeroScale: 96 posts

Posted: Tuesday, February 13, 2007 - 11:48 PM UTC
The Swiss Rega build continues 
I am reasonably happy with the progress so far, and couldn't resist test fitting the interior into the fuselage :-)
Now I am starting to get a "buzz".


I have , however discovered numerous "cock ups" with the Revell instructions ,which seem to be generic and cover a few variants of Eurocopter kits made by Revell.
The diagrams show parts that are NOT in the kit, presumably from another variant, some paint colours of parts are not identified at all. Equally, some are identified, but when one looks in the instructions, the specific paint code isn't listed !
Overall though, this is a nice kit ( thus far) and as most of the problem areas above are "hidden" within, I am not too bothered.
Steve

I am reasonably happy with the progress so far, and couldn't resist test fitting the interior into the fuselage :-)
Now I am starting to get a "buzz".
I have , however discovered numerous "cock ups" with the Revell instructions
 ,which seem to be generic and cover a few variants of Eurocopter kits made by Revell.
 The diagrams show parts that are NOT in the kit, presumably from another variant, some paint colours of parts are not identified at all. Equally, some are identified, but when one looks in the instructions, the specific paint code isn't listed !
Overall though, this is a nice kit ( thus far) and as most of the problem areas above are "hidden" within, I am not too bothered.
Steve

VonCuda

Joined: November 28, 2005
KitMaker: 2,216 posts
AeroScale: 1,080 posts

Posted: Wednesday, February 14, 2007 - 10:27 AM UTC
Joe,
Man, your helo rocks! The weathering is awsome.....just enough to make the rivits and lines stand out. Were the orange strips painted on or were they part of the kit decals?
Jesper,
I love that camo scheme. That one is going to look great on the shelf. Your canopy is also nicely done....clean and very real looking. Great job!
Hermon

Posted: Wednesday, February 14, 2007 - 12:49 PM UTC
Quoted Text
Jesper,
I love that camo scheme. That one is going to look great on the shelf. Your canopy is also nicely done....clean and very real looking. Great job!
Hermon
Thanks
 Glad to hear.
 I really wanted to do this special and unusual camouflage scheme instead of the overall black.

droseman

Joined: December 31, 2005
KitMaker: 82 posts
AeroScale: 34 posts

Posted: Thursday, February 15, 2007 - 06:21 PM UTC
wow, not sure I can compete with the quality of these excellent kits...
Is it just special ops blackhawks which were painted black, or were 'ordinaries' too?
Does anyone know where I can get some aftermarket .50cal guns in 1/48, since the ones in the kit look a bit basic...
I'll post pics when i have actually found time to do something...
Dave
Is it just special ops blackhawks which were painted black, or were 'ordinaries' too?
Does anyone know where I can get some aftermarket .50cal guns in 1/48, since the ones in the kit look a bit basic...
I'll post pics when i have actually found time to do something...
Dave
Busybeas

Joined: January 26, 2007
KitMaker: 102 posts
AeroScale: 96 posts

Posted: Thursday, February 15, 2007 - 09:31 PM UTC
A little more progress on the Rega, and a few newbie questions to ask of you seasoned, pro builders too , please 
A few more sub assemblies made up and just dry /test fitted in situ.


Now the questions?
My thoughts are turning to painting the body / fuselage, given that the seams are going to need some attention, I cannot see how I could really spray the two halves of the body separately and then join...them without some serious issues being seen around the joints,
Assuming, I glue the windows and the cockpit /cabin in situ ( as the instructions state), then join, finish off the seam repair etc,, there will be a lot of masking required prior to painting.
Only the main cockpit window glazing is fitted from the outside, all side windows are fitted from the inside,,, hence my questions .
May I ask , how you guys accomplish the major body painting issue ?
How would you suggest I proceed ?
Thanks in advance
Steve :-)

A few more sub assemblies made up and just dry /test fitted in situ.
Now the questions?
My thoughts are turning to painting the body / fuselage, given that the seams are going to need some attention, I cannot see how I could really spray the two halves of the body separately and then join...them without some serious issues being seen around the joints,
Assuming, I glue the windows and the cockpit /cabin in situ ( as the instructions state), then join, finish off the seam repair etc,, there will be a lot of masking required prior to painting.
Only the main cockpit window glazing is fitted from the outside, all side windows are fitted from the inside,,, hence my questions .
May I ask , how you guys accomplish the major body painting issue ?
How would you suggest I proceed ?
Thanks in advance
Steve :-)

HeavyArty


Joined: May 16, 2002
KitMaker: 17,694 posts
AeroScale: 1,728 posts

Posted: Thursday, February 15, 2007 - 11:44 PM UTC
I build it as much as possible before painting; fuselage halves, windows, doors, etc. I then tape off all windows. If i can tape off the opening from inside and apply the glass after, I will, unless the glass has a frame molded onto it that needs to be painted the same color as the fuselage. If this is the case, I install all the windows and tape them all off.
Hope that helps. Good luck.
Hope that helps. Good luck.
Busybeas

Joined: January 26, 2007
KitMaker: 102 posts
AeroScale: 96 posts

Posted: Friday, February 16, 2007 - 04:11 AM UTC
Thanks for the advice Gino, appreciated 
Steve

Steve
 |


