Air Campaigns
Want to start or join a group build? This is where to start.
OFFICIAL: Civilian Planes Only Campaign
bdanie6
_VISITCOMMUNITY
New Hampshire, United States
Joined: November 09, 2008
KitMaker: 615 posts
AeroScale: 459 posts
Posted: Wednesday, May 04, 2011 - 10:38 AM UTC
Jessica, welcome to Aeroscale! You will really enjoy the comeraderie here
Looks like you don't have to worry about pre-production photos for the 737-500, and as for the Frsin Brabazon I don't for-see anyone having a problem with it. I certainly don't
Just one question Could you post a history of the Frsin Brabazon?
Norweigans sure have some colourful aircraft!
Later
Jessie_C
_VISITCOMMUNITY
British Columbia, Canada
Joined: September 03, 2009
KitMaker: 6,965 posts
AeroScale: 6,247 posts
Posted: Wednesday, May 04, 2011 - 10:56 AM UTC

Quoted Text


Just one question Could you post a history of the Frsin Brabazon?


Do mean a history of the Frsin kit, or of the Bristol Brabazon itself?


Quoted Text


Norweigans sure have some colourful aircraft!


I love special schemes like this. They're so much more colourful than Euro white with a painted tail.
Jessie_C
_VISITCOMMUNITY
British Columbia, Canada
Joined: September 03, 2009
KitMaker: 6,965 posts
AeroScale: 6,247 posts
Posted: Thursday, May 05, 2011 - 04:45 PM UTC
The Brabazon was to be Britain's entry into the expected poast war civil aviation boom. Here's a short history and a video made from old newsreels . Listen to that pretentious pomposity that was so fashionable back then

Frsin is a cottage industry company who make limited-run resin and more recently injected airline kits. They also have a decal business doing airline schemes that appeal to them and that many other decal companies have overlooked. They did the Brabazon kit about 5 years or so ago, and it seems to be out of production now.

J

Edit: fixed the links. They work now
bdanie6
_VISITCOMMUNITY
New Hampshire, United States
Joined: November 09, 2008
KitMaker: 615 posts
AeroScale: 459 posts
Posted: Thursday, May 05, 2011 - 06:29 PM UTC
Thanks Jess. I actually meant a history of the a/c. Sorry I wasn't clearer I'll check out the links.
Later
Jessie_C
_VISITCOMMUNITY
British Columbia, Canada
Joined: September 03, 2009
KitMaker: 6,965 posts
AeroScale: 6,247 posts
Posted: Friday, May 06, 2011 - 10:22 AM UTC
Some progress!
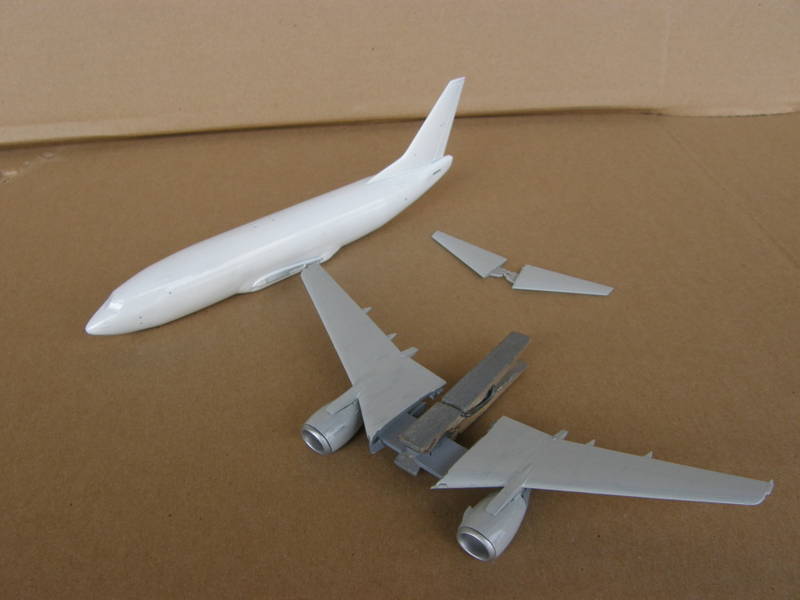
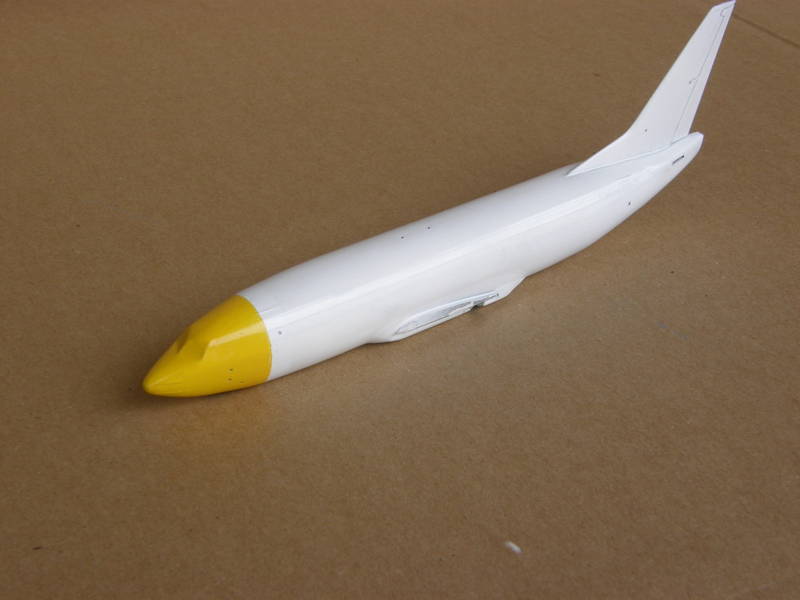
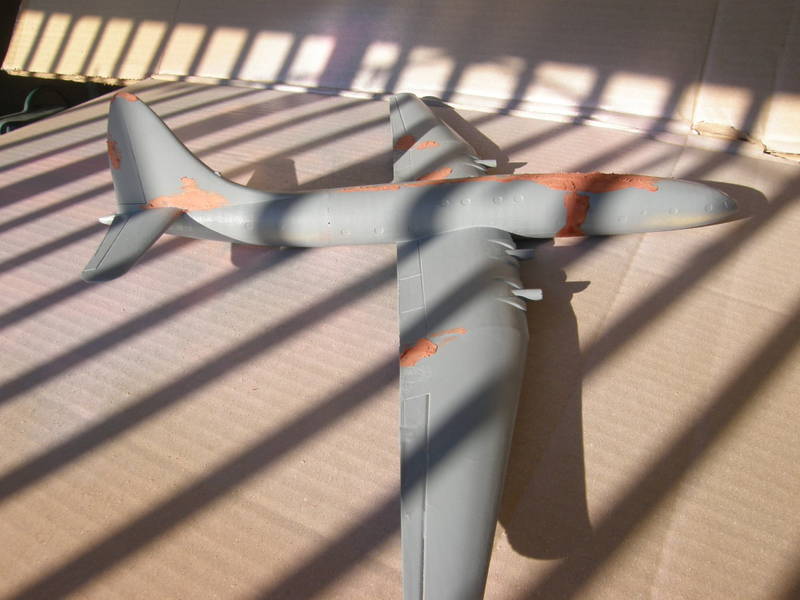
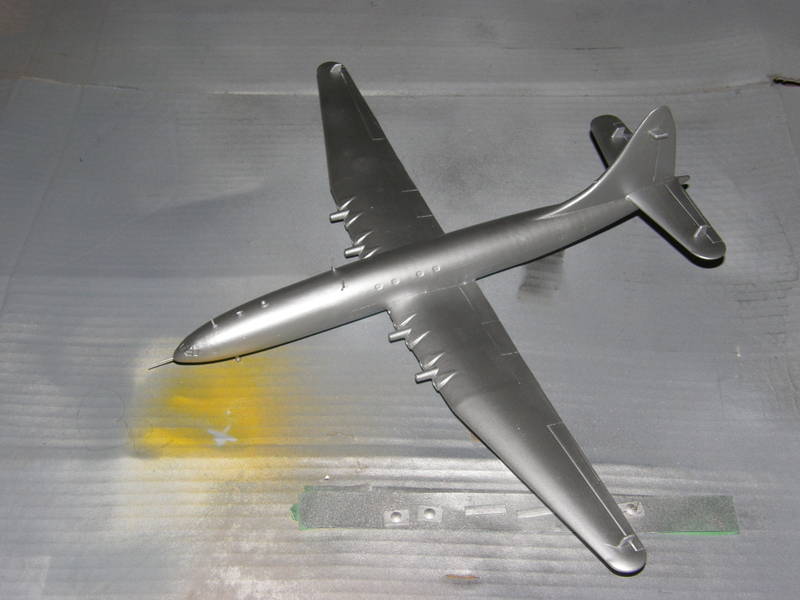
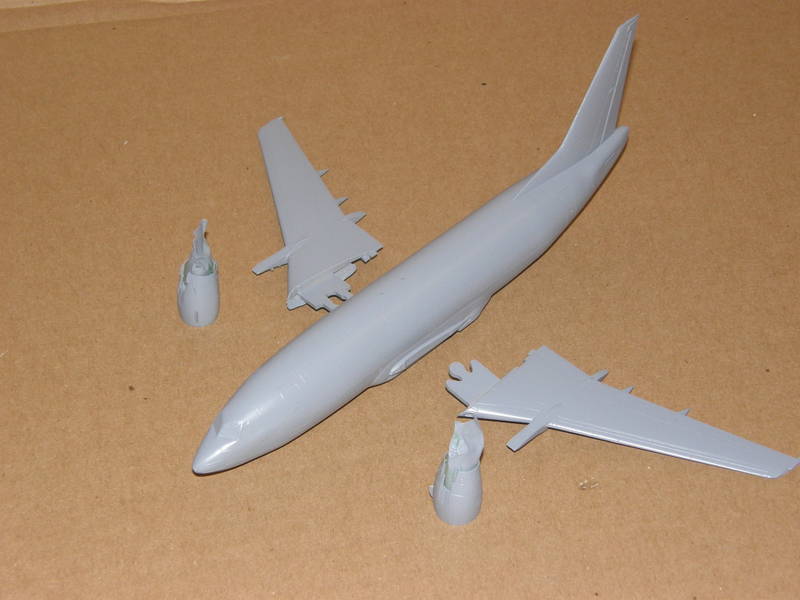
The 735's major subassemblies in primer. Not very much sanding will be needed before I can do the gloss white.


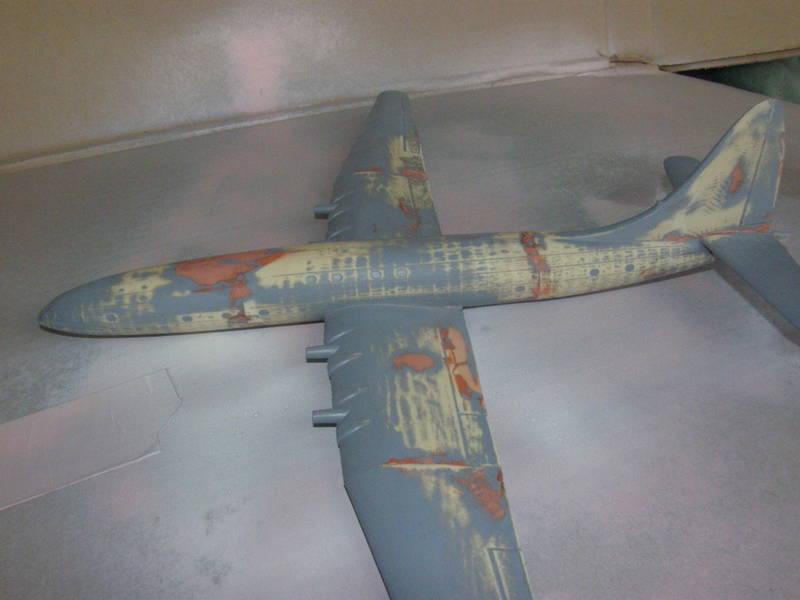
Now how does one repair a broken trailing edge? It will need to be filed down to a sharp edge, which eliminates most filler materials. My solution is acrylic dental casting resin. Dentists use it to make temporary crowns and other things for your mouth, so it's going to cure rock hard. If you can chew on it, it'll stand up to more abuse than bondo will...
Step one: aply pieces of transparent (and difficult to photograph) packing tape to the undersurface of the wing. This will hold the resin in place. The two bottles hold the 2-part resin mixture.


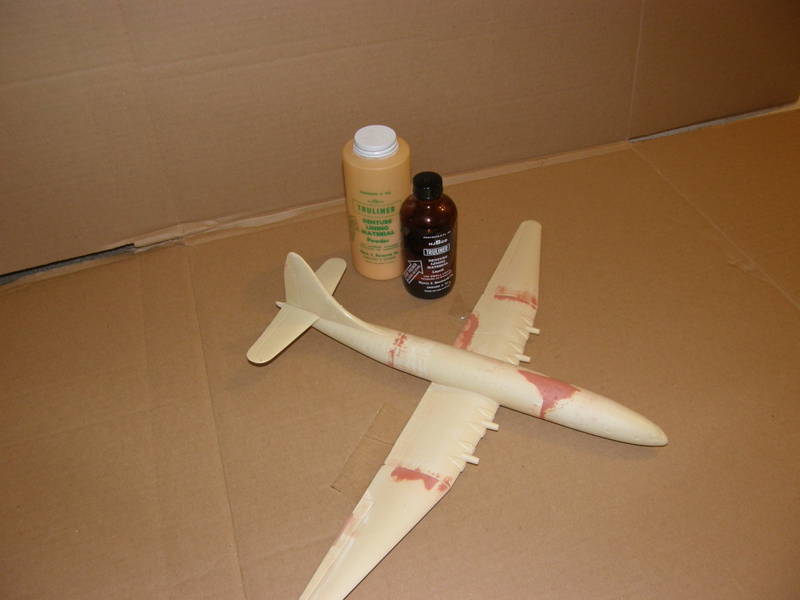
Step two: apply the resin powder to the areas to be filled. It'll dry rock hard, so don't go overboard; you'll ony have to grind it down later on.


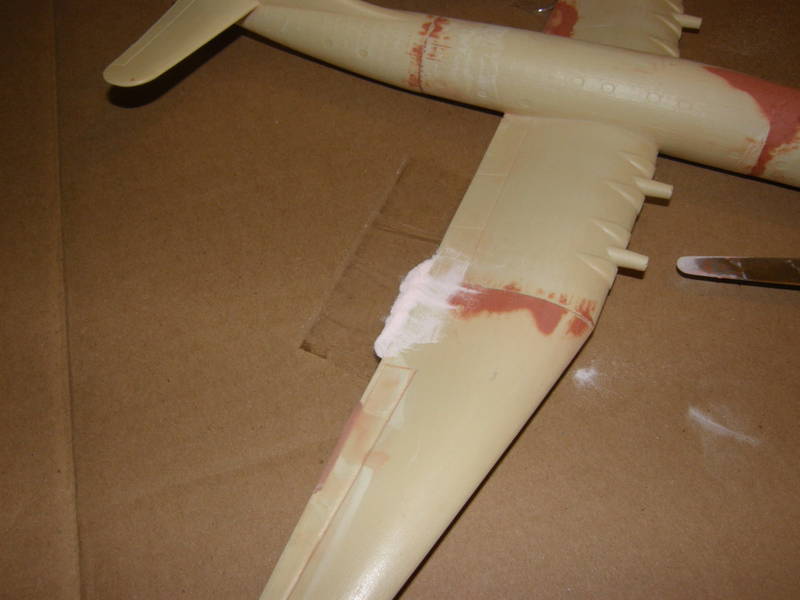
Step three: using a pipette, add drops of the liquid onto the powder, taking care not to let it splash, and allowing it to mix into the powder by capilary action. Do not use too much liquid or it won't cure properly. This stage takes a little practise to achieve. The resin should look just slightly granular when mixed properly.


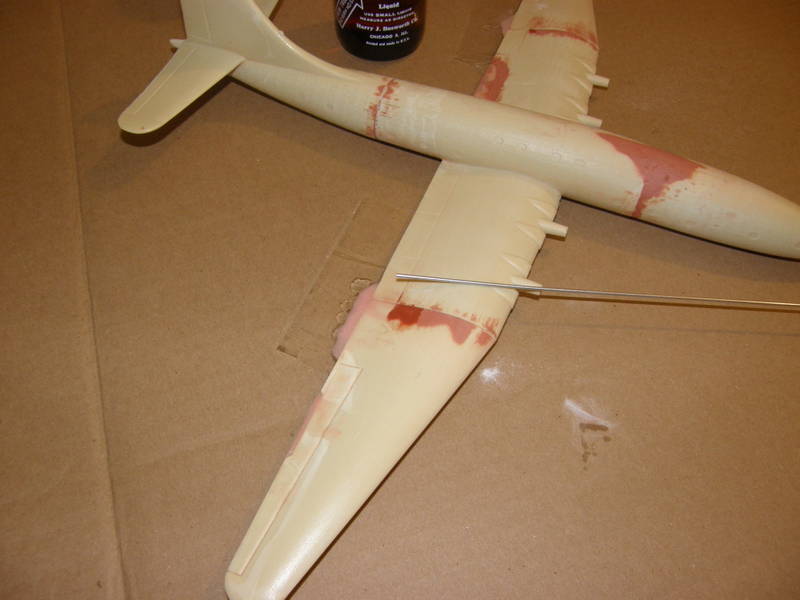
Most of this resin will be ground down with a Dremel after it cures. Your workshop will sound and smell like a Dentist's office for a little while.

J
Jessie_C
_VISITCOMMUNITY
British Columbia, Canada
Joined: September 03, 2009
KitMaker: 6,965 posts
AeroScale: 6,247 posts
Posted: Thursday, May 12, 2011 - 07:55 AM UTC
The 735 has become colourful! Here's the gloss white and first coat of Boeing #707 grey (I cheated and used Model Master's Voodoo Grey; it's the same colour). I left the intake pieces off and sprayed them silver. I'm hoping that they'll fit well enough to keep the sharp boundary between the intake and nacelle. Otherwise I'll be in for a tedious masking job. Speaking of which, now I have to mask the nose to prepare for the yellow.

Remember it's going to look like this:


The Brabazon is now wearing primer. Oh, dear. Look at all that sanding I need to do. A contest winner this is destined not to be.

I'm going to have to come up with the fairings for the control surface actuators and the gust sensor boom. Frsin didn't provide them in the kit so I'll need to laminate some scrap plastic together and sand it to shape, then make copies. The elevator and rudder actuator fairings can be clearly seen in the following image. The aileron fairings are not as clear, but they can be seen on the outboard ends of the ailerons if you know where to look.

I'll also need to raid the scrap parts box for all those antennae on the upper fuselage.

J
Jessie_C
_VISITCOMMUNITY
British Columbia, Canada
Joined: September 03, 2009
KitMaker: 6,965 posts
AeroScale: 6,247 posts
Posted: Saturday, May 14, 2011 - 10:59 AM UTC
Intoducing the yellow-headed summer bird!

There are a few touch-ups needed and then the remaining details will be taken care of with the decal sheets.

No progress to speak of on the Brabazon; the amount of sanding needed is a little depressing.
mtnflyer
_VISITCOMMUNITY
Alberta, Canada
Joined: March 08, 2009
KitMaker: 394 posts
AeroScale: 360 posts
Posted: Saturday, May 14, 2011 - 01:58 PM UTC
Looks like a ssmmooooth finish on the 737 Jessica. Very well done.
Jessie_C
_VISITCOMMUNITY
British Columbia, Canada
Joined: September 03, 2009
KitMaker: 6,965 posts
AeroScale: 6,247 posts
Posted: Saturday, May 14, 2011 - 02:51 PM UTC
Half the decals are on. The Two Six decals are printed on continuous film, so they must be closely trimmed. The film is a bit thick, which is good when applying such a large decal, but it needs care and attention to fit it to compound curves such as the area around the front door. It seems to react well to Solvaset. This sheet was an early product, done on a laser printer so it definitely needs to be applied over white in order for the colours to be as bright as they should be. I'll let these dry overnight before doing the other side.
Jessie_C
_VISITCOMMUNITY
British Columbia, Canada
Joined: September 03, 2009
KitMaker: 6,965 posts
AeroScale: 6,247 posts
Posted: Tuesday, May 17, 2011 - 07:09 AM UTC
It's beginning to look like an airplane!
Left side:

Right side:


All of those little probes and antennae on the fuselage were enough to drive me mad. I was constantly afraid that they'd ping off into the unknown lair of the carpet monster. In the end, they all behaved themselves, but not until after putting up an epic fight to avoid being glued into their respective holes.

The engine intake rings didn't fit the way I had hoped, and of course I found this out after I had the nacelles painted and decalled. This required an incredibly fiddly and nervous-making sanding session to get the top of the nacelle into something of the same shape as the intake ring (and it's always the most visible area that has the worst fit problem, isn't it?) Then an couple of equally careful masking and painting sessions. I still have to do the silver and I'm worried about pulling up the decals. I think a strategically positioned sliver of paper between the tape and decal just might work.

The wing and taiplane tabs have an extremely tight fit. I should have masked them when I did the primer coat. Since I didn't, I'm going to have to scrape the paint off in order to get the tabs to fit into their slots. Daco engineered an interesting interlocking system for the tabs; they fit together like puzzle pieces. I've never had a model part like this before and I find myself wondering how well they'll go together. If it works as advertised, the wings and tailplanes will snap together and could possibly hold without glue. I'm not far away from finding out.

Daco provides nearly 100 detaill decals, although many are duplicates to allow for different background colours. I gave up after putting on the most visible ones. The rest of the decals make it a happy little airplane, and soon I'll be a happy woman with a finished model.
Jessie_C
_VISITCOMMUNITY
British Columbia, Canada
Joined: September 03, 2009
KitMaker: 6,965 posts
AeroScale: 6,247 posts
Posted: Tuesday, May 17, 2011 - 10:37 AM UTC
It's finished!
Let's take a walkaround.


Jessie_C
_VISITCOMMUNITY
British Columbia, Canada
Joined: September 03, 2009
KitMaker: 6,965 posts
AeroScale: 6,247 posts
Posted: Thursday, May 19, 2011 - 03:10 PM UTC
Now to pay a little attention to the Brabazon. Another layer of Bondo goes on...

There's something of a divot at the joint between the nose and centre sections. I'm filling it slowly to ensure that I don't turn my poor airplane into a hunchback.

The centre section to tail joint also needs more work.

Fill, sand, check, lather, rinse, repeat...

J
bdanie6
_VISITCOMMUNITY
New Hampshire, United States
Joined: November 09, 2008
KitMaker: 615 posts
AeroScale: 459 posts
Posted: Thursday, May 19, 2011 - 03:28 PM UTC
Jessica,
the 737 looks just great in the pictures. Congrats on a model well done

The Brabazon looks to be a real beast, but you seem to have a handle on it. Can't wait for the next update

Later
Jessie_C
_VISITCOMMUNITY
British Columbia, Canada
Joined: September 03, 2009
KitMaker: 6,965 posts
AeroScale: 6,247 posts
Posted: Friday, May 27, 2011 - 08:05 AM UTC
More work on the Brabazon. It seems like I have to sand the entire airframe.


The hollow on the upper fuselage is slowly coming under control.


Note the raised areas where Frsin shows the aircraft's internal framework. I thought it was too pronounced, so I'm sanding it back a bit.
Siderius
_VISITCOMMUNITY
Tennessee, United States
Joined: September 20, 2005
KitMaker: 1,747 posts
AeroScale: 1,673 posts
Posted: Sunday, May 29, 2011 - 11:46 AM UTC
Well, my photos of the Super Constellation I finished last November aren't showing up here, so I thought I would post a couple new ones. Had to order a second set of decals from Minicraft (5 dollars please) to do some replacement on a couple of decals that didn't stay on the fuselage and wings. Oh well. Decals, decals, decals. Take a look. Russell


JPTRR
Staff MemberManaging Editor
RAILROAD MODELING
#051
_VISITCOMMUNITY
Tennessee, United States
Joined: December 21, 2002
KitMaker: 7,772 posts
AeroScale: 3,175 posts
Posted: Sunday, May 29, 2011 - 05:34 PM UTC
Russell, Jessica, Bruce, et al.,

What a fine ramp full of peaceable planes you are creating here!

The Brabazon --what a great name.

Really impressive campaign going here!
Jessie_C
_VISITCOMMUNITY
British Columbia, Canada
Joined: September 03, 2009
KitMaker: 6,965 posts
AeroScale: 6,247 posts
Posted: Thursday, June 09, 2011 - 10:16 AM UTC
Now it's time for the control surface actuator fairings that are so prominent on the Brabazon's wings and tail surfaces. I'm not sure why Frsin didn't include them in the kit, but are we modellers or are we mice?

Well, squeak up!

First I cut rough shapes of the two sizes of fairing


I smoothed them off, rounded out the leading edges and attached them to a plinth so I could make copies


Then I ran into difficulty. My copying attempt failed because I think I didn't mix the mould rubber properly and I was left with a gooey mass within which the master parts were so firmly gripped that I broke everything apart when I attempted to demould them. More practise is indicated. I fell back on Plan B and made 8 more fairings from plastic card rather than attempt more rubber follies just yet.

The Brabazon needs few more sessions of sanding and priming before I'll be happy with the surface texture, then I can get going with final assembly and painting.
dcandal
_VISITCOMMUNITY
Buenos Aires, Argentina
Joined: September 07, 2006
KitMaker: 918 posts
AeroScale: 688 posts
Posted: Friday, June 17, 2011 - 01:31 AM UTC
Hi,

Here you can see the A-380 finished,


Jessie_C
_VISITCOMMUNITY
British Columbia, Canada
Joined: September 03, 2009
KitMaker: 6,965 posts
AeroScale: 6,247 posts
Posted: Friday, June 17, 2011 - 07:10 PM UTC
The Brabazon now has a coat of silver, plus the fairings and antennae that Frsin didn't include in the kit. It's also standing on its undercarriage legs, but disaster has struck. The wheels have gone missing from my kit box. I don't know whether I've lost them, or whether they weren't in there in the first place. I've contacted Frsin to see about getting a replacement set of wheels, but I'm not going to be able to finish this model before the deadline

I was so close to finishing. All that remains are the propellors, wheels and decals. I can do the propellers and decals, but with no wheels it's kind of futile...
Tomcat31
#042
_VISITCOMMUNITY
England - North East, United Kingdom
Joined: November 18, 2006
KitMaker: 2,828 posts
AeroScale: 1,720 posts
Posted: Friday, June 17, 2011 - 09:04 PM UTC
That's a bummer Jessie but at least you finished the B737 for the campaign. worse case you could always put the Brabazon in the Hangar queen campaign when you get the wheels?
Jessie_C
_VISITCOMMUNITY
British Columbia, Canada
Joined: September 03, 2009
KitMaker: 6,965 posts
AeroScale: 6,247 posts
Posted: Saturday, June 18, 2011 - 06:52 AM UTC
It seems that the Brabazon really doesn't want to be finished. I started to apply the window decals and they shattered. I managed to mostly salvage the ones I'd soaked, and stopped to put liquid decal film on the rest. I think that I can carefully paint the windows where the decals broke into too many pieces to save.

In the meantime I'll be searching through the spares box for wheels in the proper size...

EDIT
Despite the decal film, they're still shreading themselves. I've lost the wing registration letters now
Jessie_C
_VISITCOMMUNITY
British Columbia, Canada
Joined: September 03, 2009
KitMaker: 6,965 posts
AeroScale: 6,247 posts
Posted: Sunday, June 19, 2011 - 02:26 PM UTC
The kind folks at Frsin will send me new wheels and decals. Given that our Posties are on strike right now, I can't depend on them arriving in time to finish the campaign, but I will post an "honorary finish" picture when they get here
HARV
#012
_VISITCOMMUNITY
Wyoming, United States
Joined: November 07, 2003
KitMaker: 3,098 posts
AeroScale: 79 posts
Posted: Friday, July 01, 2011 - 12:13 PM UTC
Just saw my ribbon Bruce. Thank you very much. I enjoyed your campaign and I am glad that your health has improved.

Thanks again,
Randy
Jessie_C
_VISITCOMMUNITY
British Columbia, Canada
Joined: September 03, 2009
KitMaker: 6,965 posts
AeroScale: 6,247 posts
Posted: Thursday, July 28, 2011 - 09:52 AM UTC
As promised, long after the campaign has ended, the Brabazon is fiinally done

Better late than never.
Tomcat31
#042
_VISITCOMMUNITY
England - North East, United Kingdom
Joined: November 18, 2006
KitMaker: 2,828 posts
AeroScale: 1,720 posts
Posted: Thursday, July 28, 2011 - 09:55 AM UTC
Glad to see it finished, despite the issues you had it turned out great.