OFFICIAL: Civilian Planes Only Campaign

#042
England - North East, United Kingdom
Joined: November 18, 2006
KitMaker: 2,828 posts
AeroScale: 1,720 posts
Posted: Sunday, January 30, 2011 - 10:31 AM UTC
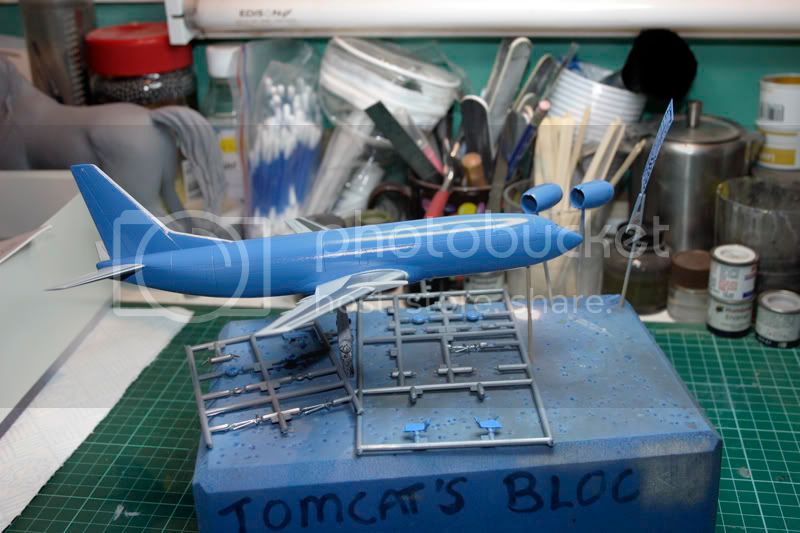
Started the painting today... First the plane was primed in grey and then the leading edges were sprayed with Alclad Aluminium and then they were masked when dry
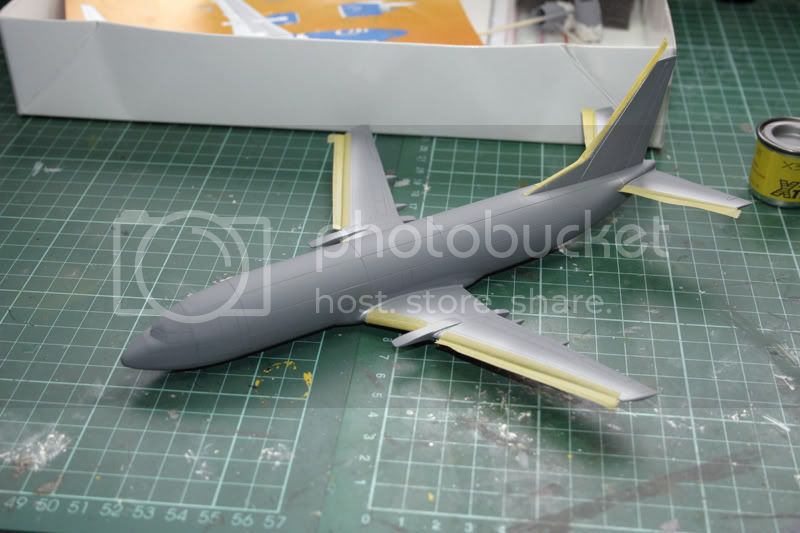
Then the coroguard was sprayed, I used Alclad Dark Aluminium to replicate this as I couldn't be bothered using the Xtracolor enamel

That was masked and then the wings were sprayed with Xtracolor Boeing Grey enamel

Before the paint and started the cure I removed all the masking (except for the fin leading edge)


Now to leave the kit for the next week to fully cure so I can mask and then start painting the fuselage with Thrifty Blue .
As always and comments, suggestions or critique is always welcomed

Modellers Creed: This is my toolbox. There are many like it, but this one is mine. My toolbox is my best friend. It is my life. I must master it as I must master my life. My toolbox, without me, is useless. Without my toolbox, I am useless.
Florida, United States
Joined: January 14, 2009
KitMaker: 2,798 posts
AeroScale: 2,443 posts
Posted: Sunday, January 30, 2011 - 10:50 AM UTC
"From time to time, the tree of liberty must be watered with the blood of
tyrants and patriots."
- Thomas Jefferson
IPMS#47611
#042
England - North East, United Kingdom
Joined: November 18, 2006
KitMaker: 2,828 posts
AeroScale: 1,720 posts
Posted: Sunday, January 30, 2011 - 10:59 AM UTC
I've designed a ribbon for the campaign. What do you all think?

and this is what it would look like in real size.

Modellers Creed: This is my toolbox. There are many like it, but this one is mine. My toolbox is my best friend. It is my life. I must master it as I must master my life. My toolbox, without me, is useless. Without my toolbox, I am useless.
Texas, United States
Joined: February 22, 2008
KitMaker: 5,026 posts
AeroScale: 2,811 posts
Posted: Sunday, January 30, 2011 - 02:46 PM UTC
@ Guy: safe choice that you made there. I would not want to tick off Hermon.
@ Allen: I like the ribbon, very nicely done.
@ Justin:

call me dumb!
Bob
If it aint broke dont fix it.
Florida, United States
Joined: January 14, 2009
KitMaker: 2,798 posts
AeroScale: 2,443 posts
Posted: Sunday, January 30, 2011 - 04:01 PM UTC
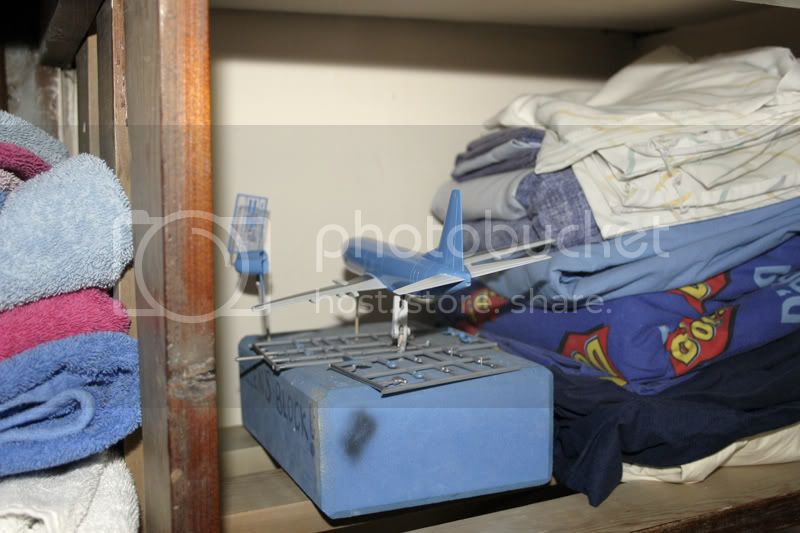
Allen labeled his foam block so Sam wouldn't use it

"From time to time, the tree of liberty must be watered with the blood of
tyrants and patriots."
- Thomas Jefferson
IPMS#47611
#042
England - North East, United Kingdom
Joined: November 18, 2006
KitMaker: 2,828 posts
AeroScale: 1,720 posts
Posted: Sunday, January 30, 2011 - 08:11 PM UTC
Actually it was from when Sam and I were with the Air Cadets. They kept 'borrowing' our blocks so we both put our names on them.
Modellers Creed: This is my toolbox. There are many like it, but this one is mine. My toolbox is my best friend. It is my life. I must master it as I must master my life. My toolbox, without me, is useless. Without my toolbox, I am useless.
#012
Wyoming, United States
Joined: November 07, 2003
KitMaker: 3,098 posts
AeroScale: 79 posts
Posted: Friday, February 04, 2011 - 01:06 PM UTC
Here is my in-progress photo #1 of the Hobbycraft Piper Cub that I am building.

I can say honestly say that I am not too impressed with this kit. My first problem is that the instructions are garbage at best. The second is that part of the fuselage next to the left wing was broken off and missing in action when the kit arrived. I didn't notice it until I started the kit and I have had it too long to return it. The third is that some of the fit isn't very good and I have had to do some "modifying" to get things to fit right.. I am very thankful for the internet so that I could have reference pictures handy or I would have been lost with some of the construction.
So I have some seams to fill and file, some scratch-building to do and then I should have another in-progress photo to share.
Thanks,
Randy
If any white man tries to destroy what is mine, or take what is mine, or take my lands, I will take my gun, get on my horse, and go punish him. Chief Low Dog - Oglala Sioux Chief
Texas, United States
Joined: February 22, 2008
KitMaker: 5,026 posts
AeroScale: 2,811 posts
Posted: Friday, February 04, 2011 - 05:38 PM UTC
Randy "Ditto on everything that you just said regarding this kit". Nice job though, how did attach the cabin brace, I was not able to figure that one out. I also have no idea of the engine essembly the instructions are no help at all. How did you assemble the engine and attach it to the firewall? Here are a few photos of where I am at with the engine.
1. I assembled the engine.
2. Cut off the cylinders.
3. Attached the block inside the cowl.
4. Stuck on what to do next.


Bob

If it aint broke dont fix it.
Alberta, Canada
Joined: March 08, 2009
KitMaker: 394 posts
AeroScale: 360 posts
Posted: Friday, February 04, 2011 - 08:06 PM UTC
Quoted Text
The third is that some of the fit isn't very good and I have had to do some "modifying" to get things to fit right..
Thus, is the way of modeling. Maybe if everything was perfect, we wouldn't do it. Keep up the good work, you'll achieve. Your Cub is coming along just fine.
Guy
Current Projects: 1/144 R5D-3 (MiniCraft)
1/48 Ford Flivver (Williams Bro.)
1/72 UC-64A Norseman (MatchBox)
MAAC No.51187
IPMS CANADA No. 3369
#012
Wyoming, United States
Joined: November 07, 2003
KitMaker: 3,098 posts
AeroScale: 79 posts
Posted: Saturday, February 05, 2011 - 05:00 AM UTC
Quoted Text
how did attach the cabin brace, I was not able to figure that one out.
Quoted Text
How did you assemble the engine
These are some good reference pictures. The top part of the cabin brace fits into the indentations in the top of the cabin next to the wings and the the two ends attach near the instrument panel. You can see this in the engine photos as well.
I assembled the main engine block and assembled the cowling around it and then added the other pieces after that had dried. I had to make the openings in the cowling longer to make the block fit correctly. I placed the firewall in the fuselage first and then glue the finished engine and cowling onto the fuselage and the end of the engine mated up the the firewall (sort of). There should be two holes for the exhaust pipes in the cowling but these are not there so they need to be drill out.
You will need to scratch build the support cables for the tail as well.

I hope that helps some Bob.
Randy
Quoted Text
Thus, is the way of modeling. Maybe if everything was perfect, we wouldn't do it.
Don't get me wrong. I am enjoying myself. I just wish Hobbycraft would have spent a little more time fine tuning the kit. I am sure the kit will look fine once it is completed.
Quoted Text
Keep up the good work, you'll achieve. Your Cub is coming along just fine.
Thank you for the kind words. I appreciate them. I plan on filling the gaps today and sanding everything down. Hopefully I will be able to get an overall base coat on it tomorrow. I think I might start the painting over and do a base coat of overall gray first and the go back and do the yellow. I wanted to "fudge" the paint scheme and paint it blue and yellow like a PA-11 but the decals I have won't work for that. So I will have to do the overall yellow I guess.
Thanks again.
Randy
If any white man tries to destroy what is mine, or take what is mine, or take my lands, I will take my gun, get on my horse, and go punish him. Chief Low Dog - Oglala Sioux Chief
#042
England - North East, United Kingdom
Joined: November 18, 2006
KitMaker: 2,828 posts
AeroScale: 1,720 posts
Posted: Saturday, February 05, 2011 - 09:58 AM UTC
I got the wings masked and the Xtracolor 'Thrifty Blue' on today. This is the shot just after removing the masking before the paint has fully cured.
After past experience with this paint (I used it on my Simpsons Jet) and the enamel taking two weeks to dry, I decided while the parents are away for the weekend to put the kit in the airing cupboard to try and speed up the drying time.
Hopefully it'll at least be touch dry by the time they get home

Modellers Creed: This is my toolbox. There are many like it, but this one is mine. My toolbox is my best friend. It is my life. I must master it as I must master my life. My toolbox, without me, is useless. Without my toolbox, I am useless.
Texas, United States
Joined: February 22, 2008
KitMaker: 5,026 posts
AeroScale: 2,811 posts
Posted: Saturday, February 05, 2011 - 10:09 AM UTC
Randy, thanks for the info. I will give it another try.
Bob
If it aint broke dont fix it.
#012
Wyoming, United States
Joined: November 07, 2003
KitMaker: 3,098 posts
AeroScale: 79 posts
Posted: Sunday, February 13, 2011 - 12:16 PM UTC
Here is my in-progress post #2 of the Hobbycraft 1/48 J-3/O-59 Piper Cub that I am building for this campaign.

Nothing too exciting has been done but I thought I would show another in-progress photo. I made a replacement piece, to replace the broken part of the fuselage, out of a plastic spoon from a McDonald's restaurant. The plastic was the right thickness and had the right angle so it worked our pretty well. I decided to prime the Piper with gray and then reapply the base coat. I am already happy that I did as it is already looking better. The down side is that I ran out of paint so I had to order more and I am hoping that it will get here sometime this week. Preferably before the weekend.

That is all for now. Thanks for looking.
Randy
PS. Glad I could be of some help Bob. Hopefully the pictures are able to answer any questions that you have.
If any white man tries to destroy what is mine, or take what is mine, or take my lands, I will take my gun, get on my horse, and go punish him. Chief Low Dog - Oglala Sioux Chief
#042
England - North East, United Kingdom
Joined: November 18, 2006
KitMaker: 2,828 posts
AeroScale: 1,720 posts
Posted: Monday, February 14, 2011 - 09:07 AM UTC
Started the decaling over the weekend and got the main decals on. These Daco/Skyline decals are reasonably thick and just wouldn't settle with Microsol, Mr Mark Softener or Daco's 'Stong' decal solvent. So I've had to slice the decals along all the panel lines and apply several applications of the decal solvents
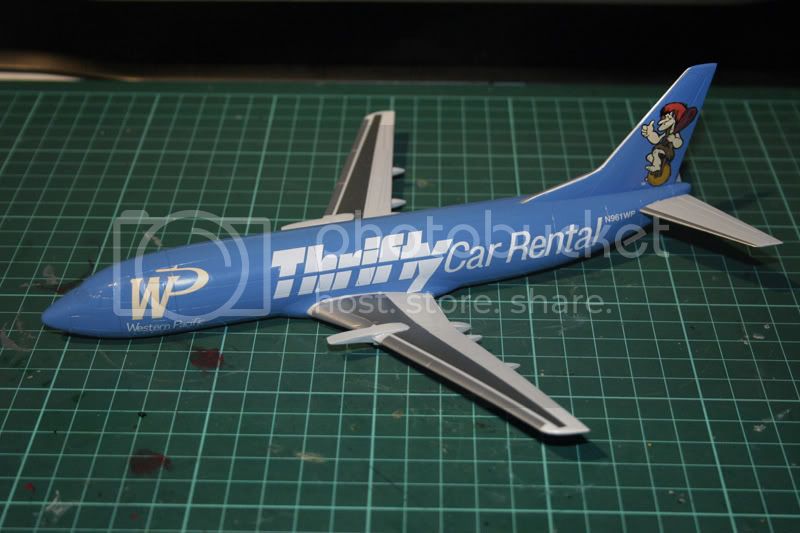
Next will be to start applying the passenger windows and stencils (the bit I hate the most)
As always critique, suggestions and comments are welcomed
Modellers Creed: This is my toolbox. There are many like it, but this one is mine. My toolbox is my best friend. It is my life. I must master it as I must master my life. My toolbox, without me, is useless. Without my toolbox, I am useless.
Texas, United States
Joined: February 22, 2008
KitMaker: 5,026 posts
AeroScale: 2,811 posts
Posted: Monday, February 14, 2011 - 07:34 PM UTC
@ Randy: it is coming along nicely. I have been using your posts as my guide with my building.
@ Allen: WOW nice paint and scheme.
Bob
If it aint broke dont fix it.
California, United States
Joined: April 01, 2002
KitMaker: 4,287 posts
AeroScale: 1,164 posts
Posted: Friday, February 18, 2011 - 01:38 AM UTC
Quoted Text
Started the decaling over the weekend and got the main decals on. These Daco/Skyline decals are reasonably thick and just wouldn't settle with Microsol, Mr Mark Softener or Daco's 'Stong' decal solvent. So I've had to slice the decals along all the panel lines and apply several applications of the decal solvents
Next will be to start applying the passenger windows and stencils (the bit I hate the most) As always critique, suggestions and comments are welcomed
Looks good Allen. When I run into that problem with pesky decals, I use a hair dryer and Solvaset. Set the hairdryer on low and warm the area for a few seconds, then apply the Solvaset to the decal. Go lightly at first as Solvaset is extremely hot and could melt your decals....test one you won't be using first to see how it is going to react. I field tested/reviewed the Daco stuff when I was with Aerospace Modeler Magazine and wasn't all that taken with it. We were sent all 3 bottles and I tried them all. Looking forward to seeing your completed kit. Love the paint scheme. "Q"
"Don't fear the night, fear what hunts at night"
Buenos Aires, Argentina
Joined: September 07, 2006
KitMaker: 918 posts
AeroScale: 688 posts
Posted: Thursday, February 24, 2011 - 10:47 AM UTC
Buenos Aires, Argentina
Joined: September 07, 2006
KitMaker: 918 posts
AeroScale: 688 posts
Posted: Thursday, February 24, 2011 - 10:50 AM UTC
Buenos Aires, Argentina
Joined: September 07, 2006
KitMaker: 918 posts
AeroScale: 688 posts
Posted: Friday, February 25, 2011 - 02:45 AM UTC
Buenos Aires, Argentina
Joined: September 07, 2006
KitMaker: 918 posts
AeroScale: 688 posts
Posted: Friday, February 25, 2011 - 02:49 AM UTC
Virginia, United States
Joined: October 16, 2009
KitMaker: 18 posts
AeroScale: 3 posts
Posted: Friday, February 25, 2011 - 08:59 AM UTC
If everybody's thinking alike, somebody isn't thinking.
Texas, United States
Joined: February 22, 2008
KitMaker: 5,026 posts
AeroScale: 2,811 posts
Posted: Friday, February 25, 2011 - 09:31 AM UTC
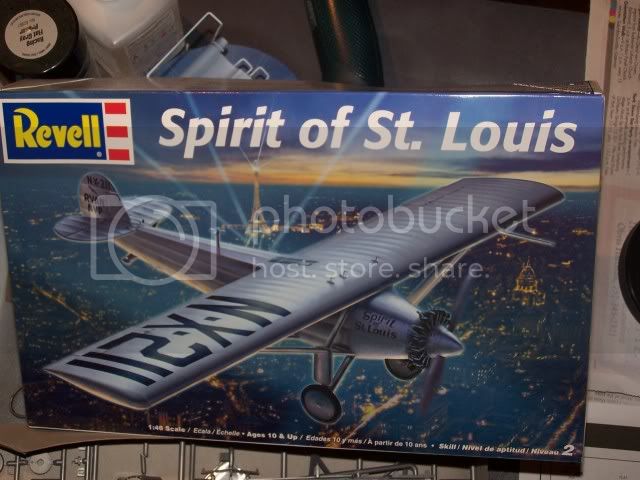
Daniel, I like the shot of the real business office and what you are doing with the kits cockpit. But the landing gear has me not wanting to build this kit. They look like they would be the parts that would go flying from my tweezers and get eaten by the carpet monster. Nice job with what to me looks like a tough assembly process.
Bob
If it aint broke dont fix it.
Buenos Aires, Argentina
Joined: September 07, 2006
KitMaker: 918 posts
AeroScale: 688 posts
Posted: Friday, February 25, 2011 - 10:32 AM UTC
Buenos Aires, Argentina
Joined: September 07, 2006
KitMaker: 918 posts
AeroScale: 688 posts
Posted: Friday, February 25, 2011 - 10:34 AM UTC
#012
Wyoming, United States
Joined: November 07, 2003
KitMaker: 3,098 posts
AeroScale: 79 posts
Posted: Thursday, March 03, 2011 - 09:53 AM UTC
Well here is in-progress post #3 of my project.

I finished up the painting, applied the decals and clear coated everything. I just need to add the windshield pieces and it will be finished. I am working on a base for it as well and I hope it will look like I want it to.
Anyway I should have my final post in a day or two. I just wanted to show where I am at with it.
Thanks,
Randy
If any white man tries to destroy what is mine, or take what is mine, or take my lands, I will take my gun, get on my horse, and go punish him. Chief Low Dog - Oglala Sioux Chief