OFFICIAL: Civilian Planes Only Campaign

#012
Wyoming, United States
Joined: November 07, 2003
KitMaker: 3,098 posts
AeroScale: 79 posts
Posted: Friday, March 04, 2011 - 05:56 AM UTC
Well I am going to call my entry complete. I finished everything up last night.
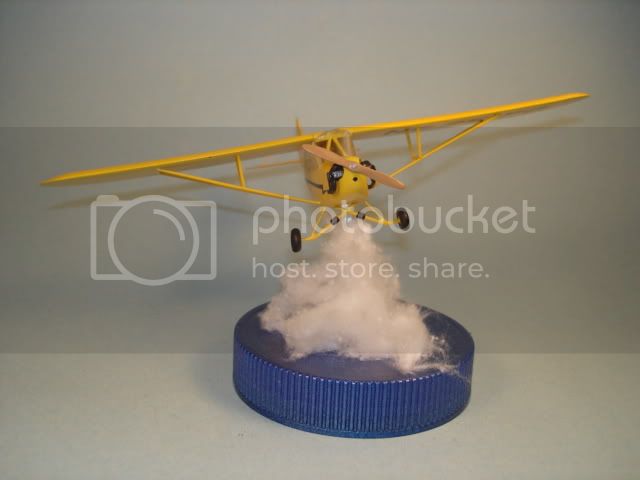


I made the base out of a peanut butter jar lid with a piece of clear sprue for a support and cotton balls for the cloud. Far from perfect I know but then again I usually don't build aircraft kits. However I did have fun with it.
Thanks for the campaign Bruce (and Jim).
Randy

If any white man tries to destroy what is mine, or take what is mine, or take my lands, I will take my gun, get on my horse, and go punish him. Chief Low Dog - Oglala Sioux Chief
Texas, United States
Joined: February 22, 2008
KitMaker: 5,026 posts
AeroScale: 2,811 posts
Posted: Friday, March 04, 2011 - 06:41 AM UTC
Randy, nice job on the CUB.
1. what yellow did you use?
2. what sequence did you use to do the major paint? wings on with or without the struts?
3. kit decals? If so were they ok?
4. canopy, white glue or Testors clear parts glue?
5. clear gloss coat on top of everything?
Again nice job, hope you enjoyed the build.
Bob
If it aint broke dont fix it.
#012
Wyoming, United States
Joined: November 07, 2003
KitMaker: 3,098 posts
AeroScale: 79 posts
Posted: Friday, March 04, 2011 - 01:21 PM UTC
Thank you Bob, I appreciate the kind words.
Here are the answers to your questions.
Quoted Text
1. what yellow did you use?
Tamiya Chrome Yellow - TS-47
Quoted Text
2. what sequence did you use to do the major paint? wings on with or without the struts?
I painted the interior first and clear coated it. I then assembled the entire aircraft and primed it with Tamiya primer. Then I painted everything with the yellow and then went back and painted the details.
Quoted Text
3. kit decals? If so were they ok?
I used the kit decals and I was happy with them. They are strong and didn't tear apart when I applied them. I was worried about the lightning bolt ripping but it went on with no problems. The Piper emblem is in two parts which I don't understand. There is the main decal and then you have to add a top decal which is nothing but a black outline. The end result is nice but I don't know why they didn't add the outline to the main decal.
Quoted Text
4. canopy, white glue or Testors clear parts glue?
I actually used 5-minute epoxy.
Quoted Text
5. clear gloss coat on top of everything?
Yep.
I was originally going to paint it blue and yellow to look like a PA-11 but I would have needed yellow decals to put on the blue so I had to change my plans. I know you were originally curious about what my color scheme was going to be since we are building the same aircraft. I hope I didn't foul up your plans.
Anyway thanks again and I hope I answered everything for you.
Randy
If any white man tries to destroy what is mine, or take what is mine, or take my lands, I will take my gun, get on my horse, and go punish him. Chief Low Dog - Oglala Sioux Chief
Buenos Aires, Argentina
Joined: September 07, 2006
KitMaker: 918 posts
AeroScale: 688 posts
Posted: Saturday, March 05, 2011 - 02:13 AM UTC
Texas, United States
Joined: February 22, 2008
KitMaker: 5,026 posts
AeroScale: 2,811 posts
Posted: Saturday, March 05, 2011 - 04:01 AM UTC
Randy, nice job on the CUB. You have given me some insight on how to do what I wanted to accomplish, as to the color I was going to try and finish mine in the shceme of the (2) that I remember from a little airfield in Dallas, TX. They did not have the extra design on the sides of the a/c just the NC numbers.
Bob
If it aint broke dont fix it.
#501
Kerala, India / भारत
Joined: August 25, 2009
KitMaker: 292 posts
AeroScale: 194 posts
Posted: Saturday, March 05, 2011 - 06:24 PM UTC
Returned to the workbench after almost 3 months. Trying to play catch up the the various campaigns that i signed up for.
Present status of my entry : Decaling work in progress. Next Step would be some weathering

@Allen
Wish my plane looked as good as yours. What color did you use for the light grey / tan of the wing???
#042
England - North East, United Kingdom
Joined: November 18, 2006
KitMaker: 2,828 posts
AeroScale: 1,720 posts
Posted: Saturday, March 05, 2011 - 11:12 PM UTC
Quoted Text
@Allen
Wish my plane looked as good as yours. What color did you use for the light grey / tan of the wing???
I used Xtracolors Boeing Grey (X301) enamel
Modellers Creed: This is my toolbox. There are many like it, but this one is mine. My toolbox is my best friend. It is my life. I must master it as I must master my life. My toolbox, without me, is useless. Without my toolbox, I am useless.
New Hampshire, United States
Joined: November 09, 2008
KitMaker: 615 posts
AeroScale: 459 posts
Posted: Tuesday, March 08, 2011 - 03:59 AM UTC
Hi all, I'm back!

I can't beleive it's been 2 months since my last post here. Most of the time was because my computer and all my modeling "stuff" has been in storage while my wife and I looked for a new place to live and new jobs. We are now in Vero Beach Florida (sorry Justin but you will have to look left instead of right now when we talk

) I just love this recession

On to the main topic. Assembly is now complete. Windows are masked and it is ready for the paint box...wait that is still in storage...on to the great outdoors!
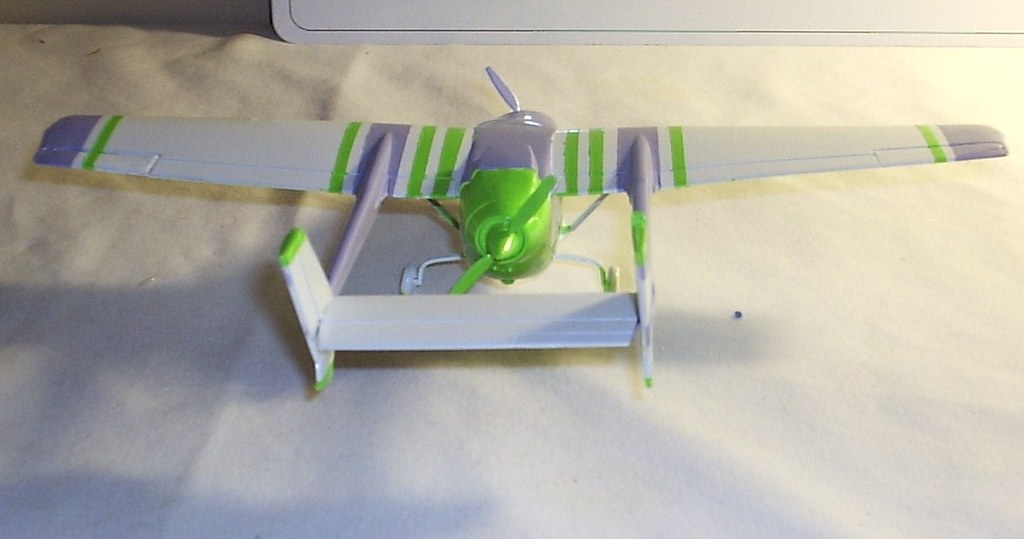
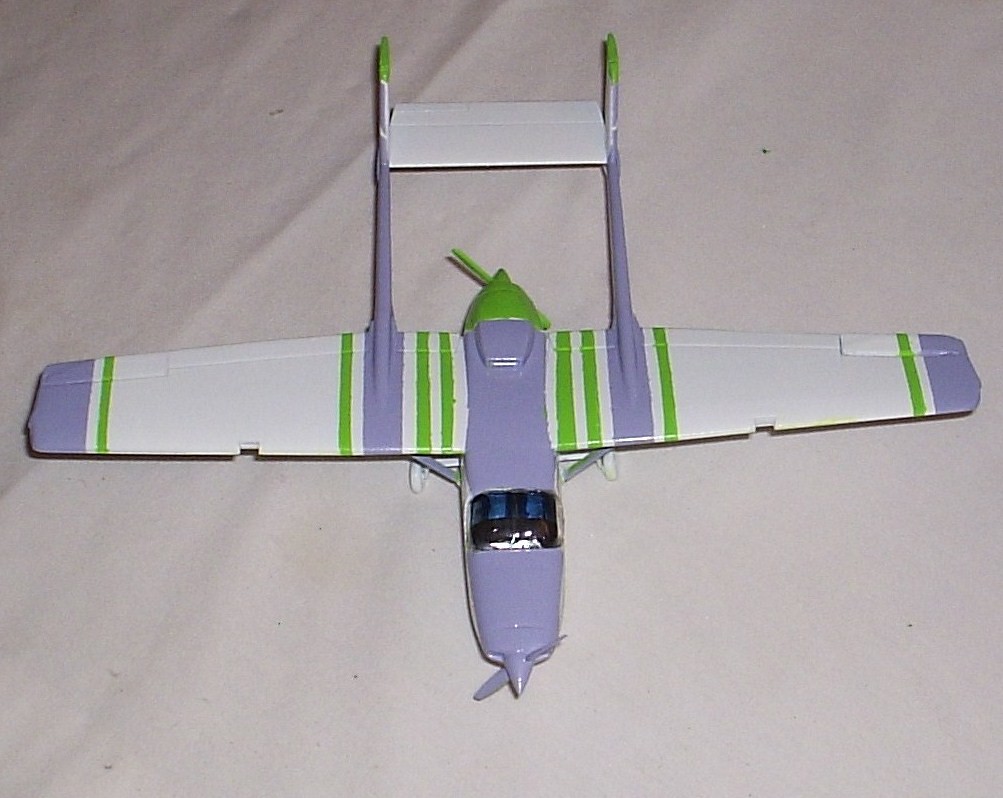
This is what she looks like now:
Next come the colour coats. I wanted to do this in red, white and blue, like the first one I saw in Springfield Vt many years ago. Then I thought, what the heck, I'm in Florida now, so I thought I'd use the same patteren, but do it in tropical (pastel) colours. When I got to the LHS here, he didn't have the colours I was looking for!
So I picked up white, lavander and chartruesse
We will see what we will see
Later
P-61 Black Widows, the Group Build
Veni, Vidi, Velcro; I came, I saw, I stuck around
Buenos Aires, Argentina
Joined: September 07, 2006
KitMaker: 918 posts
AeroScale: 688 posts
Posted: Saturday, March 12, 2011 - 03:35 AM UTC
Scotland, United Kingdom
Joined: February 07, 2008
KitMaker: 1,699 posts
AeroScale: 1,384 posts
Posted: Monday, March 14, 2011 - 11:45 AM UTC
Decided I needed to join the fun. Also thought I'd best complete some of the campaigns I've already entered before starting new ones.
So started on the old Otaki.Entex?Matchbox Do-X.
I did have great plans to detail the interior. But time is too short these days to get bogged down. Esp when the effort/reward is so low.
A couple of hours sees the fuselage glued. Plenty of seam cleanup todo yet.
Just painted the inside of the passenger windows black and added floor and bulkhead again painted black for the flight deck.

The moulds are quite crisp and nice engraved detail too. I'm not convinced about the plastic though. Seems quite brittle and many of the props are broken.
Can't be too hard to simulate a prop in 1/144 ther are bloody loads of them though.
Texas, United States
Joined: February 22, 2008
KitMaker: 5,026 posts
AeroScale: 2,811 posts
Posted: Monday, March 14, 2011 - 12:50 PM UTC
JP
Great choice for a build, how long have you had the kit in your stash?
Bob
If it aint broke dont fix it.
Scotland, United Kingdom
Joined: February 07, 2008
KitMaker: 1,699 posts
AeroScale: 1,384 posts
Posted: Monday, March 14, 2011 - 09:18 PM UTC
Thank, probably a year. I'm running the stash down.
Having it there is too daunting. And at the pace I build it's becoming a monster. Best clear it out then only have a stash of 1. That's the aim.
Of course that 1 would have to be a 1/24 lancaster
New Hampshire, United States
Joined: November 09, 2008
KitMaker: 615 posts
AeroScale: 459 posts
Posted: Thursday, March 17, 2011 - 12:01 AM UTC
P-61 Black Widows, the Group Build
Veni, Vidi, Velcro; I came, I saw, I stuck around
#042
England - North East, United Kingdom
Joined: November 18, 2006
KitMaker: 2,828 posts
AeroScale: 1,720 posts
Posted: Saturday, March 19, 2011 - 11:42 AM UTC
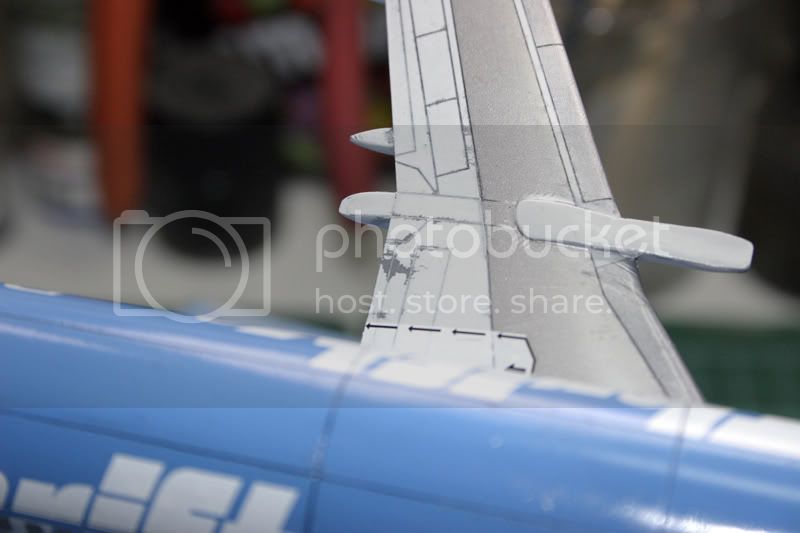
Finally finished my 737 to today after applying the panel wash and all the tiny etch (I thought etch in 1/48 was bad) any way here are the pictures

Unfortunately the wash pulled off some of the Boeing grey in places but I feel it adds to the weathering
and the finished product

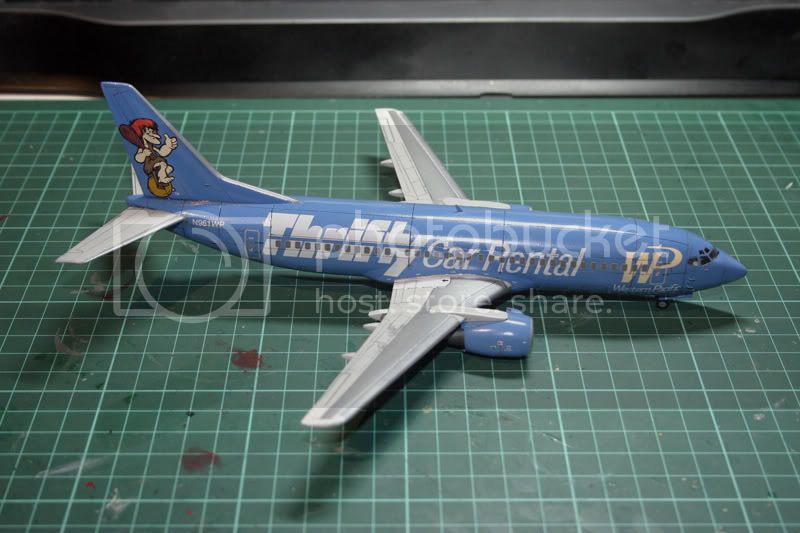
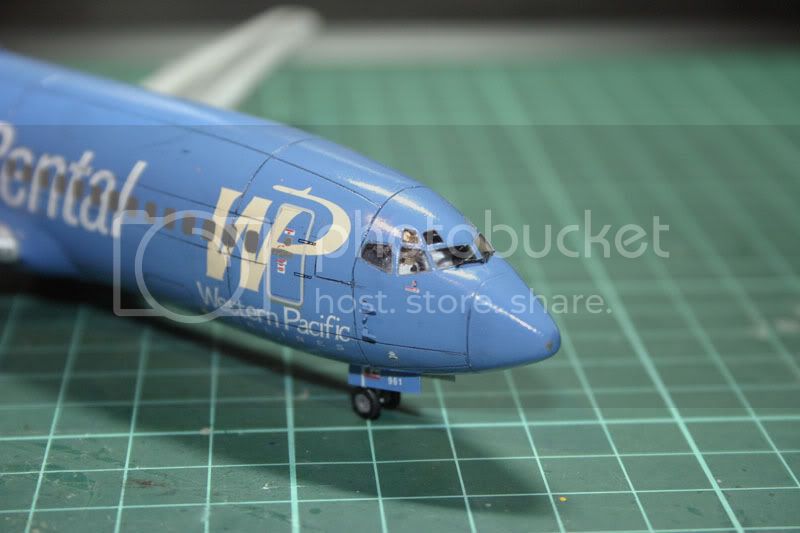
I'll get some proper photos tomorrow in the daylight and upload them then
As always comments and critique are always welcomed
Modellers Creed: This is my toolbox. There are many like it, but this one is mine. My toolbox is my best friend. It is my life. I must master it as I must master my life. My toolbox, without me, is useless. Without my toolbox, I am useless.
Tennessee, United States
Joined: September 20, 2005
KitMaker: 1,747 posts
AeroScale: 1,673 posts
Posted: Saturday, March 19, 2011 - 12:41 PM UTC
Allen, great looking 73 there. I bought one a couple of months ago with Piedmont decals, a local airline which was based here in the southeastern U.S.. Hope to get it going soon. Again, great work. Russell
To Thine Own Self Be True
Siderius
A.K.A., RTA
Tennessee, United States
Joined: September 20, 2005
KitMaker: 1,747 posts
AeroScale: 1,673 posts
Posted: Saturday, March 19, 2011 - 12:42 PM UTC
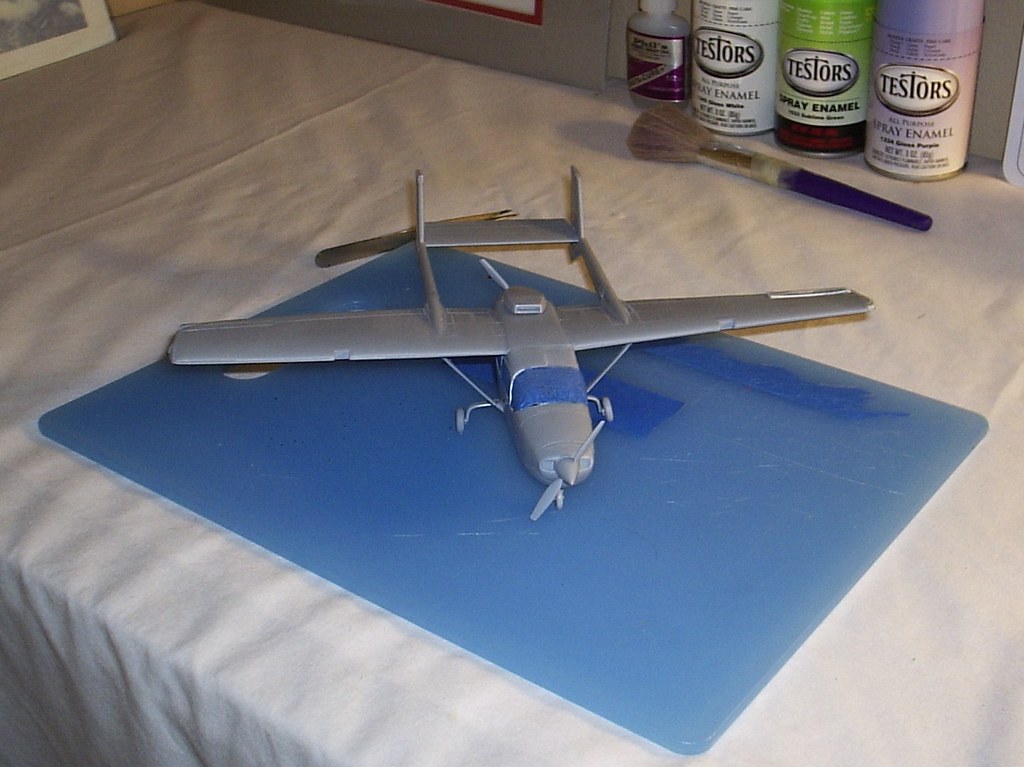
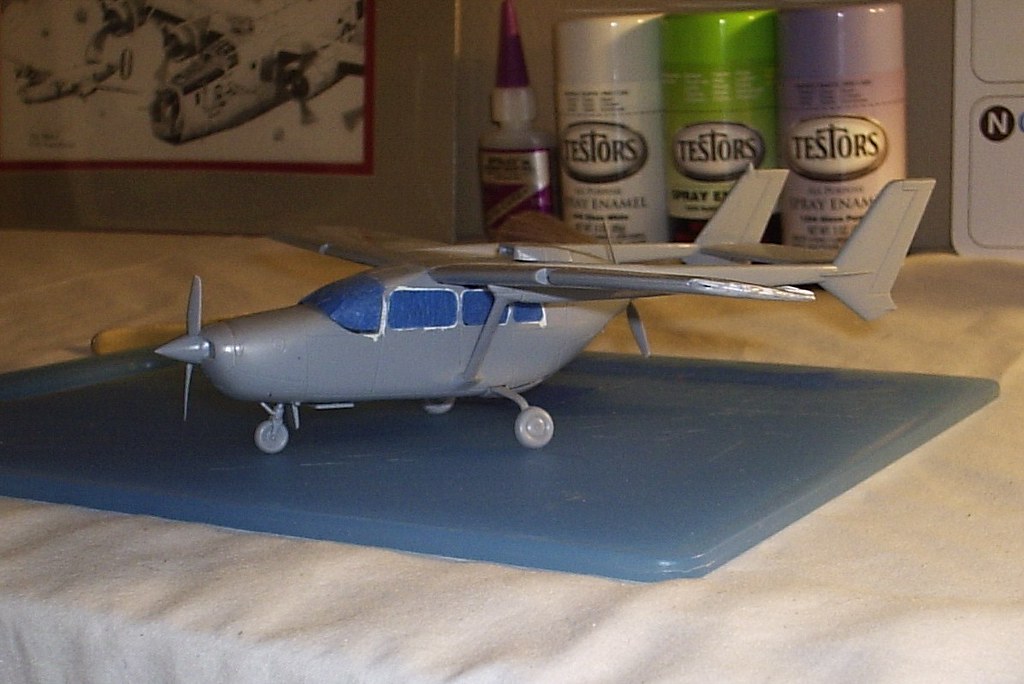
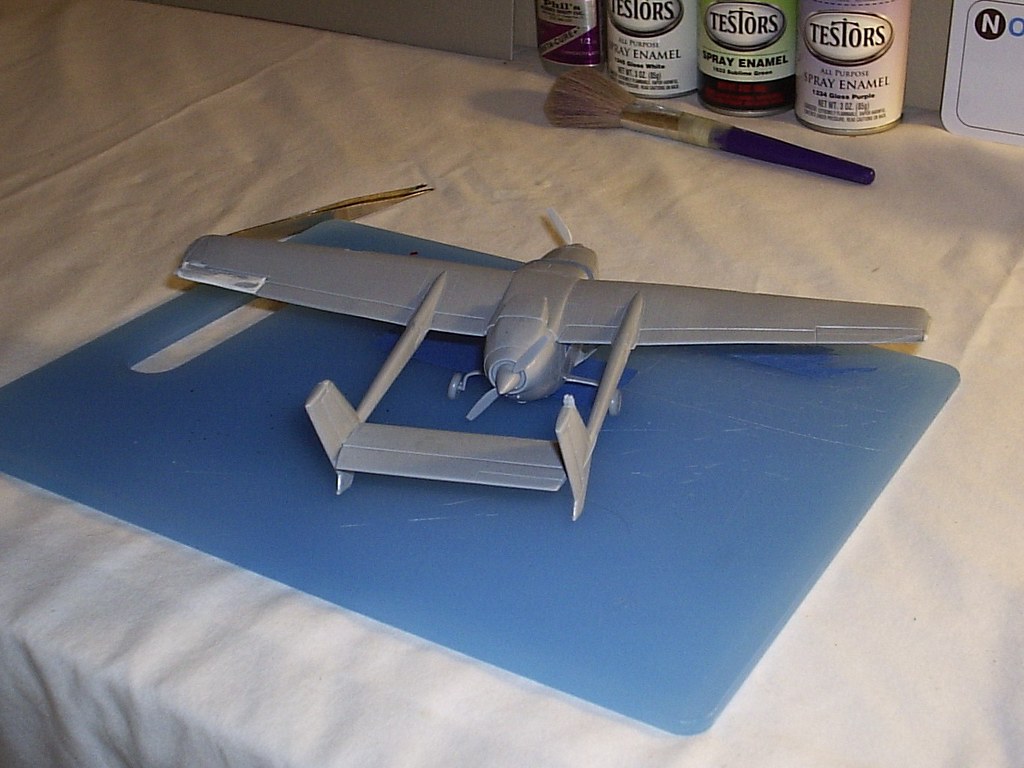
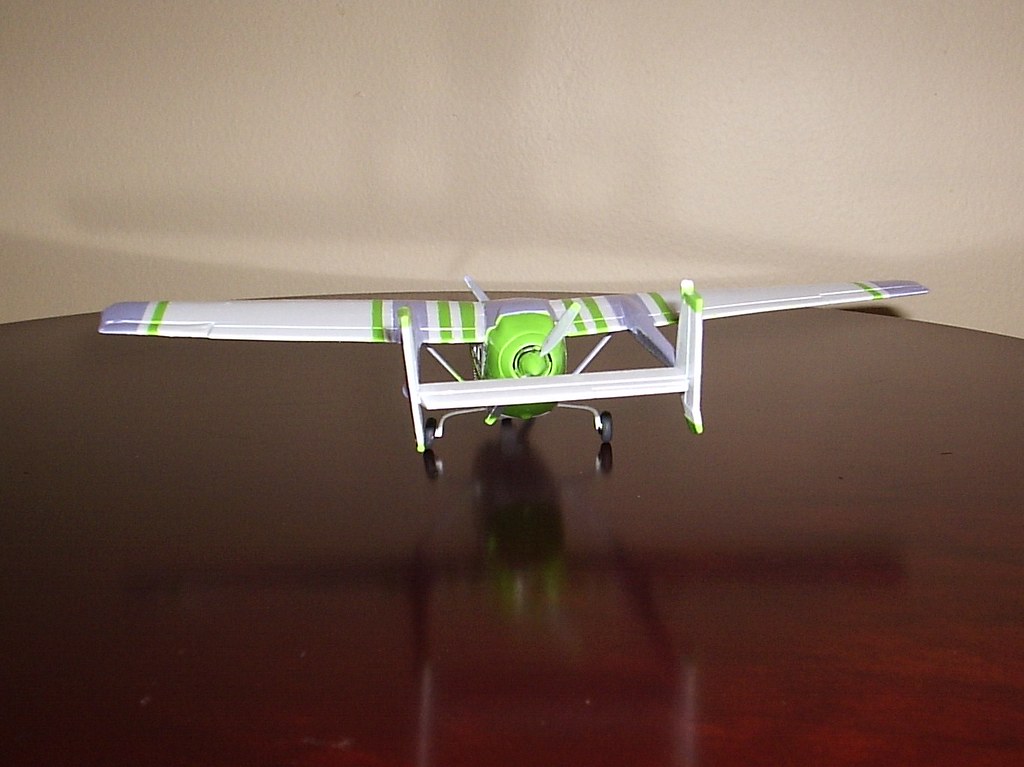
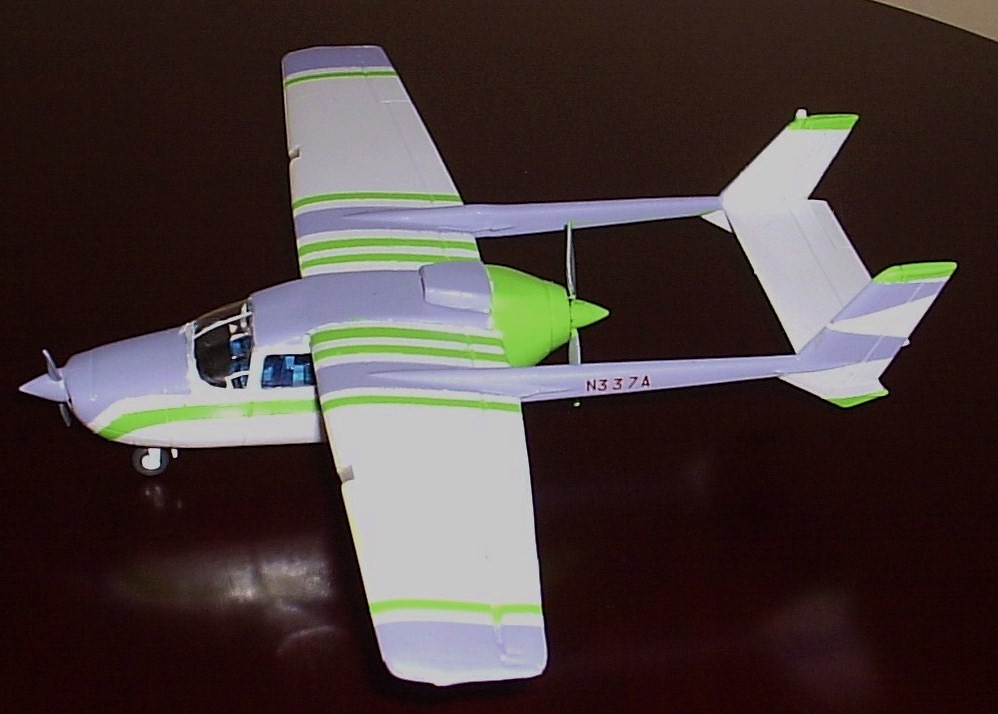
Bruce, I like the Cessna 337. I believe it is the only multi-engine aircraft you can fly with a single engine rating due to the inline, centerline thrust of the two engines. Neat job. Russell
To Thine Own Self Be True
Siderius
A.K.A., RTA
New Hampshire, United States
Joined: November 09, 2008
KitMaker: 615 posts
AeroScale: 459 posts
Posted: Tuesday, March 22, 2011 - 01:40 AM UTC
Hi Russell and thank you. I'm not sure about single engine ratings being able to fly the 337, but I do know that it is the only plane that could fly on one engine with no performance degradation.
Any way, I'm calling this Testors beastie DONE!


Now this poor thing goes into storage...never to be seen again

Now, onto the Spitfire Campaign!
Later
P-61 Black Widows, the Group Build
Veni, Vidi, Velcro; I came, I saw, I stuck around
Virginia, United States
Joined: October 16, 2009
KitMaker: 18 posts
AeroScale: 3 posts
Posted: Tuesday, March 22, 2011 - 06:02 AM UTC
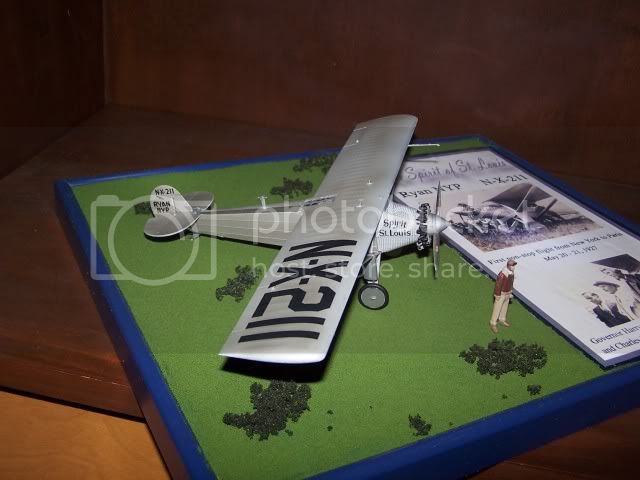
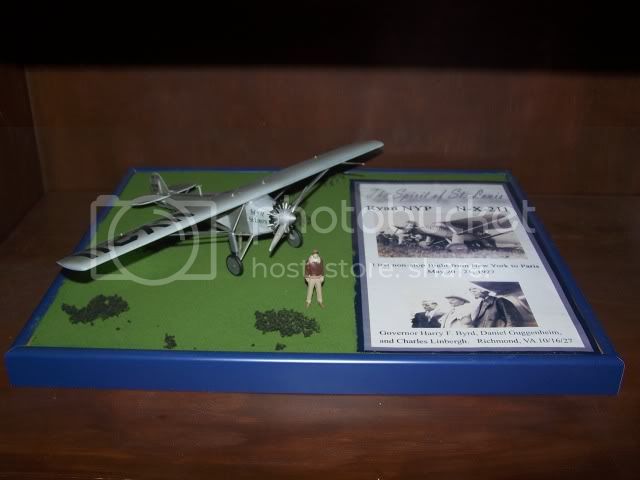
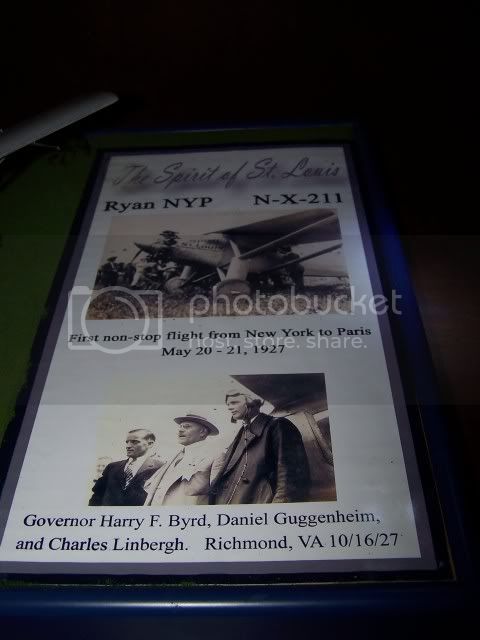
Just started a new job so my free time is scarce but I did manage to finish the Sprit of St Louis. I wanted to do more with the display but I just dont have the time right now. I did manage to include my great aunt's pictures taken during Lindbergh's trip through Richmond, VA celebrating his flight.
This is actually my first completed campaign. Enjoyed it and hope to take part in more when time permits.
If everybody's thinking alike, somebody isn't thinking.
Buenos Aires, Argentina
Joined: September 07, 2006
KitMaker: 918 posts
AeroScale: 688 posts
Posted: Sunday, April 17, 2011 - 05:13 AM UTC
Here I put the landing hear in their hole,


Buenos Aires, Argentina
Joined: September 07, 2006
KitMaker: 918 posts
AeroScale: 688 posts
Posted: Sunday, April 17, 2011 - 05:17 AM UTC
Buenos Aires, Argentina
Joined: September 07, 2006
KitMaker: 918 posts
AeroScale: 688 posts
Posted: Wednesday, April 20, 2011 - 10:40 AM UTC
Buenos Aires, Argentina
Joined: September 07, 2006
KitMaker: 918 posts
AeroScale: 688 posts
Posted: Thursday, April 21, 2011 - 02:24 PM UTC
British Columbia, Canada
Joined: September 03, 2009
KitMaker: 6,965 posts
AeroScale: 6,247 posts
Posted: Tuesday, May 03, 2011 - 11:49 AM UTC
Hi all,
I'm chiming in very late but still within sight of finishing
I had planned on entering an Frsin Brabazon in 1/144 that I'd coincidentally started around about the time the campaign began but I see I've disqualified myself by already starting it without having taken pictures of the unassembled parts. Oh well.
Therefore my kit will be a DACO 737-500 finished with Two Siz decals'
Braathens Sommerflyet special scheme .
Now as soon as I can find where my camera has hidden itself I'll see about getting some pictures up.
J
When once you have tasted flight you will walk the Earth with your eyes turned skyward.
For there you have been, and there you will always long to return.
-Leonardo Da Vinci
#042
England - North East, United Kingdom
Joined: November 18, 2006
KitMaker: 2,828 posts
AeroScale: 1,720 posts
Posted: Wednesday, May 04, 2011 - 09:02 AM UTC
Welcome to the campaign and Aeroscale
Although most campaigns would like for progress photos to be posted I have noticed in the past that this is not always the case. I for one don't always remember to post the kit before starting so don't discount yourself with out asking on the campaign forum.
Cheers
Allen
Modellers Creed: This is my toolbox. There are many like it, but this one is mine. My toolbox is my best friend. It is my life. I must master it as I must master my life. My toolbox, without me, is useless. Without my toolbox, I am useless.
British Columbia, Canada
Joined: September 03, 2009
KitMaker: 6,965 posts
AeroScale: 6,247 posts
Posted: Wednesday, May 04, 2011 - 10:22 AM UTC
Okay, I have pictures now
I'll post the 737 and the Brabazon and throw myself upon the mercy of the campaign membership

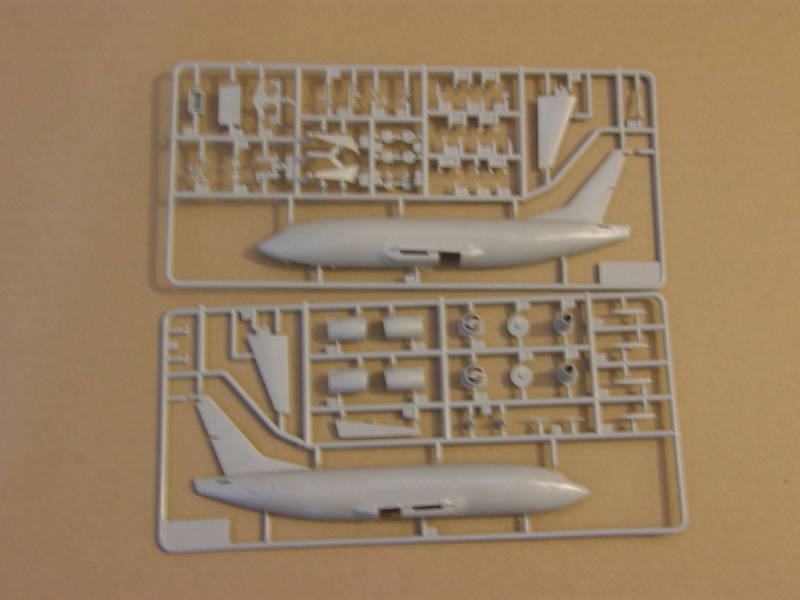
Here's the DACO Skyline kit:
Fuselage sprues:
Wing sprues:

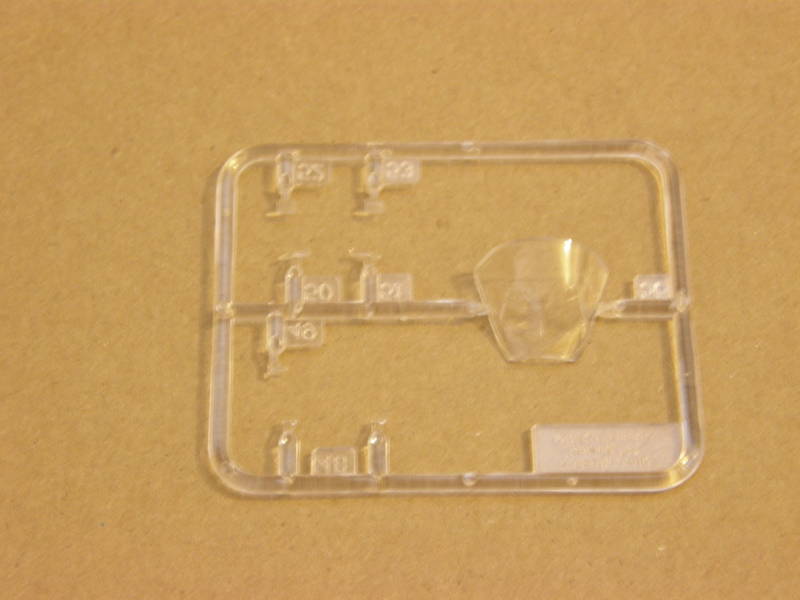
Clear parts:
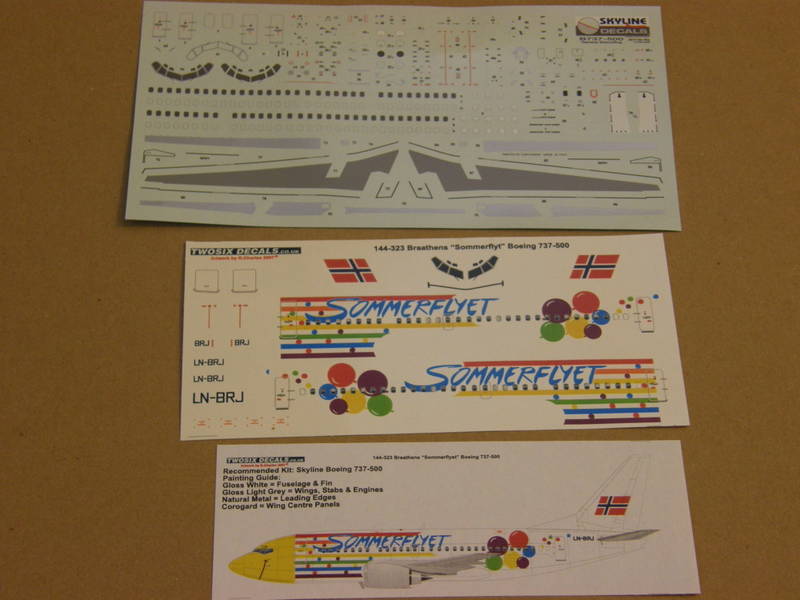
Decal sheets. Top is the very complete detail sheet from the DACO kit, bottom is the Two Six Decals Braathens sheet and instructions
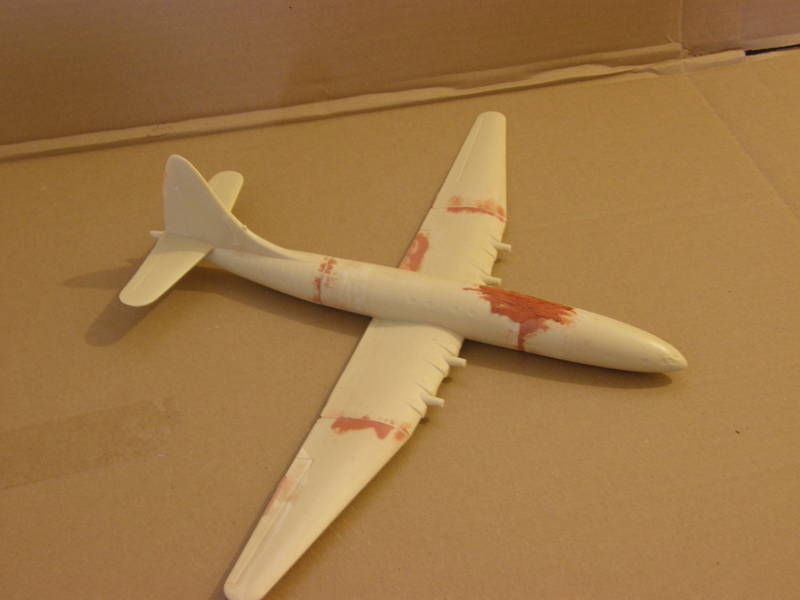
Frsin's Brabazon as it stands today. My kit arrived with a very chopped up trailing edge. I've had to fill it in with 2-part Dental casting resin, and there's more to do. In addition, the surface is very lumpy. I think it was an attempt to show the framework under the skin, but if so, it's quite out of scale and not very consistent. I'll need to sand down the entire model to make it smoother.
As can be seen, there are also fit problems here and there. All in all, this is not a "shake the box" kit. But I live for these challenges

Here's the Brabazon with the 737 fuselage perched on the wing for a size comparisson:

When once you have tasted flight you will walk the Earth with your eyes turned skyward.
For there you have been, and there you will always long to return.
-Leonardo Da Vinci