I updated the P-40 list by merging the Kits into the spread sheet. I've got some decals to chase, but I hope to get an update posted this week.
Hanger Queens in Waiting:
Monogram 1/72 F8F-1
Corsair the Sky Pirate - 1/72 Ace A-7D
Century Series - Airfix 1/72 F-105G
Anti Shipping - Academy 1/72 PBJ-1D
Academy 1/72 F-84E
Bigrip74
Texas, United States Joined: February 22, 2008
KitMaker: 5,026 posts
AeroScale: 2,811 posts
Mark, from what you see here is there a cockpit that will help me? I know that some A/M wheels, prop, and cockpit would give this vintage a better look. The cockpit has been started, but it is nasty
Bob
If it aint broke dont fix it.
md72
#439
Washington, United States Joined: November 05, 2005
KitMaker: 4,950 posts
AeroScale: 3,192 posts
Nothing for th Otaki / Arii cockpit. Avionix/ Black Box and CMK do resin cockpits for the Hase P-40E. Ultracast does cast seats for P-40E's with US style or no harnesses. Eduard does lots of brass, but none for Otaki. Squadron does 1/48 canopies for athe Arii version. Hope it helps.
Hanger Queens in Waiting:
Monogram 1/72 F8F-1
Corsair the Sky Pirate - 1/72 Ace A-7D
Century Series - Airfix 1/72 F-105G
Anti Shipping - Academy 1/72 PBJ-1D
Academy 1/72 F-84E
Bigrip74
Texas, United States Joined: February 22, 2008
KitMaker: 5,026 posts
AeroScale: 2,811 posts
Ok! I was a good boy and got to play some more on my Otaki P-40E
Here I did a little work on the cockpit/engine
The Otaki seat was thrown into the trash, here are seats from an old AMT P-40 and a True Details P-40 bag. now to see which one fits the best.
I used the exhaust from an Academy P-40 B/C which came with open ends. May not be correct, but sure looks cool.
The interior showing the exhaust covered with some sheet plastic glued in place for support (other wise the exhaust fell out).
Another problem was the wing fit, I inserted plastic wedges to bring the wing up to meet the fuselage and lessen the need for putty.
I will post the success or failure of my attempts at reducing the need for putty at the wing root. This does not count for the campaign ribbon, I just could not sit and watch TV (wasted time) so I took out the trash, washed the dishes and was able to play some more. ENJOY!
Bob
If it aint broke dont fix it.
md72
#439
Washington, United States Joined: November 05, 2005
KitMaker: 4,950 posts
AeroScale: 3,192 posts
Be careful Bob, all this good behavior is liable to get us in trouble.
Kinsey claims that early P-40E's had round exhausts that were replaced with the 'fish tails'. No S/N guidance, but it could have been a field upgrade, so check your references!
Hanger Queens in Waiting:
Monogram 1/72 F8F-1
Corsair the Sky Pirate - 1/72 Ace A-7D
Century Series - Airfix 1/72 F-105G
Anti Shipping - Academy 1/72 PBJ-1D
Academy 1/72 F-84E
Bigrip74
Texas, United States Joined: February 22, 2008
KitMaker: 5,026 posts
AeroScale: 2,811 posts
Mark, if it comes down to it I will use a hot xacto blade and modify the exhaust. As for the rest of you, and your chores that is not my problem I did mine
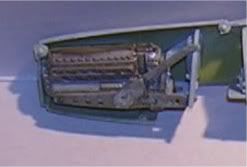
Bob
If it aint broke dont fix it.
md72
#439
Washington, United States Joined: November 05, 2005
KitMaker: 4,950 posts
AeroScale: 3,192 posts
Do you think it's cause of the P-40 to P-51 heriatage link or Arii's tool maker?
Hanger Queens in Waiting:
Monogram 1/72 F8F-1
Corsair the Sky Pirate - 1/72 Ace A-7D
Century Series - Airfix 1/72 F-105G
Anti Shipping - Academy 1/72 PBJ-1D
Academy 1/72 F-84E
Bigrip74
Texas, United States Joined: February 22, 2008
KitMaker: 5,026 posts
AeroScale: 2,811 posts
Mark the bottom line dictates if you produce different engines or if you save money by using what is at hand. Most people (the average joe) would not know the difference anyway. Hey I was a good boy again I fixed some ones computer and had some more time at the bench.
True Details seat for a P-40 painted interior apple green with a wash and waiting for a flat coat to make it look pretty
Otaki's barren cockpit with some interior apple green, detail colors, and wash. Again waiting for a flat coat.
The right and left fusleage interior waiting for the flat coat.
Critisim welcome,
Bob
If it aint broke dont fix it.
AussieReg
Associate Editor AUTOMODELER
#007
Victoria, Australia Joined: June 09, 2009
KitMaker: 8,156 posts
AeroScale: 3,756 posts
ON the bench
Revell 1/24 '53 Corvette (building as '54)
Revell 1/24 BMW 507 Coupe and Cabrio
Italeri 1/48 Me262 B-1a/U1 Nightfighter
Monogram 1/24 '57 Chevy Nomad
Dragon 1/350 USS Frank Knox DD-742
Bigrip74
Texas, United States Joined: February 22, 2008
KitMaker: 5,026 posts
AeroScale: 2,811 posts
D. how do you clean, cynoacrilite, epoxy, putty, testors glue, melted plastic, miliputty, and paint from your board. Mine still retains the mess and keeps on ticking. The real treat was when Ko Sprue instructed me in how to use my camera (for the first, no manual) now I am able to take close ups so my building needs to be on a higher level than before since the photos will show my every mistake with better close ups
Bob
If it aint broke dont fix it.
md72
#439
Washington, United States Joined: November 05, 2005
KitMaker: 4,950 posts
AeroScale: 3,192 posts
There was a line from Groucho I wanted to put here, but I can't find it.
Looks good. Considering the age of the Arii kit, that's a lot of good detail. They even got the curve of the cockpit floor in there. Making my Heller look worse all the time.
Hanger Queens in Waiting:
Monogram 1/72 F8F-1
Corsair the Sky Pirate - 1/72 Ace A-7D
Century Series - Airfix 1/72 F-105G
Anti Shipping - Academy 1/72 PBJ-1D
Academy 1/72 F-84E
Bigrip74
Texas, United States Joined: February 22, 2008
KitMaker: 5,026 posts
AeroScale: 2,811 posts
Mark, working in 1/72 is a world of its own and what you have done so far is great. I thought of placing ribbing in the wheel well after looking at your Heller WIP. And find that line from Groucho please
Bob
If it aint broke dont fix it.
Bigrip74
Texas, United States Joined: February 22, 2008
KitMaker: 5,026 posts
AeroScale: 2,811 posts
Attached the fuselage halves together and they did not seem warped before I started the build. The kit has locater pins, but acted as if there were none by shifting. I glued some small plastic sheet pieces to help with alignment which helped a little. Here are some pictures of the mess awaiting (filing, putty, and sanding) when the glue dries.
Here I painted the leading and trailing edges to see what needed more attention. The fuselage Here was the area that gave me the most trouble, I had to keep shaving plastic from the former inside that held the engine. Here you can see the cockpit is not completely attached to the rear of the fuselage. It would not go in any other way, so I attached the front and will glue the rear after the fuselage halves are dry. Again you can see the cockpit from the top. I do not remember having this much fit trouble with an Otaki kit in the past, either the molds have become bad, the plastic chosen is not up to par, or its just me 
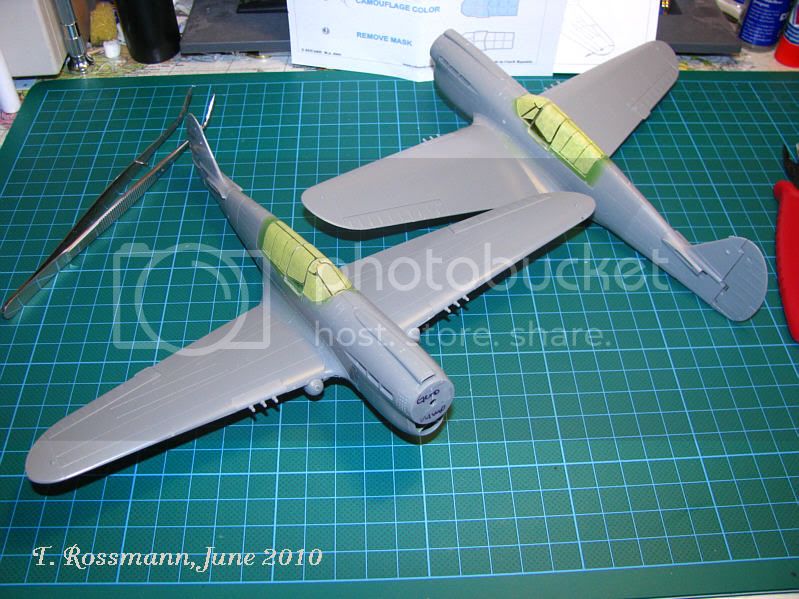
. I used Vallejo to paint the grey on the wings and was suprised at how easy it was to apply and how fast it dried.
Bob
If it aint broke dont fix it.
Bigrip74
Texas, United States Joined: February 22, 2008
KitMaker: 5,026 posts
AeroScale: 2,811 posts
Putty time! nasty stuff, I taped off the area after seeing the process here. There is still a lot of fine touch up to accomplish. notice the bad area still present.
Bob
If it aint broke dont fix it.
md72
#439
Washington, United States Joined: November 05, 2005
KitMaker: 4,950 posts
AeroScale: 3,192 posts
I hate that nose divot. My Heller one has a divot under the spinner and one infront of the nose intake. I covered it in Mr. Surfacer and wrapped sandpaper around a file handle to work it out.
Hanger Queens in Waiting:
Monogram 1/72 F8F-1
Corsair the Sky Pirate - 1/72 Ace A-7D
Century Series - Airfix 1/72 F-105G
Anti Shipping - Academy 1/72 PBJ-1D
Academy 1/72 F-84E
BlackWidow
European Union Joined: August 09, 2009
KitMaker: 1,732 posts
AeroScale: 1,336 posts
Hey Bob, I also work on 2 Warhawks at the moment. Actually I planned both for this campaign if it would start in 2010. It's that great 1:48 Hasegawa kit and as usual I build a dual combo. One will become a member of the 89. FS with a skull on the cowling, the other one will be "Geronimo" of the 45. FS. I hope they will be ready for take off for the Leipzig Expo in 4 weeks. I just finished masking the canopies ....
Happy modelling Torsten
My campaigns for 2020:
MiGs - Done !
The Big Three - Done !
65 years Bundeswehr - Done !
40 years Leopard 2 - Done !
Land Lease - Done !
Bigrip74
Texas, United States Joined: February 22, 2008
KitMaker: 5,026 posts
AeroScale: 2,811 posts
Hello Torsten, nice job so far. Are the a/c both "N" models or is one an "M" with the later canopy. I like the way that you have installed the canopies, what was used for their attachment and did you need to use any filler at the bases? There is no putty shown in my photos, or are you that good and how do you accomplish such clean seem lines? Please post more photos as your build progresses, others building technique helps me as well as others. Good on the Leipzig Expo. I have not put any real considreration into my build for the campaign, but I am leaning towards the F/L model. what will be your build for the campaign? Cant wait!
Bob
If it aint broke dont fix it.
BlackWidow
European Union Joined: August 09, 2009
KitMaker: 1,732 posts
AeroScale: 1,336 posts
Hey Bob, thanks for your compliments. but I'm just an average builder. I try my best but others sure do better .... Both a/c are "N-5" and I always use furniture glue for the canopies which I have masked with Eduard mask EX113. This Hasegawa kit is probably the best 1:48 P-40 kit of them all. Here I don't need any filler just a bit of sanding, that's all. Everything fits perfectly. These Warhawks will be my Nos. 5 and 6. For the campaign I have planned a Tomahawk Mk. II of No. 112 Sqn, as it was flown by the Australian Jack Bartle. The other one will be another "N-5" of the NEIAF (former KNIL). Surely a bit exotic. So another double pack ....
Happy modelling Torsten
My campaigns for 2020:
MiGs - Done !
The Big Three - Done !
65 years Bundeswehr - Done !
40 years Leopard 2 - Done !
Land Lease - Done !
md72
#439
Washington, United States Joined: November 05, 2005
KitMaker: 4,950 posts
AeroScale: 3,192 posts
What are you referring to as 'furniture glue'? I'm guessing it's a white PVA (Polyvinyl acetate), a water based glue used by carpenters and woodworkers that dries clear.
Hanger Queens in Waiting:
Monogram 1/72 F8F-1
Corsair the Sky Pirate - 1/72 Ace A-7D
Century Series - Airfix 1/72 F-105G
Anti Shipping - Academy 1/72 PBJ-1D
Academy 1/72 F-84E
Bigrip74
Texas, United States Joined: February 22, 2008
KitMaker: 5,026 posts
AeroScale: 2,811 posts
After looking at my stash shelf and the half finished area that I would finish a P-36A that was started for the Pearl Harbor campaign of 2008. This is the old AMT 1/48 kit, boy what a dog . I first put together the wings, fuselage, tailplanes and then puttied the GAPS. Then sanded them down along with those manhole sized rivits. I tried an early (Bob) try at preshading. notice the non existant seat/cockpit detail. here is an attempt at a radial engine that I think will be left but some more paint and detailing
My intention is to finish this a/c in the scheme of a unit at Pearl on Dec. 7, 1941.