

Hi Felipe. Never too many pics of such a beautiful build. Well done, your Passion Wagon is a great addition to the Pin-Ups Gallery.
Justin, don't panic mate, "Lady in the Dark" is still progressing. The glass gave me hell and I had to cut and re-fit some, but she's masked up now and ready for paint. Pics soon.
Cheers, D
Air Campaigns
Want to start or join a group build? This is where to start.
Want to start or join a group build? This is where to start.
Hosted by Frederick Boucher, Michael Satin
Official PIN-UPS CAMPAIGN

AussieReg

#007

Joined: June 09, 2009
KitMaker: 8,156 posts
AeroScale: 3,756 posts
Posted: Sunday, August 01, 2010 - 06:34 PM UTC


Keeperofsouls2099

Joined: January 14, 2009
KitMaker: 2,798 posts
AeroScale: 2,443 posts
Posted: Monday, August 02, 2010 - 06:40 AM UTC
BlackAce very nice finish dont forget to put a pic. in the gallery.
@Aussie-i know the auss man will pull through
@Aussie-i know the auss man will pull through


lampie
#029

Joined: December 23, 2005
KitMaker: 6,249 posts
AeroScale: 3,270 posts

Posted: Monday, August 02, 2010 - 06:49 AM UTC
Some progress on Rozzie Geth/Boch Buster.

Nige

Nige


Rebilda
#057

Joined: May 11, 2010
KitMaker: 248 posts
AeroScale: 123 posts

Posted: Monday, August 02, 2010 - 07:29 AM UTC
Whoa, Felipe, THAT's a nice one!!! What clear cotes did you use? Really, awesome...
@Nigel: nice one, lokking forward to the decal stage!!
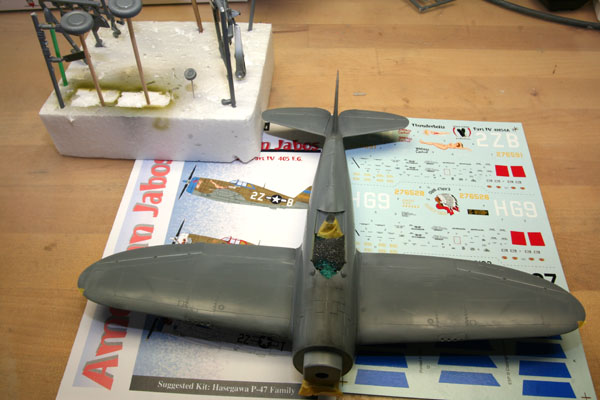
This is my contribution, started yesterday:
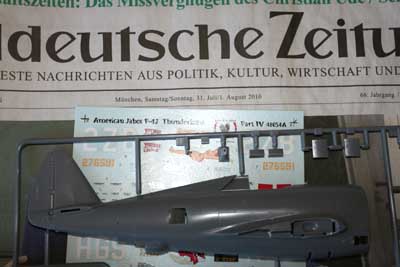
That's how far I got til now:
The Mustang you see in the background is for Terri's P-51-Campaign.
Hope to close the fuselages this evening!!
Greetings
@Nigel: nice one, lokking forward to the decal stage!!
This is my contribution, started yesterday:
That's how far I got til now:
The Mustang you see in the background is for Terri's P-51-Campaign.
Hope to close the fuselages this evening!!
Greetings


SellSword
Joined: February 15, 2010
KitMaker: 167 posts
AeroScale: 141 posts
Posted: Monday, August 02, 2010 - 12:40 PM UTC
WOW!!! So many great builds! So many beautiful Mustangs too!!!
I just got home from Cozumel ( late honeymoon taken on our one year anniversary... keep your wives happy guys, they are more forgiving when your " fiddling around with your toys" ) and I've got a break from the hurling matches until autumn league, so I'm back at my build.
I "fiddled" around with some detail painting tonight, and i hope to close up the canopy and start getting the metal finish down this week.
I'll post some pics when I get into the first stages of paint!
Slainte!!!
Keeperofsouls2099
Joined: January 14, 2009
KitMaker: 2,798 posts
AeroScale: 2,443 posts
Posted: Monday, August 02, 2010 - 12:49 PM UTC
Wow Rab looks like we got a new speed builder.Did you sleep at all 

Ruffus

Joined: April 12, 2005
KitMaker: 343 posts
AeroScale: 111 posts

Posted: Tuesday, August 03, 2010 - 07:10 AM UTC
Mis respetos Felipe, te quedo precioso el Mustang, Felicitaciones.
Byron
Byron


doubtingthomas
Joined: March 17, 2009
KitMaker: 156 posts
AeroScale: 153 posts
Posted: Tuesday, August 03, 2010 - 07:54 AM UTC
Felipe-
That's a great-looking Mustang. I have those decals, and will someday get around to using them. Very inspirational!
That's a great-looking Mustang. I have those decals, and will someday get around to using them. Very inspirational!
BlackAce

Joined: June 13, 2010
KitMaker: 20 posts
AeroScale: 19 posts
Posted: Tuesday, August 03, 2010 - 09:26 AM UTC
Hey, realy realy thanks for all the answers, im glad you liked it, the level of modelling over here is realy good, so im glad to be amongst you 
hey nigel, that painting job on the thunderbolt is looking great, looking forward to see it.
regards for everybody.
hey nigel, that painting job on the thunderbolt is looking great, looking forward to see it.
regards for everybody.

AussieReg
#007
Joined: June 09, 2009
KitMaker: 8,156 posts
AeroScale: 3,756 posts
Posted: Tuesday, August 03, 2010 - 06:09 PM UTC
Hi all, a progress report FINALLY on my "Lady in the Dark" and I apologise for the poor photo quality, still no camera and using the mobile phone.
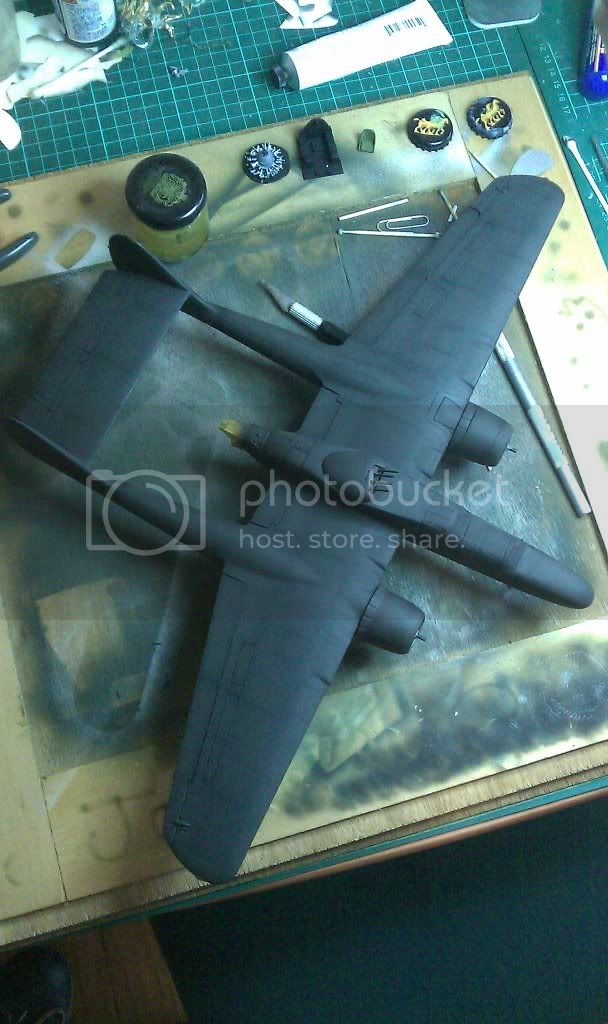
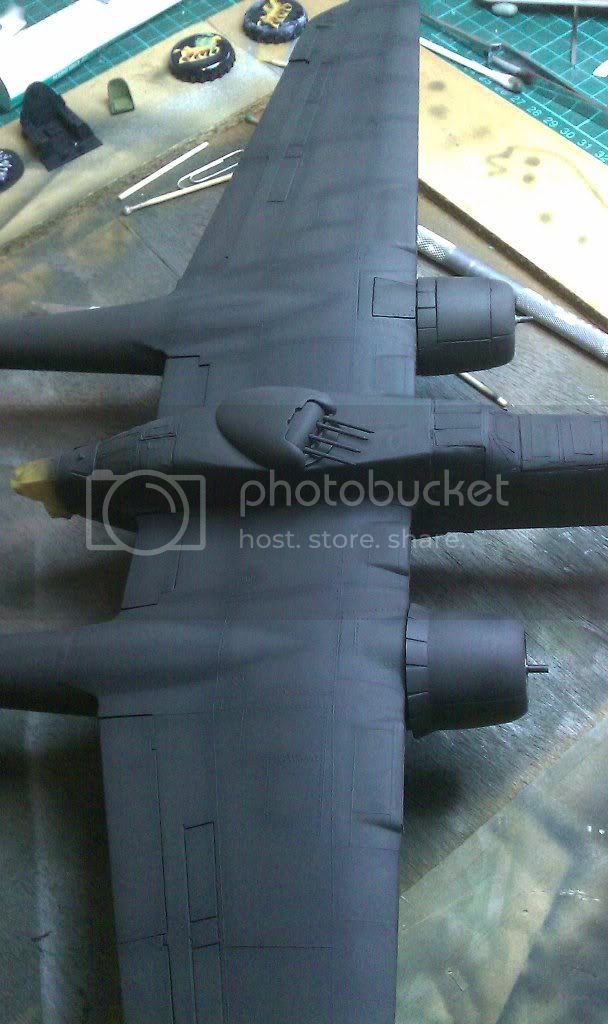
I used the "Q" method of post-shading for the first time on this build. For those of you who haven't seen the article, take a look here POST SHADING .
The base coat is a 50/50 mix of Tamiya Red Brown (XF-64) and Flat Black (XF-1) acrylics, and the panel lines were done with a heavily thinned (70% Thinner : 30% Paint ) straight XF-1 Flat Black.
Next step is clear coat, then decals.
Cheers, D

warreni
Joined: August 14, 2007
KitMaker: 5,926 posts
AeroScale: 2,201 posts

Posted: Tuesday, August 03, 2010 - 07:19 PM UTC
Damian, just a quick question, how come one engine has it's cowl flaps open and the others are closed??
AussieReg
#007
Joined: June 09, 2009
KitMaker: 8,156 posts
AeroScale: 3,756 posts
Posted: Tuesday, August 03, 2010 - 07:47 PM UTC
'Coz that's how they came i the box Warren, and I wasn't up for that degree of rectification just now. The inspection panels on the port engine are just tacked in place for painting as well, that's why there's gaps there (just in case you were wondering).Cheers, D

Phantom2

Joined: April 18, 2006
KitMaker: 708 posts
AeroScale: 678 posts
Posted: Wednesday, August 04, 2010 - 01:47 AM UTC
Hi all!
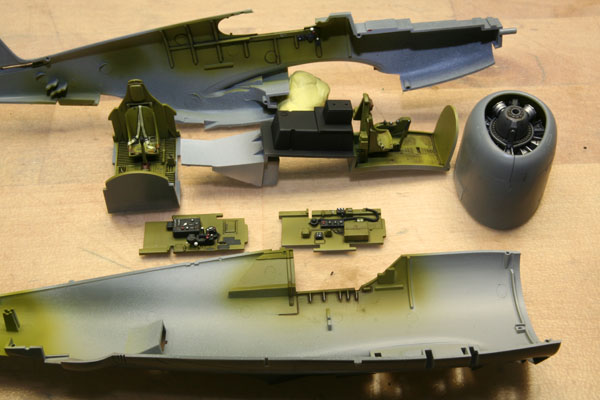
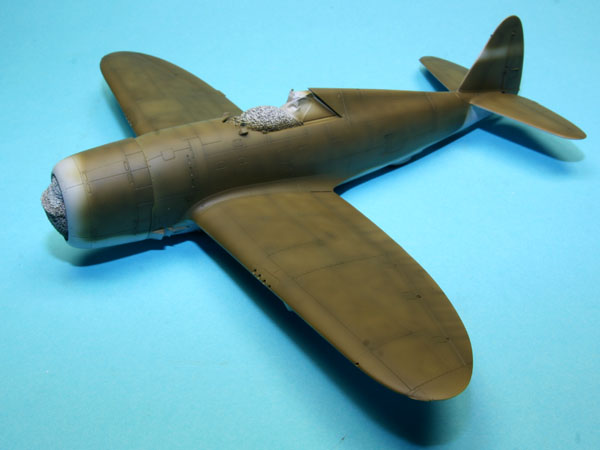
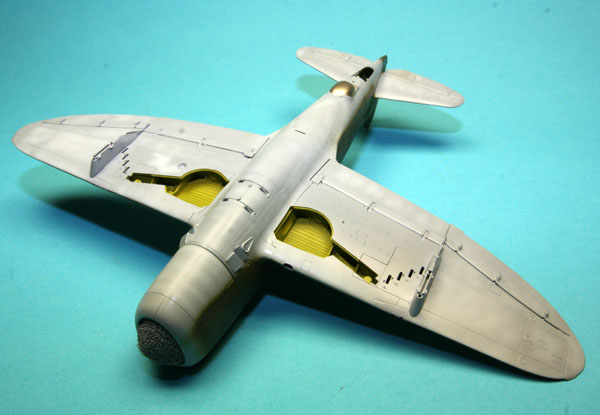
Time to get the colors out and paint the interior, Bell Green was the official name, but that was a Medium Greem, and that´s what I used.


All the tiny boxes, levers and other details were painted black.
The breaches of the cannons were painted a metallic black (Hu201), red details and finally a silver drybrush to suggest some wear-n-tear.
Some other small details were picked out in different colors.


The instrument panel is supplied in the kit and it comes from eduard, and looks faboulous!


Seatbelts have been made and added to the seat.
You actually get two different instrument panels and two sets of different seat belts, plus several smaller details are supplied in two versions, wherever the prototypes differ!
That´s attention to detail, full mark to Special Hobby (and eduard), wonderful!


More to come soon!
Cheers!
Stefan E
Time to get the colors out and paint the interior, Bell Green was the official name, but that was a Medium Greem, and that´s what I used.
All the tiny boxes, levers and other details were painted black.
The breaches of the cannons were painted a metallic black (Hu201), red details and finally a silver drybrush to suggest some wear-n-tear.
Some other small details were picked out in different colors.
The instrument panel is supplied in the kit and it comes from eduard, and looks faboulous!
Seatbelts have been made and added to the seat.
You actually get two different instrument panels and two sets of different seat belts, plus several smaller details are supplied in two versions, wherever the prototypes differ!
That´s attention to detail, full mark to Special Hobby (and eduard), wonderful!
More to come soon!
Cheers!
Stefan E

FalkeEins

Joined: March 07, 2005
KitMaker: 868 posts
AeroScale: 690 posts
Posted: Wednesday, August 04, 2010 - 02:16 AM UTC
...just spent 30 mins going through this thread ...what a super campaign ! Aeroscale at its best ..kudos to all the great builders & builds completed so far .I've just enlisted - no idea what I'll build though!
Keeperofsouls2099
Joined: January 14, 2009
KitMaker: 2,798 posts
AeroScale: 2,443 posts
Posted: Wednesday, August 04, 2010 - 02:35 AM UTC
Good to hear you join.Everybody is doing a great job keep them coming

vonHengest
Joined: June 29, 2010
KitMaker: 5,854 posts
AeroScale: 372 posts

Posted: Wednesday, August 04, 2010 - 10:47 AM UTC
Justin: I'm working hard to finish up my first armor build for the Miniart Diorama campaign on Armorama. If things go well I can start my first two aircraft builds for this campaign and the Dressed to Kill campaign on P-47 Heaven. I joined all of these campaigns quite late, but with some luck things should work out.
My plan for this campaign is to build the Eduard F6F-5n Hellcat.
My plan for this campaign is to build the Eduard F6F-5n Hellcat.
Keeperofsouls2099
Joined: January 14, 2009
KitMaker: 2,798 posts
AeroScale: 2,443 posts
Posted: Wednesday, August 04, 2010 - 02:08 PM UTC
great sir thanks for joining.Look forward to your build
Keeperofsouls2099
Joined: January 14, 2009
KitMaker: 2,798 posts
AeroScale: 2,443 posts
Posted: Wednesday, August 04, 2010 - 02:28 PM UTC
I noticed theres quite a few planes missing from the gallery.You will need to put one there if you wish to recieve a ribbon.I also noticed that there are 44 enlisties and only a small amount of finished builds.You all should be modeling in your sleep
In case you need to get to the gallery here is link.
Pin-up gallery
In case you need to get to the gallery here is link.
Pin-up gallery
Rebilda
#057
Joined: May 11, 2010
KitMaker: 248 posts
AeroScale: 123 posts
Posted: Thursday, August 05, 2010 - 02:23 AM UTC
Well, then you'll like this:
ready for priming. I'll start painting this afternoon maybe.
BTW, who knows this: which one is the early C.E., what are the others:
Thanks for watching.
ready for priming. I'll start painting this afternoon maybe.
BTW, who knows this: which one is the early C.E., what are the others:
Thanks for watching.
lampie
#029
Joined: December 23, 2005
KitMaker: 6,249 posts
AeroScale: 3,270 posts
Posted: Thursday, August 05, 2010 - 02:26 AM UTC
Quoted Text
BTW, who knows this: which one is the early C.E., what are the others:
.
From left to right,,
Hamilton standard "paddle blade"
Curtiss Electric . "Paddle blade"
Curtiss Electric "toothpick" ( C.E "early")
Nige
lampie
#029
Joined: December 23, 2005
KitMaker: 6,249 posts
AeroScale: 3,270 posts
Posted: Thursday, August 05, 2010 - 02:44 AM UTC
A very common mistake by decal manufacturers is incorrect colours for noseart and BocheBuster/Rozzie Geth is no exception.
While the PinUp cowling art is close as makes no difference to the proper colours the name "Rozzie Goth" is offered on the Eagle Strike sheet as a yellow decal but was actually white.
Step forward,,Mal Mayfield ( Holdfast) and his Miracle Masks.....
Mal had already produced masks for another subject on this sheet for me ( "Tony", and I asked him if he could do anything with the Rozzie Geth artwork.
A few days later, postie delivered the masks.
So..this morning, deciding that its "now or never",,on goes the mask....

Weed out the mask slowly and carefully,, no problems here...............some extra masking and some very thin misty coats of Humbrol Matt white enamel.

A few hours later, very carefully remove the mask.

And breath a sigh of relief!!!
There are a couple of very small areas where the white paint has run into the panel lines but that will be covered by the Pro Modeller wash at a later stage.
Plan B....( not required today thankfully)
The reason I used enamel instead of acrylics for painting this is that if I had messed it up I would have been able to carefully remove the enamel paint using a cotton bud and white spirit and the coats of Klear would have protected the acrylic finish underneath.
Going for a lie down now
Nige
While the PinUp cowling art is close as makes no difference to the proper colours the name "Rozzie Goth" is offered on the Eagle Strike sheet as a yellow decal but was actually white.
Step forward,,Mal Mayfield ( Holdfast) and his Miracle Masks.....
Mal had already produced masks for another subject on this sheet for me ( "Tony", and I asked him if he could do anything with the Rozzie Geth artwork.
A few days later, postie delivered the masks.
So..this morning, deciding that its "now or never",,on goes the mask....
Weed out the mask slowly and carefully,, no problems here...............some extra masking and some very thin misty coats of Humbrol Matt white enamel.
A few hours later, very carefully remove the mask.
And breath a sigh of relief!!!
There are a couple of very small areas where the white paint has run into the panel lines but that will be covered by the Pro Modeller wash at a later stage.
Plan B....( not required today thankfully)
The reason I used enamel instead of acrylics for painting this is that if I had messed it up I would have been able to carefully remove the enamel paint using a cotton bud and white spirit and the coats of Klear would have protected the acrylic finish underneath.
Going for a lie down now
Nige
Rebilda
#057
Joined: May 11, 2010
KitMaker: 248 posts
AeroScale: 123 posts
Posted: Thursday, August 05, 2010 - 05:33 AM UTC
Man, this is awesome!!!!!!
You got a few or other of those kits under ye belt, huh?!!
How many coats of white did you do? Misted very thin? I really hate airbrushing white. Takes me mostly six coats to do the job. If I can help it i try to do it before everything else and use Valejo which dries a little thicker but is really opaque.
Is there a better way to spray acrylic white?
Thanks for the tip on the props, mate. Helps me a lot!!
Got my underside, try to finish painting tomorrow!
SellSword
Joined: February 15, 2010
KitMaker: 167 posts
AeroScale: 141 posts
Posted: Thursday, August 05, 2010 - 01:30 PM UTC
Huzzah! I'm making fine progress myself! After destroying a canopy or 2 and nearly flinging everything into the corner I've hunkered down and gotten some more work done... I really want that ribbon!!!


Keeperofsouls2099
Joined: January 14, 2009
KitMaker: 2,798 posts
AeroScale: 2,443 posts
Posted: Thursday, August 05, 2010 - 03:02 PM UTC
looking good sell most worthy of a ribbon for sure
Rebilda
#057
Joined: May 11, 2010
KitMaker: 248 posts
AeroScale: 123 posts
Posted: Friday, August 06, 2010 - 10:04 AM UTC
Hello kids.
What I've done till now:
I am grotesquely behind my scedule. I'm down with flu, got the mother the brother and the father of a headache and my back hurts like a sonoffa.
But I hope to spray the recog-bands tomorrow, repair some overspray in the wastegate-area (or is it the bleed-air-ducts?), put on some fashy gloss and slap on the decals.
Well...
That's the plan.
Now I'm off to a beer and bed (Agony!!)....
What I've done till now:
I am grotesquely behind my scedule. I'm down with flu, got the mother the brother and the father of a
headache and my back hurts like a sonoffa.But I hope to spray the recog-bands tomorrow, repair some overspray in the wastegate-area (or is it the bleed-air-ducts?), put on some fashy gloss and slap on the decals.
Well...
That's the plan.
Now I'm off to a beer and bed (Agony!!)....
 |

WEB HOSTING BY


Copyright ©2021 AeroScale and Kitmaker Network, a subsidiary of Silver Star Enterprises
All Rights Reserved. Please read our Conditions of Use and Privacy Policy.
All Rights Reserved. Please read our Conditions of Use and Privacy Policy.