
Air Campaigns
Want to start or join a group build? This is where to start.
Want to start or join a group build? This is where to start.
Hosted by Frederick Boucher, Michael Satin
OFFICIAL: CAS (Close Air Support)

vonHengest

Joined: June 29, 2010
KitMaker: 5,854 posts
AeroScale: 372 posts

Posted: Saturday, January 15, 2011 - 03:21 PM UTC
Thanks for the tip and for the accompanying pictures in your next post Q, I'm still trying to familiarize myself with modeling scale aircraft 

Red4

Joined: April 01, 2002
KitMaker: 4,287 posts
AeroScale: 1,164 posts

Posted: Sunday, January 16, 2011 - 04:42 AM UTC
No problem Jeremy, hope it helps.
I shot the gloss coat on her this morning. Still waiting on the rotor hubs to dry (Humbrol), but I did mask the blades in preparation for the white leading edge color. Once the black is dry, I'll mask that part off and shoot the white. The tips of the rotors are red so those will add a little splash of color to this one. Anxiously waiting on this gloss to dry...might throw her in the dehumidifier to help speed things along. More to follow. "Q"


I shot the gloss coat on her this morning. Still waiting on the rotor hubs to dry (Humbrol), but I did mask the blades in preparation for the white leading edge color. Once the black is dry, I'll mask that part off and shoot the white. The tips of the rotors are red so those will add a little splash of color to this one. Anxiously waiting on this gloss to dry...might throw her in the dehumidifier to help speed things along.
 More to follow. "Q"


Red4

Joined: April 01, 2002
KitMaker: 4,287 posts
AeroScale: 1,164 posts

Posted: Sunday, January 16, 2011 - 02:18 PM UTC
I think I'm sticking a fork in this one for the day. 12 hours of modeling today has taken its toll  Gloss coated, decals added, post shading, and an overall flat coat....plus I started a 1/72 F-105F for the Century Series campaign. Tomorrow I should be able to move into final assembly. I got a book to read for a couple hours..."The Hound of the Baskervilles".
  See you all tomorrow. "Q"


 Gloss coated, decals added, post shading, and an overall flat coat....plus I started a 1/72 F-105F for the Century Series campaign. Tomorrow I should be able to move into final assembly. I got a book to read for a couple hours..."The Hound of the Baskervilles".
  See you all tomorrow. "Q"


KrisMax

Joined: January 23, 2010
KitMaker: 156 posts
AeroScale: 139 posts

Posted: Sunday, January 16, 2011 - 11:33 PM UTC
Looking good Q. A very nice finish on the paint job.
I've managed to scribe panel lines on the HS-129 wings and get the fuselage halves together. This is the most spartan cockpit of any kit I've built. A seat, a stick and a flat panel for the pilot to look at. It's a good job I don't worry too much about the finer details.


Simon
I've managed to scribe panel lines on the HS-129 wings and get the fuselage halves together. This is the most spartan cockpit of any kit I've built. A seat, a stick and a flat panel for the pilot to look at. It's a good job I don't worry too much about the finer details.


Simon
Red4

Joined: April 01, 2002
KitMaker: 4,287 posts
AeroScale: 1,164 posts

Posted: Monday, January 17, 2011 - 07:32 AM UTC
This one is complete and going in the case. Not a bad little kit, but there are some glitches in the instructions as there is no mention of how or where the troop door struts attach inside the fuselage. Luckily I noticed the holes for them before everything cured/dried. Now I know...
 Some small and fiddly parts here and there, but overall it's really buildable. Think I'll tackle the Mi-8 I have from Hobby Boss soon. Will get a pic or two posted to the gallery after this. Thanks, "Q"


 Some small and fiddly parts here and there, but overall it's really buildable. Think I'll tackle the Mi-8 I have from Hobby Boss soon. Will get a pic or two posted to the gallery after this. Thanks, "Q"


Red4

Joined: April 01, 2002
KitMaker: 4,287 posts
AeroScale: 1,164 posts

Posted: Monday, January 17, 2011 - 11:28 AM UTC
After looking at my pics I realized I forgot the nose probe so I added that and also made a base for my Hind. Found one of those craft boxes at Hobby Lobby and the idea light went off 
 Found an image of the hammer and sickle online, printed it to size, cut it out and made a stencil. A few passes with some rattle cans, and a little shadow work with the airbrush and Ta-dah... instant base. "Q"
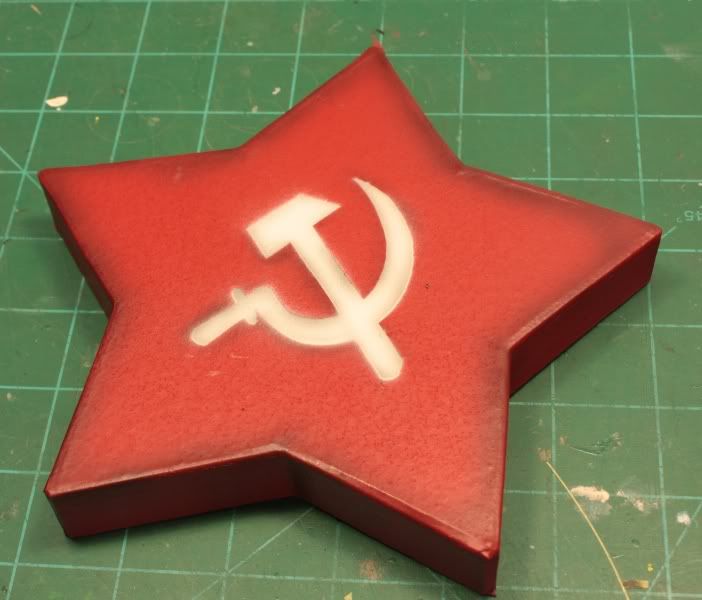
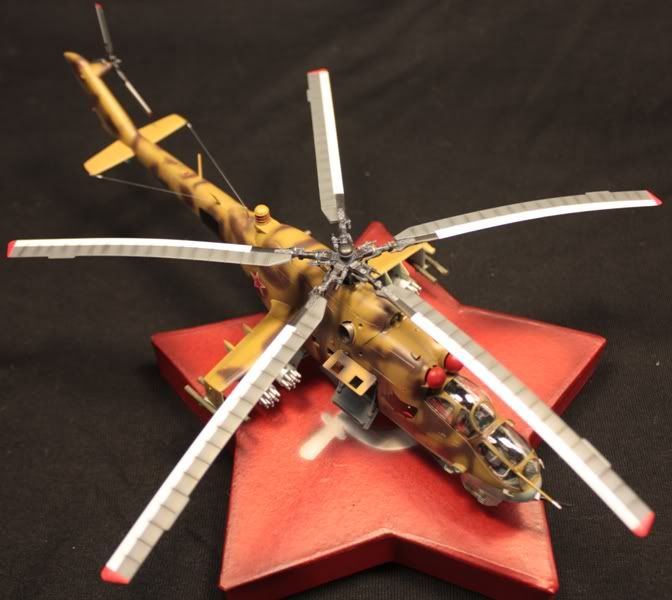
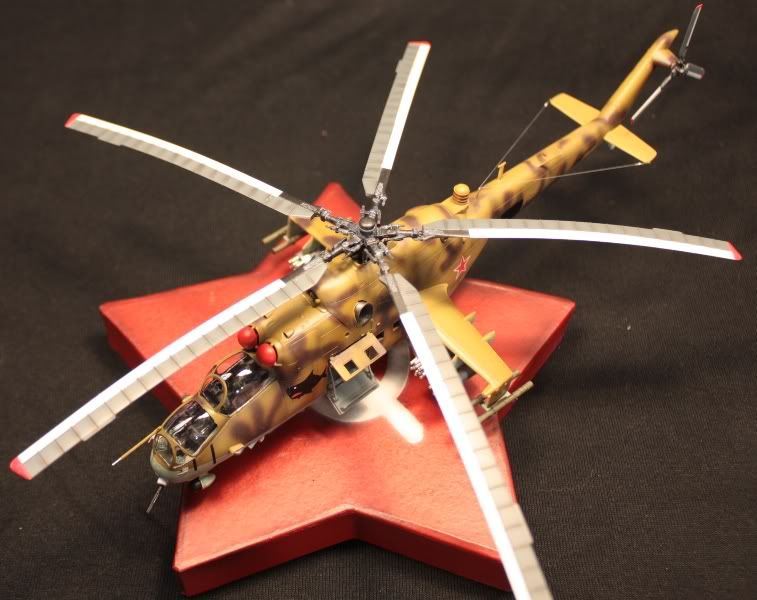

 Found an image of the hammer and sickle online, printed it to size, cut it out and made a stencil. A few passes with some rattle cans, and a little shadow work with the airbrush and Ta-dah... instant base. "Q"


Posted: Monday, January 17, 2011 - 11:53 AM UTC
Great work Matt. Love the quicky display base. I built a 1/144 Hind years ago almost cured me of helos in general and 1/44 in particular.
BTW, how did you convince Mrs. Red4 let you get that much modeling in??
BTW, how did you convince Mrs. Red4 let you get that much modeling in??


Keeperofsouls2099

Joined: January 14, 2009
KitMaker: 2,798 posts
AeroScale: 2,443 posts

Posted: Monday, January 17, 2011 - 12:42 PM UTC
congrats matt on a fine build 

Red4

Joined: April 01, 2002
KitMaker: 4,287 posts
AeroScale: 1,164 posts

Posted: Monday, January 17, 2011 - 01:21 PM UTC
Quoted Text
We have an agreement. She works, I clean the house and take care of dinner. I have it down to a science. 4500 square feet cleaned in about an hour and 15 minutes. Leaves me plenty of time to build or do something else like ride my dirt bikes, mountain bike, Harley..etc. BTW, how did you convince Mrs. Red4 let you get that much modeling in??
 Being retired has its perks.
  Thanks for the kudos guys. "Q"
TheDiggs

Joined: April 25, 2008
KitMaker: 338 posts
AeroScale: 20 posts

Posted: Monday, January 17, 2011 - 02:50 PM UTC
Hi all,
Got my entry finished. Built a 1/72 AH-64D Apache Longbow from Italeri OOB. I thought the kit was okay but not great. There were a few too many seems that had to be filled and smoothed out on the fuselage for my liking but I am mostly satisfied with how it turned out.


Got my entry finished. Built a 1/72 AH-64D Apache Longbow from Italeri OOB. I thought the kit was okay but not great. There were a few too many seems that had to be filled and smoothed out on the fuselage for my liking but I am mostly satisfied with how it turned out.

vonHengest

Joined: June 29, 2010
KitMaker: 5,854 posts
AeroScale: 372 posts

Posted: Monday, January 17, 2011 - 03:01 PM UTC
Q: Sweet build, and thanks for pointing out the struts. Btw, did you have a seem line running down the middle of the cockpit glazing?
David: I don't like messing with a lot of seems either, it can really slow down the build for me. Looks like you did well
David: I don't like messing with a lot of seems either, it can really slow down the build for me. Looks like you did well

Red4

Joined: April 01, 2002
KitMaker: 4,287 posts
AeroScale: 1,164 posts

Posted: Monday, January 17, 2011 - 04:05 PM UTC
Quoted Text
Thanks Jeremy. In regards to the seam on the canopy..yep. Very faint but visible. I sanded it out, then polished the canopy out again. "Q"Q: Sweet build, and thanks for pointing out the struts. Btw, did you have a seem line running down the middle of the cockpit glazing?

vonHengest

Joined: June 29, 2010
KitMaker: 5,854 posts
AeroScale: 372 posts

Posted: Monday, January 17, 2011 - 10:20 PM UTC
Quoted Text
Quoted TextThanks Jeremy. In regards to the seam on the canopy..yep. Very faint but visible. I sanded it out, then polished the canopy out again. "Q"Q: Sweet build, and thanks for pointing out the struts. Btw, did you have a seem line running down the middle of the cockpit glazing?
Very good then, may I ask what you used to polish it? I was thinking of a fine grit sanding stick.
Red4

Joined: April 01, 2002
KitMaker: 4,287 posts
AeroScale: 1,164 posts

Posted: Tuesday, January 18, 2011 - 01:23 AM UTC
No problem. I used a set of Micro Mark sanding/polishing cloths. They start at 2300 grit and go to 12000. Final polish was done with Novus Plastic Polish followed by a good dunk in a jar of future and then set aside to dry. Check a beauty supply place for one of those 3 or 4 side sanding sticks women use for their nails. I've got a couple of those that I use for small areas and they work well. Hope that helps. "Q"
Posted: Tuesday, January 18, 2011 - 03:41 AM UTC
I'll vouch for the 2300-12000 sanding pads. I used them and the Novus polish to clean up the canopy on this A4D years ago. As molded, the canopy was ~1/32 wider than the fuselage, so there was quite a bit of sanding and polishing involved.
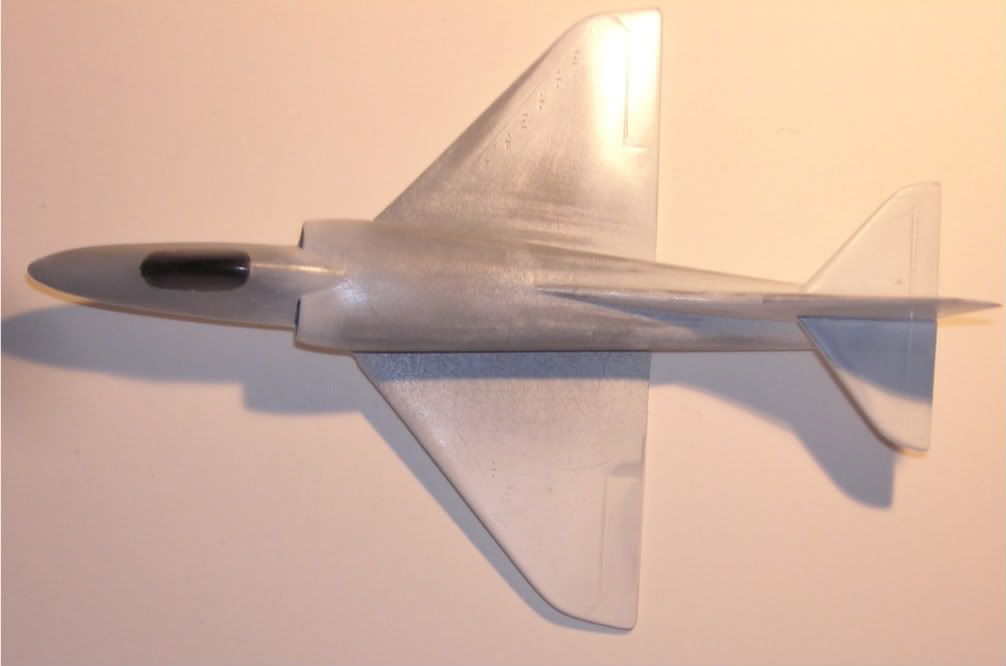
Since then I've had to polish it back out with the sanding pads after I got some overspary on it.
Squadron also has a 3 in 1 sanding stick for polishing.

Since then I've had to polish it back out with the sanding pads after I got some overspary on it.
Squadron also has a 3 in 1 sanding stick for polishing.

vonHengest

Joined: June 29, 2010
KitMaker: 5,854 posts
AeroScale: 372 posts

Posted: Tuesday, January 18, 2011 - 06:46 AM UTC
Very good then, thanks for the tips guys! 

emroglan

Joined: December 16, 2004
KitMaker: 1,163 posts
AeroScale: 255 posts

Posted: Saturday, January 22, 2011 - 09:28 AM UTC
Hello guys and gals!
My progress has been slow, since I'll get married this summer and have to take care of a house renovation... was well as my hectic pace at work. I could barely find time to sleep, let alone build models.
I completed the assemblies of my two Spads. Left, with weapons payload, is the Air Force Spad... Right, with fuel tanks, will be the Navy Spad.

I will be using a Superscale decal sheet. The Air Force Skyraider has a tri-colored flag painted on its tail. Superscale gave a large, single piece decal for it. No way it could fit with the rear stabilizer and all those details in the way. So I decided to go crazy, mask everything and paint it myself. Here's the last stage, the white portion was painted blue after the photo.

I chose Gunze colors to paint the relevant FS colors. The Navy Skyraider first received a coat of white underneath, as well as for its rudder. Then, it was time for its FS 36440 grey (I cheated and used 16440).

After that I decided to play around with the grey to make it look like a heavily weathered aircraft. The shadowy parts became darker than I intended... let's see how they finally turn out.


My progress has been slow, since I'll get married this summer and have to take care of a house renovation... was well as my hectic pace at work. I could barely find time to sleep, let alone build models.
I completed the assemblies of my two Spads. Left, with weapons payload, is the Air Force Spad... Right, with fuel tanks, will be the Navy Spad.

I will be using a Superscale decal sheet. The Air Force Skyraider has a tri-colored flag painted on its tail. Superscale gave a large, single piece decal for it. No way it could fit with the rear stabilizer and all those details in the way. So I decided to go crazy, mask everything and paint it myself. Here's the last stage, the white portion was painted blue after the photo.

I chose Gunze colors to paint the relevant FS colors. The Navy Skyraider first received a coat of white underneath, as well as for its rudder. Then, it was time for its FS 36440 grey (I cheated and used 16440).

After that I decided to play around with the grey to make it look like a heavily weathered aircraft. The shadowy parts became darker than I intended... let's see how they finally turn out.


emroglan

Joined: December 16, 2004
KitMaker: 1,163 posts
AeroScale: 255 posts

Posted: Saturday, January 22, 2011 - 09:30 AM UTC
On the other hand, the Air Force Spad was painted FS 36622 grey underneath:

And the first color of its SEA camouflage, FS34102 went on.


And the first color of its SEA camouflage, FS34102 went on.


emroglan

Joined: December 16, 2004
KitMaker: 1,163 posts
AeroScale: 255 posts

Posted: Saturday, January 22, 2011 - 11:21 AM UTC
Okay, continuing the Air Force Skyraider... I just completed its basic painting, with FS34079 Green (Mr Hobby H309) and FS30219 Brown (Mr Hobby H310).


eoinryan

Joined: April 30, 2010
KitMaker: 232 posts
AeroScale: 66 posts

Posted: Sunday, January 23, 2011 - 04:53 AM UTC
Hi folks,
I've been away for a while finishing my Sturmovik.
@ Q: Your Hind looks absolutely fantastic- that paint job is A1
@ Atoplu: I loved your extremely weathered Stuka. How did you get that finish? Was it one of those hairspray jobs I've been hearing rumours about??? Any chance of giving a brief outline of the technique?
Anywho, here a few photos of my (99.5%) finished sturmovik:
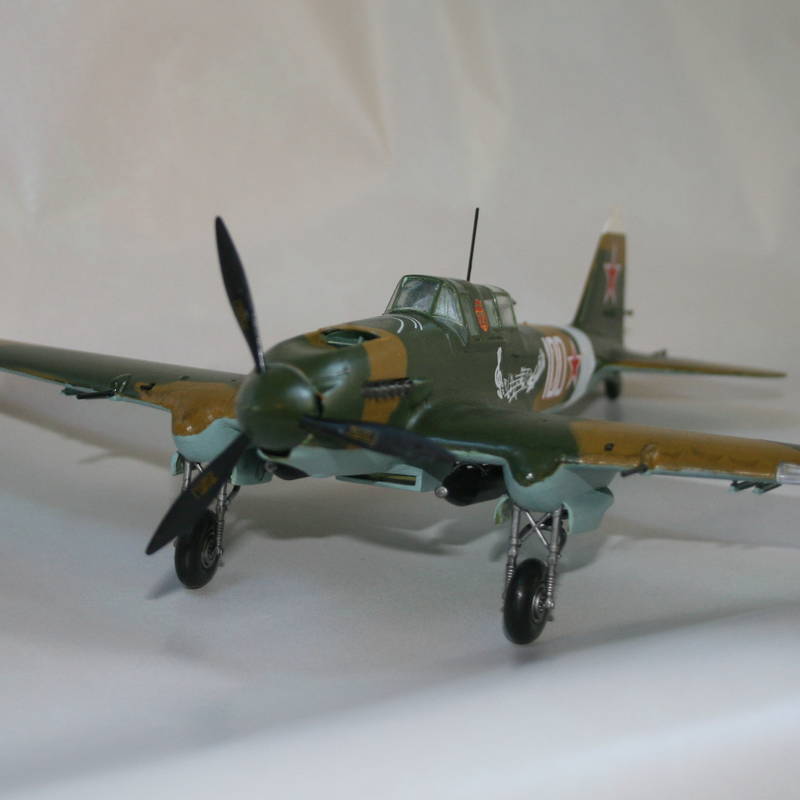
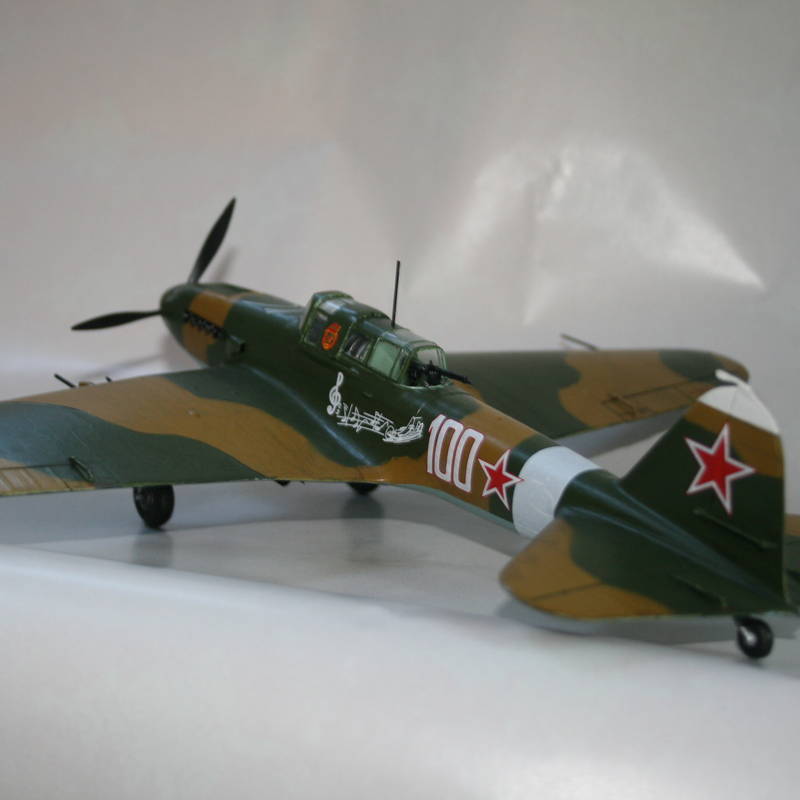
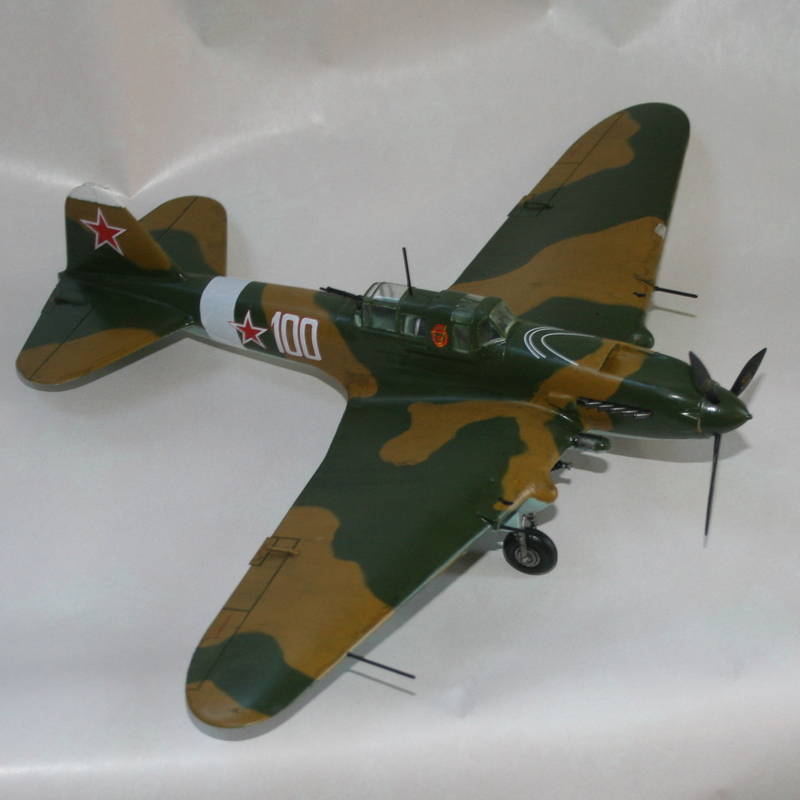
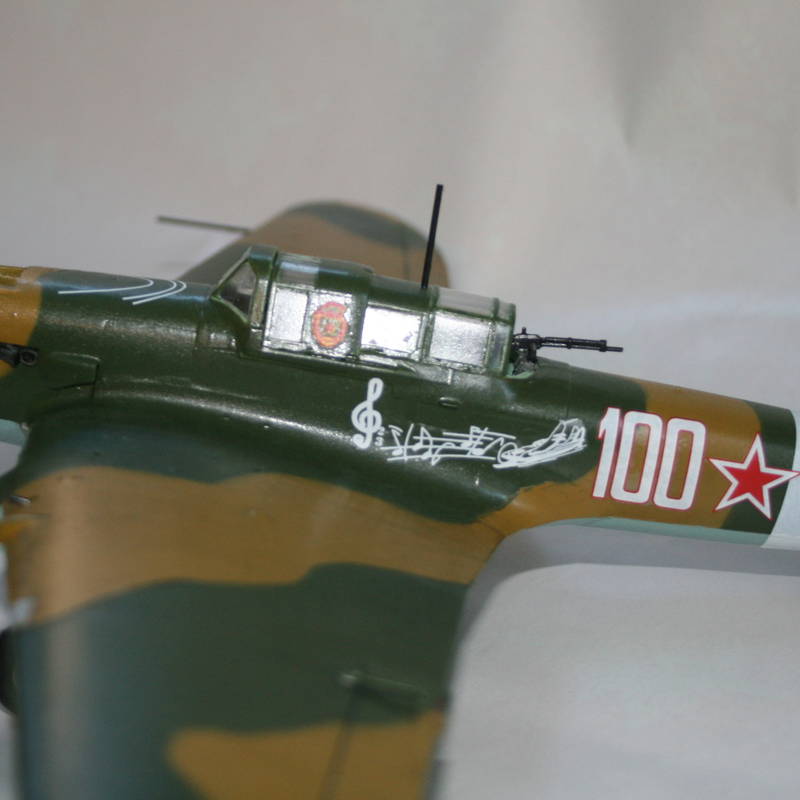
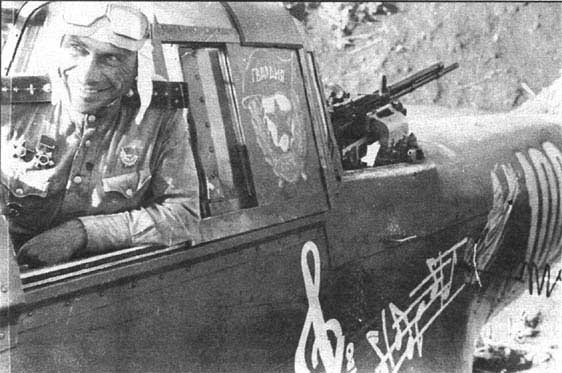
This Sturmovik was flown by Captain Vasily Emelianenko, who flew with the 7th Guards Assault Regiment until 1944 (note the Guards badge behind the cockpit). The was a composer in Moscow before the war, hence the musical theme. Captain Emelianenko is credited with destroying dozens of German vehicles, twenty three aircraft destroyed on the ground and he even managed to shoot down a Ju86.
Eoin
I've been away for a while finishing my Sturmovik.
@ Q: Your Hind looks absolutely fantastic- that paint job is A1
@ Atoplu: I loved your extremely weathered Stuka. How did you get that finish? Was it one of those hairspray jobs I've been hearing rumours about??? Any chance of giving a brief outline of the technique?
Anywho, here a few photos of my (99.5%) finished sturmovik:


This Sturmovik was flown by Captain Vasily Emelianenko, who flew with the 7th Guards Assault Regiment until 1944 (note the Guards badge behind the cockpit). The was a composer in Moscow before the war, hence the musical theme. Captain Emelianenko is credited with destroying dozens of German vehicles, twenty three aircraft destroyed on the ground and he even managed to shoot down a Ju86.
Eoin
emroglan

Joined: December 16, 2004
KitMaker: 1,163 posts
AeroScale: 255 posts

Posted: Monday, January 24, 2011 - 10:59 AM UTC
Tonight I worked on faded paint on the Air Force Skyraider. This is not the final result, because the alcohol I used to thin the paints whitened, creating an exaggerated result. This whitening will vanish once I get some gloss coat on the model.


emroglan

Joined: December 16, 2004
KitMaker: 1,163 posts
AeroScale: 255 posts

Posted: Thursday, January 27, 2011 - 10:08 AM UTC
Ongoing progress:
I removed the masks on the tail of my USAF Spad. Then I masked the walkways on both planes and sprayed matt black. The nose of the Navy Spad also received some matt black.


Last photo shows how messy my bench can get while building aircraft. I don't make the same mess building AFV kits... I think it is the masking tape's fault
These photos were taken about 2 hours ago. Since then I masked and sprayed the canopies of both aircraft. I tried to make the flag colors on the USAF Spad fade. I touched up a lot of areas. I also painted the bombs olive drab. Soo many little things got done out of the way... but in the end, no visible change. My back hurts!
I removed the masks on the tail of my USAF Spad. Then I masked the walkways on both planes and sprayed matt black. The nose of the Navy Spad also received some matt black.


Last photo shows how messy my bench can get while building aircraft. I don't make the same mess building AFV kits... I think it is the masking tape's fault

These photos were taken about 2 hours ago. Since then I masked and sprayed the canopies of both aircraft. I tried to make the flag colors on the USAF Spad fade. I touched up a lot of areas. I also painted the bombs olive drab. Soo many little things got done out of the way... but in the end, no visible change. My back hurts!

vonHengest

Joined: June 29, 2010
KitMaker: 5,854 posts
AeroScale: 372 posts

Posted: Thursday, January 27, 2011 - 03:24 PM UTC
Take a well earned break Emre, those Skyraiders are looking awesome 

emroglan

Joined: December 16, 2004
KitMaker: 1,163 posts
AeroScale: 255 posts

Posted: Thursday, January 27, 2011 - 08:56 PM UTC
Thanks Jeremy!
I'll hopefully spray gloss coat on them tonight. I'm planning to complete them this week, I hope I can do that.
I'll hopefully spray gloss coat on them tonight. I'm planning to complete them this week, I hope I can do that.
Red4

Joined: April 01, 2002
KitMaker: 4,287 posts
AeroScale: 1,164 posts

Posted: Friday, January 28, 2011 - 06:15 PM UTC
I gotta concur with Jeremy, those Spads are looking great! Nicely done. "Q" 

 |


