

Hey Erme,
Well done on the Spads- excellent finish- the Navy Spad looks excellent!
@ Alcatraz- good choice with the ole Dragonfly. There was another one built earlier in the campaign so it may be worth your while scrolling though the earlier posts. Let us know how you find the Academy kit (I've one or two Academy kits recently added to my stash but I haven't had a chance to build them yet!)
Eoin
Air Campaigns
Want to start or join a group build? This is where to start.
Want to start or join a group build? This is where to start.
Hosted by Frederick Boucher, Michael Satin
OFFICIAL: CAS (Close Air Support)
eoinryan

Joined: April 30, 2010
KitMaker: 232 posts
AeroScale: 66 posts

Posted: Monday, February 28, 2011 - 09:07 AM UTC
vertigo
Joined: November 11, 2004
KitMaker: 388 posts
AeroScale: 225 posts

Posted: Monday, February 28, 2011 - 11:08 PM UTC
@eoinryan: I hope to be starting the little Dragonfly today so I'll let you know how it goes together. It was one of three choices I had for the campaign with the other two being the Academy OV-10 Bronco and the BAC Strikemaster from Airfix.

SGTJKJ

#041

Joined: July 20, 2006
KitMaker: 10,069 posts
AeroScale: 3,788 posts

Posted: Tuesday, March 01, 2011 - 01:17 AM UTC
Nice choice, Alcatras. I have the Dragonfly in 1/48 and have researched the different camouflage schemes. Looking forward to see how yours will look in Ecuadorian markings.
Progress is slow on my Stuka, but now I have one colour of the camouflage on. Next is some masking and then the other green. Hopefully more will follow soon.

Progress is slow on my Stuka, but now I have one colour of the camouflage on. Next is some masking and then the other green. Hopefully more will follow soon.

SGTJKJ
#041
Joined: July 20, 2006
KitMaker: 10,069 posts
AeroScale: 3,788 posts
Posted: Tuesday, March 01, 2011 - 10:00 PM UTC
A little more progres on my Stuka.
The basic camouflage is now on. The colours came out to light compared to what I wanted, but I will try to fix that with a wash or two.
Despite the colours being too light, they are much darker than the photos. I will photograph in daylight next time to show the colours correctly.
More to follow.


The basic camouflage is now on. The colours came out to light compared to what I wanted, but I will try to fix that with a wash or two.
Despite the colours being too light, they are much darker than the photos. I will photograph in daylight next time to show the colours correctly.
More to follow.
vertigo
Joined: November 11, 2004
KitMaker: 388 posts
AeroScale: 225 posts
Posted: Wednesday, March 02, 2011 - 10:39 AM UTC
There shall be a slight change of plans on my part; same aircraft, same conflict, different side.
Rather than attempt the camo scheme of an Ecuadorian Dragonfly I'm going to go for the two-tone wrap around scheme for Peru. This is only to make things a little easier on myself. I paint by hand and I'm not confident enough to try for Ecuador just yet.
To give an idea of the camo schemes, and my main camo reference, I'll post this chart I found online.

Work on the Dragonfly has begun; I've finished up the cockpit and joined the main fuselage together. It's getting the overnight, just to be sure, elastic band treatment at the moment.
The instructions called out for a 5g weight in the nosecone. I had planned using two or three 1 cent coins () as they're ridiculously small but the Dragonfly proved to be smaller. In the end I mixed some scenic gravel with PVA glue and filled in the nosecone to provide the necessary weight.
Rather than attempt the camo scheme of an Ecuadorian Dragonfly I'm going to go for the two-tone wrap around scheme for Peru. This is only to make things a little easier on myself. I paint by hand and I'm not confident enough to try for Ecuador just yet.
To give an idea of the camo schemes, and my main camo reference, I'll post this chart I found online.
Work on the Dragonfly has begun; I've finished up the cockpit and joined the main fuselage together. It's getting the overnight, just to be sure, elastic band treatment at the moment.
The instructions called out for a 5g weight in the nosecone. I had planned using two or three 1 cent coins () as they're ridiculously small but the Dragonfly proved to be smaller. In the end I mixed some scenic gravel with PVA glue and filled in the nosecone to provide the necessary weight.
eoinryan
Joined: April 30, 2010
KitMaker: 232 posts
AeroScale: 66 posts
Posted: Wednesday, March 02, 2011 - 12:59 PM UTC
Hi Alcatraz,
In terms of noseweights, I always use lead fishing weights. You can go into any outdoor/fishing shop and get pack of about two dozen for about 2euro. They are very compact and 3g weights can be fitted anywhere. They're great for 1/72 models. It also means that you don't have to tear your toolbox apart looking for random odds and ends every time you need a noseweight!
Eoin
vertigo
Joined: November 11, 2004
KitMaker: 388 posts
AeroScale: 225 posts
Posted: Friday, March 04, 2011 - 05:17 AM UTC
A little update for a little plane. I've joined the main fuselage and installed the cockpit. It's a very small aircraft compared to the Buccaneer I'm doing for the Anti-Shipping Campaign.


I painted the cockpit as per Academy instructions, although my grey may be a bit too light. I don't know if these are the proper colors for a Peruvian Dragonfly but I think it'll do.
On a related note I've been searching for some Dragonfly weapons charts and I've made a thread here. Any help would be appreciated.

Buckeye198

Joined: May 02, 2010
KitMaker: 596 posts
AeroScale: 197 posts

Posted: Saturday, March 05, 2011 - 01:05 PM UTC
With Soviet tanks stationed in East Germany, the West German military realized that it needed a way to quickly deal with this threat if necessary. The solution was radical for the time; arm a helicopter with anti-tank missiles. The Alouette II was thus selected to be the first close-air support helicopter. Although it failed in its trials, the idea of an armed helicopter was further developed into the reality of close air support and is now an essential component on the modern battlefield. Revell's 1/32 kit of this revolutionary vehicle was not as straightforward as it appears; in fact, at times it was outright frustrating. But the end result, minus the heartbreak involved with a kit gone awry, is a fulfilling and intriguing piece of history.
Here's the box art, spread of pieces, and directions laid out on my workstation

The anti-tank missiles that define this kit (and allow me to build the Alouette II for a CAS campaign!)

The finished product.
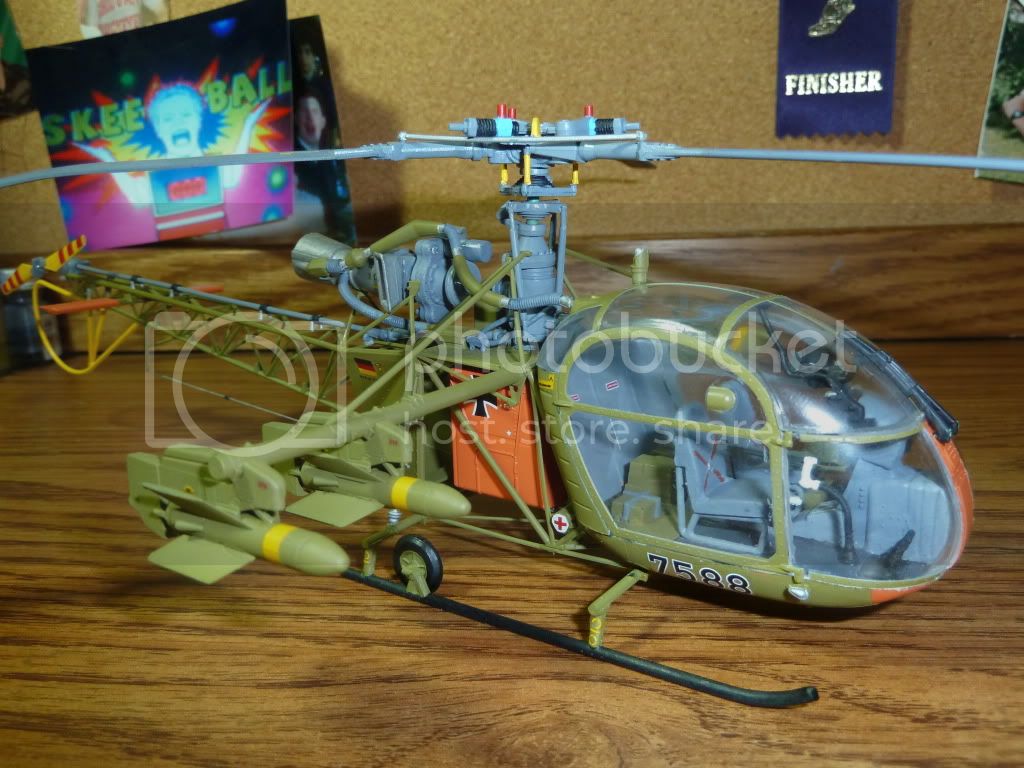
For a complete photostory of my build, follow this link. Feel free to check out some of my other builds as well! http://s894.photobucket.com/albums/ac143/rgoldberg91/Alouette%20II%20with%20Nord%20SS-11%20Anti-Tank%20Missiles/
Here's the box art, spread of pieces, and directions laid out on my workstation
The anti-tank missiles that define this kit (and allow me to build the Alouette II for a CAS campaign!)
The finished product.
For a complete photostory of my build, follow this link. Feel free to check out some of my other builds as well! http://s894.photobucket.com/albums/ac143/rgoldberg91/Alouette%20II%20with%20Nord%20SS-11%20Anti-Tank%20Missiles/

dcandal

Joined: September 07, 2006
KitMaker: 918 posts
AeroScale: 688 posts

Posted: Sunday, March 13, 2011 - 01:30 AM UTC
Marking some panles after I´ve sand it,


KrisMax

Joined: January 23, 2010
KitMaker: 156 posts
AeroScale: 139 posts
Posted: Monday, March 14, 2011 - 11:08 PM UTC
Daniel,
Aren't you building the Hasegawa Hs129??
After rescibing all the panel lines on my AMT Hs 129 I promised to invest in the Hasegawa model next time to save me the trouble. But I see you're scribing lines! What's the reason?
I've finished mine and will post a photo at the weekend
Cheers
Simon
Aren't you building the Hasegawa Hs129??
After rescibing all the panel lines on my AMT Hs 129 I promised to invest in the Hasegawa model next time to save me the trouble. But I see you're scribing lines! What's the reason?
I've finished mine and will post a photo at the weekend
Cheers
Simon
emroglan

Joined: December 16, 2004
KitMaker: 1,163 posts
AeroScale: 255 posts

Posted: Tuesday, March 15, 2011 - 12:18 AM UTC
Quoted Text
Daniel,
Aren't you building the Hasegawa Hs129??
After rescibing all the panel lines on my AMT Hs 129 I promised to invest in the Hasegawa model next time to save me the trouble. But I see you're scribing lines! What's the reason?
I've finished mine and will post a photo at the weekend
Cheers
Simon
Simon, as far as I can see, Daniel is re-scribing lost detail after sanding, not scribing missing detail that should have been there. I have the Hasegawa kit as well and the details are engraved, not raised.
vertigo
Joined: November 11, 2004
KitMaker: 388 posts
AeroScale: 225 posts
Posted: Tuesday, March 15, 2011 - 04:30 AM UTC
Some updates on the little Dragonfly. I've attached the wings, the wingtip fuel tanks, the undercarriage and the tail wings as well as a few bits and bobs.


Unfortunately despite my best efforts during initial assembly once I remove that tube of Revell filler in the pictures above I get this:

She's sitting on her tail and I don't have anyway to add more weight. I was thinking of making a small base for her so I'll probably pin her standing proper.
Moving on, a close up of my intended armaments.

What little resources I have for the Cenepa War have indicated that Peruvian Dragonflys carried mostly bombs and rockets into battle. On that basis, and with a little artistic license, I've decided on 100 gal fuel tanks on the inner pylons followed by LAU - 3 rocket pods and Mk 82 bombs on the next two. For such a small aircraft she can sure pack a load on those wide wings.
Next up, the undercarriage:

One of the most difficult aspects of painting by hand is trying to get an even coat of white. I've found applying it like a wash works for the most part. It can take five or six coats to get a somewhat even coat though.
Annoyingly Academy left small sink holes on the landing gear flaps; easy to fill but difficult to sand because of their slight curve.
And finally the tail wing which is a little strange.

As you can see from the red ring above one tail wing has a long protrusion that the other doesn't. At first I thought it was a molding error but Academys instructions clearly show it as well. Anyone have a clue what is up with that?
Unfortunately despite my best efforts during initial assembly once I remove that tube of Revell filler in the pictures above I get this:
She's sitting on her tail and I don't have anyway to add more weight. I was thinking of making a small base for her so I'll probably pin her standing proper.
Moving on, a close up of my intended armaments.
What little resources I have for the Cenepa War have indicated that Peruvian Dragonflys carried mostly bombs and rockets into battle. On that basis, and with a little artistic license, I've decided on 100 gal fuel tanks on the inner pylons followed by LAU - 3 rocket pods and Mk 82 bombs on the next two. For such a small aircraft she can sure pack a load on those wide wings.
Next up, the undercarriage:
One of the most difficult aspects of painting by hand is trying to get an even coat of white. I've found applying it like a wash works for the most part. It can take five or six coats to get a somewhat even coat though.
Annoyingly Academy left small sink holes on the landing gear flaps; easy to fill but difficult to sand because of their slight curve.
And finally the tail wing which is a little strange.
As you can see from the red ring above one tail wing has a long protrusion that the other doesn't. At first I thought it was a molding error but Academys instructions clearly show it as well. Anyone have a clue what is up with that?
KrisMax
Joined: January 23, 2010
KitMaker: 156 posts
AeroScale: 139 posts
Posted: Wednesday, March 16, 2011 - 01:09 AM UTC
Quoted Text
Simon, as far as I can see, Daniel is re-scribing lost detail after sanding, not scribing missing detail that should have been there. I have the Hasegawa kit as well and the details are engraved, not raised.
Thanks Emre,
I see you're right. I got confused thinking one of the photos was showing work on a wing, but I see now it's the underside of the fuselage which is very flat. I will look more closely next time!
Cheers
Simon
vanize
Joined: January 30, 2006
KitMaker: 1,954 posts
AeroScale: 1,163 posts
Posted: Thursday, March 17, 2011 - 12:34 AM UTC
Quoted Text
As you can see from the red ring above one tail wing has a long protrusion that the other doesn't. At first I thought it was a molding error but Academys instructions clearly show it as well. Anyone have a clue what is up with that?
what is up with that is that the real aircraft has it:


KrisMax
Joined: January 23, 2010
KitMaker: 156 posts
AeroScale: 139 posts
Posted: Saturday, March 19, 2011 - 04:25 PM UTC
Here's my completed HS129-B2.

Not an easy build and not the best end result I've achieved, but enjoyable nontheless. I tried a few new things, some of which worked and some didn't, which should help with future builds.
Thanks for looking.
Simon
Not an easy build and not the best end result I've achieved, but enjoyable nontheless. I tried a few new things, some of which worked and some didn't, which should help with future builds.
Thanks for looking.
Simon
SGTJKJ
#041
Joined: July 20, 2006
KitMaker: 10,069 posts
AeroScale: 3,788 posts
Posted: Tuesday, March 22, 2011 - 11:13 PM UTC
Very nice build, Simon. A true ground attack aircraft.
I have made some more progress on my Stuka. Most of the weathering is in place. Everytime I take photos the colours on the wings come out differently.
Anyway, the colours are now darker compared to earlier since I added and mat varnish that often darkens colours.
Next are the decals. More to follow


I have made some more progress on my Stuka. Most of the weathering is in place. Everytime I take photos the colours on the wings come out differently.
Anyway, the colours are now darker compared to earlier since I added and mat varnish that often darkens colours.
Next are the decals. More to follow
SGTJKJ
#041
Joined: July 20, 2006
KitMaker: 10,069 posts
AeroScale: 3,788 posts
Posted: Wednesday, March 23, 2011 - 08:28 PM UTC
A short update on my build and a major set back. I was going to build this Stuka as a Hungarian Stuka to make something a little out of the ordinary. However, when I started with the decals they immediately broke in a lot of pieces. Needless to say, I had to come up with another marking scheme without repainting the whole aircraft.
The kit decals looked very nice although I of course lost the instructions somewhere as I thought I did not need them. Looking through my references I happily discovered that the camouflage I had chosen would fit perfectly to late war German aircraft as well. Even the black and white spiral on the spinner. So now the Stuka will go into its original German colours.
More to follow....
SGTJKJ
#041
Joined: July 20, 2006
KitMaker: 10,069 posts
AeroScale: 3,788 posts
Posted: Friday, March 25, 2011 - 07:14 AM UTC
The decals are now on. Considering this scheme was not the plan it came out allright.
Next is the final weathering and then I am calling this one done.


Next is the final weathering and then I am calling this one done.
SGTJKJ
#041
Joined: July 20, 2006
KitMaker: 10,069 posts
AeroScale: 3,788 posts
Posted: Saturday, March 26, 2011 - 11:16 PM UTC
Here is my finished entry for this campaign. The Revell/Monogram 1/48 JU-87D Stuka. A nice kit that goes together well although details are of course not up to todays standards.
None the less a nice build that was a pleasure despite my aftermarket decals decided to disintegrate in water. A bad characteristic for waterslide decals.
I gave it a heavy coat of dust and grime to reflect a Stuka operating from a forward airfield somewhere on the Eastern Front. This has obscured the demarkation lines in the camouflage pattern, but is actually quite realistic I think.
Great campaign and I really loved to see all those Hogs!
Comments welcome

klimmer

Joined: May 16, 2003
KitMaker: 250 posts
AeroScale: 207 posts
Posted: Sunday, March 27, 2011 - 06:01 AM UTC
Hello there all
I apologize for not posting more during this campain. There have been some great builds so far.
I have been working on my AH-1W Super Cobra as my submission.
I am close to completeing it, just put a coat of future on in preperation for the decals.
Here are some pic's:
Front Office


Ready for Paint Shop


Weapons:

I will try to post more as I progress.
 Ted
Ted
I apologize for not posting more during this campain. There have been some great builds so far.
I have been working on my AH-1W Super Cobra as my submission.
I am close to completeing it, just put a coat of future on in preperation for the decals.
Here are some pic's:
Front Office
Ready for Paint Shop

Weapons:
I will try to post more as I progress.
TedSGTJKJ
#041
Joined: July 20, 2006
KitMaker: 10,069 posts
AeroScale: 3,788 posts
Posted: Sunday, March 27, 2011 - 07:55 AM UTC
Looks good so far, Ted. A really nice load out for the Cobra. I like that you are mixing all the different weapon systems on the pylons.
Looking forward to see more
Looking forward to see more

JackFlash
Joined: January 25, 2004
KitMaker: 11,669 posts
AeroScale: 11,011 posts
Posted: Sunday, March 27, 2011 - 05:33 PM UTC
Anyone interested in a set of the Aber 1:32 gun detail sets for a minigun M6A1? Contact me by PM
Minigun 20mm barrels M61A review
Minigun 20mm barrels M61A review
eoinryan
Joined: April 30, 2010
KitMaker: 232 posts
AeroScale: 66 posts
Posted: Monday, March 28, 2011 - 03:27 AM UTC
Hey Jesper,
Pity about the Hungarian decals for the Stuka- they would have looked great. Anywho, glad you could finish it without repainting the whole gd thing. It came out alright for you in the end, though. The pre-shading on the underside of the Stuka came out really well.
Roll on the next campaign!
Eoin
SGTJKJ
#041
Joined: July 20, 2006
KitMaker: 10,069 posts
AeroScale: 3,788 posts
Posted: Monday, March 28, 2011 - 02:33 PM UTC
Thanks for the comment, Eoin. Appreciate it.
Next is the nemesis of the Stuka. A Spitfire Mk. V in Soviet colours.
Next is the nemesis of the Stuka. A Spitfire Mk. V in Soviet colours.
KrisMax
Joined: January 23, 2010
KitMaker: 156 posts
AeroScale: 139 posts
Posted: Tuesday, March 29, 2011 - 11:34 PM UTC
Jesper,
I agree with Eoin, you finished off the Stuka really well. The weathering is very realistic
Simon
I agree with Eoin, you finished off the Stuka really well. The weathering is very realistic
Simon
 |

WEB HOSTING BY


Copyright ©2021 AeroScale and Kitmaker Network, a subsidiary of Silver Star Enterprises
All Rights Reserved. Please read our Conditions of Use and Privacy Policy.
All Rights Reserved. Please read our Conditions of Use and Privacy Policy.