

All right guys, things are really starting to roll here now !
Guido, excellent work mate, your Wyvern looks amazing. That tin fish hanging off the bottom looks like it means business, and that's the whole point of this Campaign, punching holes in hulls !! Don't forget to post a pic of your finished build in the Campaign Gallery HERE to qualify for your ribbon.
Torsten, great to see the 217 getting some paint, it's coming together really well.
Warren, you never cease to blow me away with the sheer volume of work you get through with such high quality. The SBD looks really good with the colour on.
'Cuda, sorry to hear about your decal issues, I'm sure your mad weathering skills will make it all ok.
I'm going to get back to my build here in the next couple of days, so stay tuned for some progress from me.
Cheers guys, and keep the progress reports coming through.
D
Air Campaigns
Want to start or join a group build? This is where to start.
Want to start or join a group build? This is where to start.
Hosted by Frederick Boucher, Michael Satin
OFFICIAL: Anti-Shipping Campaign

AussieReg

#007

Joined: June 09, 2009
KitMaker: 8,156 posts
AeroScale: 3,756 posts
Posted: Monday, January 10, 2011 - 08:51 PM UTC


warreni
Joined: August 14, 2007
KitMaker: 5,926 posts
AeroScale: 2,201 posts

Posted: Tuesday, January 11, 2011 - 09:10 PM UTC
Hi All.
Well, it is just waiting for decals now and putting the rest of the canopy into place in an open position... oh and a propeller would be handy..
Well, it is just waiting for decals now and putting the rest of the canopy into place in an open position... oh and a propeller would be handy..

camogirl

Joined: October 20, 2005
KitMaker: 1,045 posts
AeroScale: 622 posts

Posted: Thursday, January 13, 2011 - 11:13 AM UTC
A bit of good news my wonderful mummy who works at the local model shop has emailed Italeris U.K importer to try and get me the part or the sprue. Fingers crossed it arrives at some point 

warreni
Joined: August 14, 2007
KitMaker: 5,926 posts
AeroScale: 2,201 posts
Posted: Thursday, January 13, 2011 - 01:25 PM UTC
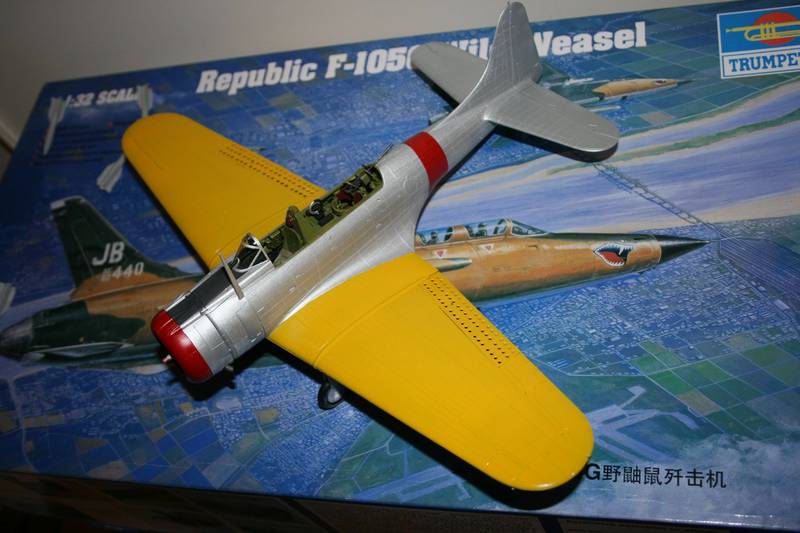
Finished...
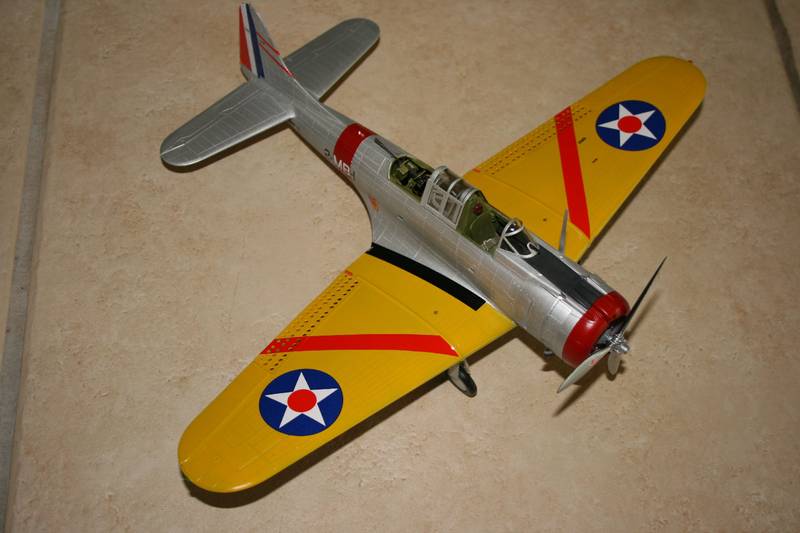
This is my 1/32 Trumpeter Douglas SBD-1 Dauntless.

No real problems with this one except the decals had a strange bubbly finish in places. It caused one of the under wing roundels to be damaged when being removed from the backing paper. I let the others soak for longer before removing them and it seemed to work.
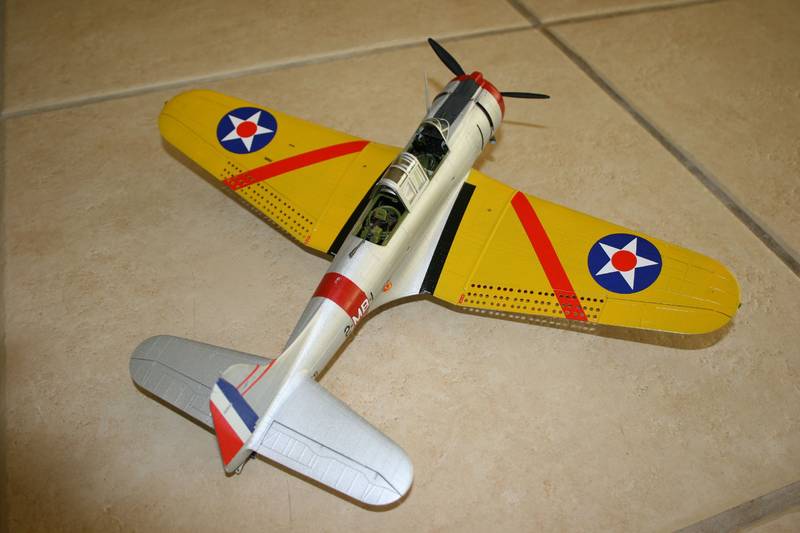
Totally OOB except of course for the Montex mask I used. First time I have masked inside and outside the canopy.
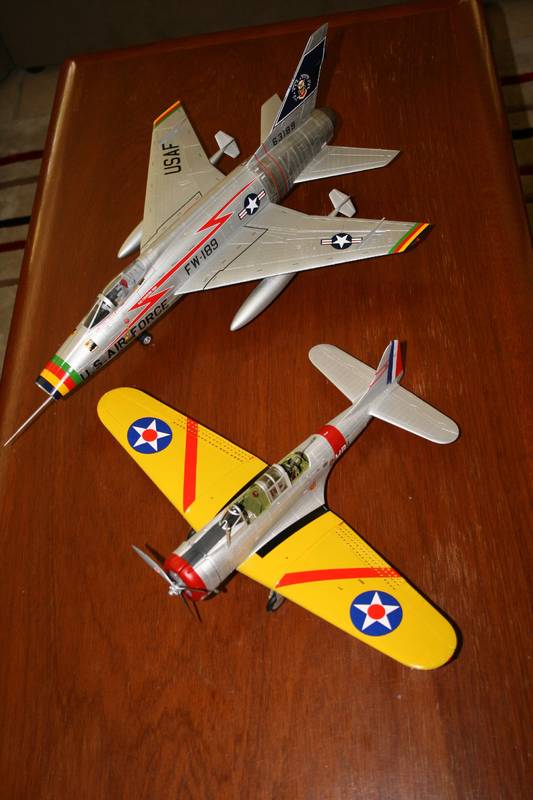
Posed here with my other recent finish, the 1/32 F-100D Super Sabre. SHows how far technology came in a very short time.
After finishing 8 models in the last few days, including the 6 for my own personal start of the year campaign, I am going to have a few days of rest before I start another... or will I...
PS Just a short plug for the model kits I just put on Ebay under username a232744. Some real bargains there. You can get them outside of Ebay if you want.
This is my 1/32 Trumpeter Douglas SBD-1 Dauntless.
No real problems with this one except the decals had a strange bubbly finish in places. It caused one of the under wing roundels to be damaged when being removed from the backing paper. I let the others soak for longer before removing them and it seemed to work.
Totally OOB except of course for the Montex mask I used. First time I have masked inside and outside the canopy.
Posed here with my other recent finish, the 1/32 F-100D Super Sabre. SHows how far technology came in a very short time.
After finishing 8 models in the last few days, including the 6 for my own personal start of the year campaign, I am going to have a few days of rest before I start another... or will I...
PS Just a short plug for the model kits I just put on Ebay under username a232744. Some real bargains there. You can get them outside of Ebay if you want.

Bigrip74

Joined: February 22, 2008
KitMaker: 5,026 posts
AeroScale: 2,811 posts

Posted: Thursday, January 13, 2011 - 02:03 PM UTC
I had know idea that the SBD was so large. Nice job on both a/c Warren.
Bob
Bob
warreni
Joined: August 14, 2007
KitMaker: 5,926 posts
AeroScale: 2,201 posts
Posted: Thursday, January 13, 2011 - 04:51 PM UTC
Thanks Bob.
AussieReg
#007
Joined: June 09, 2009
KitMaker: 8,156 posts
AeroScale: 3,756 posts
Posted: Thursday, January 13, 2011 - 05:49 PM UTC
Great job on the SBD Warren, lovely work ! That colour scheme really stands out from the normal blues and greens and greys of the Anti-Shipping fraternity.
The Campaign Gallery is starting to look serious now also, excellent work and many thanks to all who have contributed so far !!
Cheers, D
The Campaign Gallery is starting to look serious now also, excellent work and many thanks to all who have contributed so far !!
Cheers, D

Kiwi_Modeller
Joined: August 13, 2010
KitMaker: 188 posts
AeroScale: 62 posts

Posted: Thursday, January 13, 2011 - 07:46 PM UTC
yeh SBD looks great Warren, suites the silver/yellow scheme.
cheers,
Graham
cheers,
Graham
warreni
Joined: August 14, 2007
KitMaker: 5,926 posts
AeroScale: 2,201 posts
Posted: Thursday, January 13, 2011 - 09:11 PM UTC
Thanks Guys. Glad you like it. Bring some colour to a very drab place here at the moment.
Regards
Warren
Regards
Warren
AussieReg
#007
Joined: June 09, 2009
KitMaker: 8,156 posts
AeroScale: 3,756 posts
Posted: Sunday, January 16, 2011 - 06:49 PM UTC
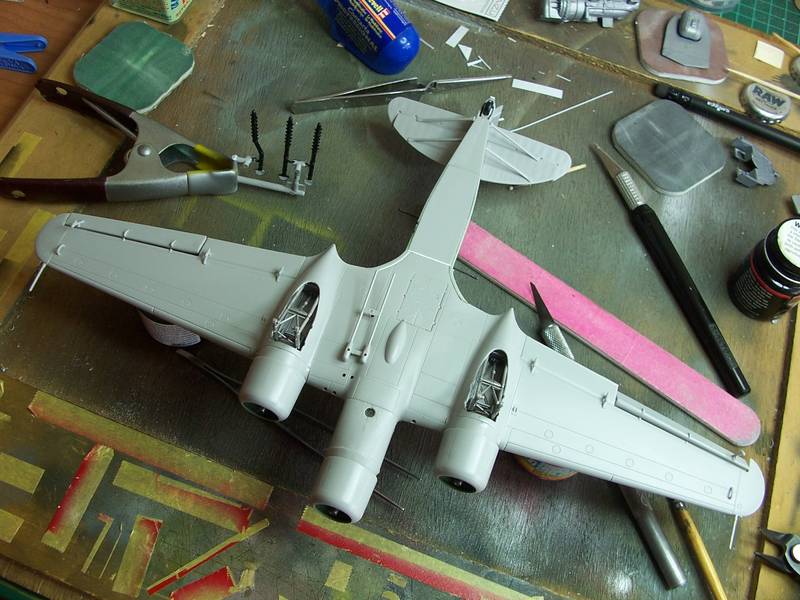
Hi all, I got some time today and hit the bench for this build. After the F-82 dramas it's REALLY good to put together a kit that only need a minor tweak here and there.
Anyway, I started the day with just the cockpit assembled and the interior of the fuselages painted and weathered, and ended up here . . . . .


The major assemble is done, just some seam sanding and minor filling and she's ready for paint !!
I did a quick google for S.79 images and found a couple on the ground with the flaps down and rudder angled, so I posed them that way to make it a bit different.
I might even have paint on it tomorrow !!
Cheers, D
Anyway, I started the day with just the cockpit assembled and the interior of the fuselages painted and weathered, and ended up here . . . . .
The major assemble is done, just some seam sanding and minor filling and she's ready for paint !!
I did a quick google for S.79 images and found a couple on the ground with the flaps down and rudder angled, so I posed them that way to make it a bit different.
I might even have paint on it tomorrow !!
Cheers, D

vonHengest
Joined: June 29, 2010
KitMaker: 5,854 posts
AeroScale: 372 posts

Posted: Sunday, January 16, 2011 - 07:15 PM UTC
Sweet Damian, I love WWII Italian aircraft! What's the colour scheme going to be?
AussieReg
#007
Joined: June 09, 2009
KitMaker: 8,156 posts
AeroScale: 3,756 posts
Posted: Sunday, January 16, 2011 - 07:51 PM UTC
Hi Jeremy. Nothing too adventurous for me on the Italian Aircraft just yet, my airbrushing skills aren't "mad" enough to try out those wild schemes.
I've got 2 box options, medium green over light grey or medium green over black. I like the thought of a black underside, so I'm leaning that way at the moment.
Cheers, D
I've got 2 box options, medium green over light grey or medium green over black. I like the thought of a black underside, so I'm leaning that way at the moment.
Cheers, D
Kiwi_Modeller
Joined: August 13, 2010
KitMaker: 188 posts
AeroScale: 62 posts
Posted: Sunday, January 16, 2011 - 09:53 PM UTC
nice D its lookin good, hope ya gonna stick 1 of them ailerons up they dont turn too good both pointin in the same direction 
look forward to some color on it.
cheers,
Graham
look forward to some color on it.
cheers,
Graham
Bigrip74
Joined: February 22, 2008
KitMaker: 5,026 posts
AeroScale: 2,811 posts
Posted: Monday, January 17, 2011 - 06:40 AM UTC
All of that hair pulling time  spent on the F82 made you a better builder than you were when you started the S79. Great job so far, so how is the vacation now
Bob
spent on the F82 made you a better builder than you were when you started the S79. Great job so far, so how is the vacation now Bob
AussieReg
#007
Joined: June 09, 2009
KitMaker: 8,156 posts
AeroScale: 3,756 posts
Posted: Wednesday, January 19, 2011 - 12:53 AM UTC
Thanks guys, this one is a dream compared to that other thing !! I got the basic assembly finished last night, all of the struts and antenna posts and aileron balances and other doodads are attached.

I even got time to throw some paint at it today


Pics aren't the best, but you can see some progress !
Cheers, D
I even got time to throw some paint at it today
Pics aren't the best, but you can see some progress !
Cheers, D
Tailor

Joined: May 26, 2008
KitMaker: 1,168 posts
AeroScale: 199 posts

Posted: Wednesday, January 19, 2011 - 04:09 AM UTC
Looking very good, D!
Cheers,
Guido
Cheers,
Guido

windysean
Joined: September 11, 2009
KitMaker: 1,917 posts
AeroScale: 563 posts
Posted: Friday, January 21, 2011 - 06:54 AM UTC
Alright. I was watching from the side, but I'm jumping in now. I realized I had capacity for at least one more campaign at the moment, so I'm building the 1/72 Academy TBF Avenger, with just some minor modifications to the base kit.
I'm opening the bay doors to show the torpedo for this campaign, adding a hint of some interior detail, and maybe opening the side crew door, depending how ambitious I get, to make the scene more busy/interesting. Not nearly as much detail as given the 1/32 scale ones I see so expertly done on this campaign, but not so little as to take this campaign lightly.

thanks,
Sean.
I'm opening the bay doors to show the torpedo for this campaign, adding a hint of some interior detail, and maybe opening the side crew door, depending how ambitious I get, to make the scene more busy/interesting. Not nearly as much detail as given the 1/32 scale ones I see so expertly done on this campaign, but not so little as to take this campaign lightly.
thanks,
Sean.

md72

#439
Joined: November 05, 2005
KitMaker: 4,950 posts
AeroScale: 3,192 posts

Posted: Friday, January 21, 2011 - 07:03 AM UTC
Windy, Looking forward to this one.. I've got a MUCH older boxing of the Academy TBF on the shelf...

windysean
Joined: September 11, 2009
KitMaker: 1,917 posts
AeroScale: 563 posts
Posted: Friday, January 21, 2011 - 07:46 AM UTC
md,
I see you have Hawk kits in your current builds list. A quick check of the internet shows me that they still exist, but I don't see those heavier-than-air-craft kits still made.
This is from a small stack of these kits, bought maybe in the late 1980's, when a high school friend and I had aspirations of building a 1/72 jeep carrier. I recently found them in a box in my garage, and with all the campaigns here, I might build another as one of the 6 originals on Midway, and maybe one in Atlantic ASW gray (although I'd like to pair that with a Wildcat). My 4-year-old built one with me already in solid blue, and it flies around our house every so often.
thanks,
Sean.
md72
#439
Joined: November 05, 2005
KitMaker: 4,950 posts
AeroScale: 3,192 posts
Posted: Friday, January 21, 2011 - 08:12 AM UTC
Perhaps I'm claiming credit where it isn't fully due. Many of the old Hawk kits are being re-boxed with improved decals and current prices  by Testors. Check out the 9xx series of 1/72 kits.
I've had the SBD for over 10 years (wrote an in the box review for Modeling Madness in Oct of 2001). The parts came in a yellow & white Testors box, The tool has been reworked several times over the years, but both fuselage halves still had "HAWK" molded inside.
The P-51 is also a Testors kit, Fellow at local club claims it's a vintage 55-57 Hawk kit. Hard to say. some modern features, some old toy like features. Recessed panel lines on the fuselage, raised lines on the wings. Minimum of detail in the cockpit (floor, seat, stick and decal). Main grear might have been designed to be retractable, that feature has been revised out. Canopy set up to be opened or closed. 7 piece prop with assembly jig. Huge slots in the wings for the drop tanks.
by Testors. Check out the 9xx series of 1/72 kits.I've had the SBD for over 10 years (wrote an in the box review for Modeling Madness in Oct of 2001). The parts came in a yellow & white Testors box, The tool has been reworked several times over the years, but both fuselage halves still had "HAWK" molded inside.
The P-51 is also a Testors kit, Fellow at local club claims it's a vintage 55-57 Hawk kit. Hard to say. some modern features, some old toy like features. Recessed panel lines on the fuselage, raised lines on the wings. Minimum of detail in the cockpit (floor, seat, stick and decal). Main grear might have been designed to be retractable, that feature has been revised out. Canopy set up to be opened or closed. 7 piece prop with assembly jig. Huge slots in the wings for the drop tanks.
Matty_K
Joined: January 31, 2010
KitMaker: 103 posts
AeroScale: 71 posts
Posted: Saturday, January 22, 2011 - 09:53 AM UTC
@Damian: Good progress on your Sparviero. Eagerly awaiting your next post.
@Warren: Great job on your Dauntless! Nice bird with really colourful feathers.
Meanwhile, I started with the Skyhawk and assembled the first bits. Encountered some irritating problems in gluing the parts together for the first time - the plastic didnt react well to the glue. Ive heard about this phenomenon already but hadnt experienced it myself so far.


Cheers
Matt
@Warren: Great job on your Dauntless! Nice bird with really colourful feathers.
Meanwhile, I started with the Skyhawk and assembled the first bits. Encountered some irritating problems in gluing the parts together for the first time - the plastic didnt react well to the glue. Ive heard about this phenomenon already but hadnt experienced it myself so far.
Cheers
Matt

B33rw0lf
Joined: May 20, 2009
KitMaker: 50 posts
AeroScale: 20 posts
Posted: Saturday, January 22, 2011 - 08:03 PM UTC
Hi All
Nearly ready to close up the Super Etendard.


Nearly ready to close up the Super Etendard.
warreni
Joined: August 14, 2007
KitMaker: 5,926 posts
AeroScale: 2,201 posts
Posted: Saturday, January 22, 2011 - 08:59 PM UTC
Thanks Matt,
Keep on plugging away on that Skyhawk.
Cheers
Warren
Keep on plugging away on that Skyhawk.
Cheers
Warren

BlackWidow

Joined: August 09, 2009
KitMaker: 1,732 posts
AeroScale: 1,336 posts
Posted: Sunday, January 23, 2011 - 04:13 AM UTC
@Damian
Your Sparviero turns out nicely! Can't wait to see it finished. I have here the 1/48 Trumpeter kit also with torpedo but in mottle camo ....
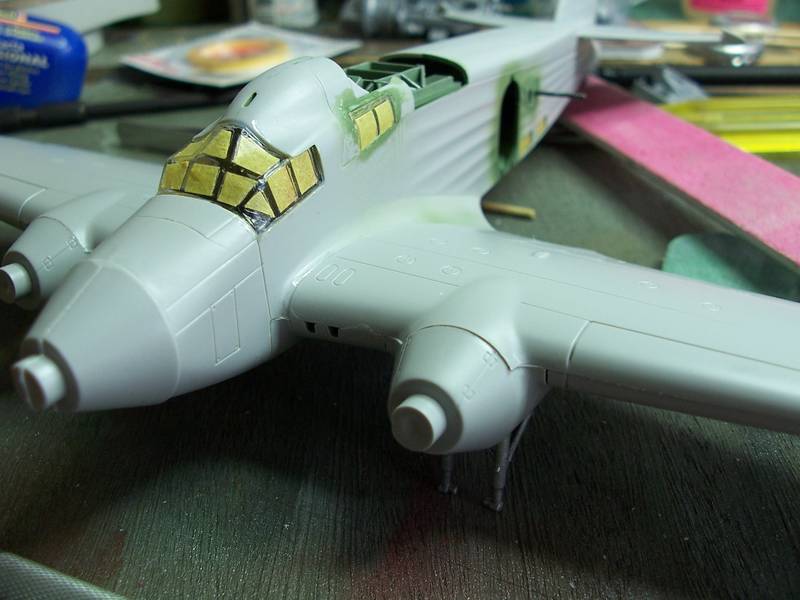
After a slow start my campaign build speeded up a bit and a lot of work happened around my workbench in the last 2 weeks. Now, let's have a look what I did so far ....
RLM 65 Light Blue is painted on the underside and pre-masked with Tamiya tape ....

the rest is masked with the cheaper Kip tape. Looks pretty wrapped, uh? No, I'm not Christo ....

first upperside camo RLM 73 Dark Green is thrown on the kit ....

again Tamiya tape ist used to pre-mask the borders between the 2 greens. This action took me 2 evenings ....

the rest is filled again with Kip tape ....

the 2. upperside camo RLM 72 Black Green is on. The difference between the 2 greens is just very little .....

this morning I painted the mottling with RLM 75 Medium Grey and demasked the aircraft nearly completly. Under the cockpit you can see the housing for the "Kehl" rocket-guiding-radar ....

Next steps are working on the landing gear and propellers, then - Future! Should be on by next weekend ....
Oh, and the rocket Hs 293 is also already glued together and painted. Comes under the right wing, under the left comes the external fuel tank.
Happy modelling!
Torsten
Your Sparviero turns out nicely! Can't wait to see it finished. I have here the 1/48 Trumpeter kit also with torpedo but in mottle camo ....
After a slow start my campaign build speeded up a bit and a lot of work happened around my workbench in the last 2 weeks. Now, let's have a look what I did so far ....
RLM 65 Light Blue is painted on the underside and pre-masked with Tamiya tape ....
the rest is masked with the cheaper Kip tape. Looks pretty wrapped, uh? No, I'm not Christo ....
first upperside camo RLM 73 Dark Green is thrown on the kit ....
again Tamiya tape ist used to pre-mask the borders between the 2 greens. This action took me 2 evenings ....
the rest is filled again with Kip tape ....
the 2. upperside camo RLM 72 Black Green is on. The difference between the 2 greens is just very little .....
this morning I painted the mottling with RLM 75 Medium Grey and demasked the aircraft nearly completly.
Under the cockpit you can see the housing for the "Kehl" rocket-guiding-radar ....Next steps are working on the landing gear and propellers, then - Future!
Should be on by next weekend ....Oh, and the rocket Hs 293 is also already glued together and painted. Comes under the right wing, under the left comes the external fuel tank.
Happy modelling!
Torsten

Kiwi_Modeller
Joined: August 13, 2010
KitMaker: 188 posts
AeroScale: 62 posts
Posted: Sunday, January 23, 2011 - 12:12 PM UTC
nice Torsten that camo looks really good, i always liked thos schemes.
cheers.
Graham
cheers.
Graham
 |

WEB HOSTING BY


Copyright ©2021 AeroScale and Kitmaker Network, a subsidiary of Silver Star Enterprises
All Rights Reserved. Please read our Conditions of Use and Privacy Policy.
All Rights Reserved. Please read our Conditions of Use and Privacy Policy.