

Aaron,
I'm both a trader and a modeller and might be able to help you. I've been building loads of Airfix kits so if you want to know the New Tool stuff, give me a shout. I recommend the new tool Mk I Spitfire most highly!
I've got a Fine Molds BF109K-4, ME410 and Ki-100 in my stash, they look excellent and I've heard good things about them. Also Tamiya, every Tamiya kit I've built always builds nicely.
I've got some Special Hobby/MPM kits in my stash but haven't built them yet. I've built other limited run kits and find them trickier to build but you can still make nice models out of them and of course they are mostly more unusual subjects.
We stock the likes of Special Hobby/MPM so if you can't get what you want over there, let me know and I'll see what I can do.
thanks
Mike
Air Campaigns
Want to start or join a group build? This is where to start.
Want to start or join a group build? This is where to start.
Hosted by Frederick Boucher, Michael Satin
OFFICIAL: Anti-Shipping Campaign
MikeMx

Joined: May 22, 2008
KitMaker: 649 posts
AeroScale: 434 posts

Posted: Thursday, January 27, 2011 - 10:59 PM UTC

AussieReg

#007

Joined: June 09, 2009
KitMaker: 8,156 posts
AeroScale: 3,756 posts
Posted: Friday, January 28, 2011 - 12:50 AM UTC
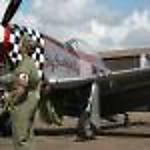
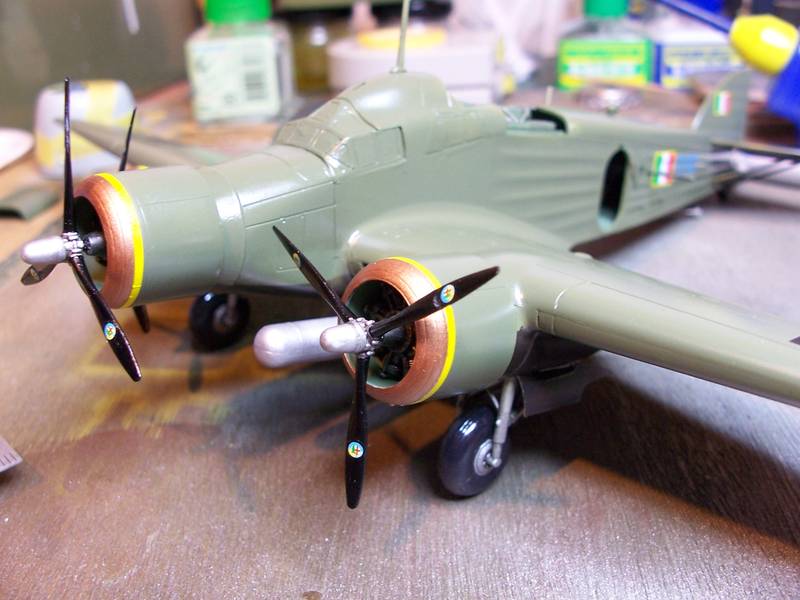
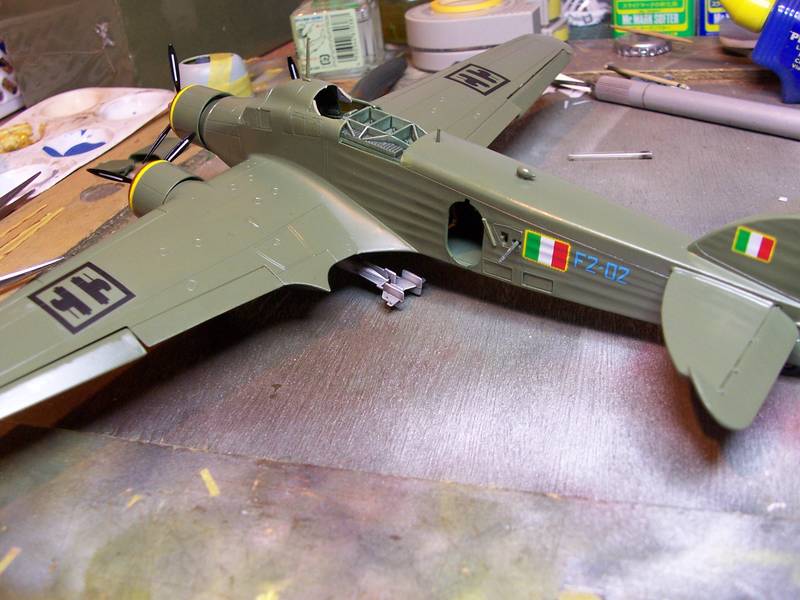
Hello again folks. I got markings on my S.79 tonight !! I'll let them settle overnight and might need to slop a little bit of softener on a couple tomorrow, but if they behave nicely I might get a gloss coat on them tomorrow afternoon.
Getting close to done now !!
Cheers, D
Getting close to done now !!
Cheers, D


611_sqd

Joined: January 24, 2011
KitMaker: 470 posts
AeroScale: 99 posts
Posted: Friday, January 28, 2011 - 02:28 AM UTC
@Mike. Thanks Mate I appreciate it. I really like Special Hobby for their...well craziness. I consider myself pretty well versed when it comes to planes and there were some they did that I hadn't even seen before. Pretty gutsy for a company to take a risk on unusual subjects. They seem to bet on people going for that and it must have worked for them. But wow, and for 1/72 they ain't cheap either.
@AussieReg your Italian bird is coming along nicely. I'm typically a RAF/Luftwaffe guy but this year I have more Japanese and some Italian in the mix. Those tri-motors always looked cool. Were they used in anti-shipping at Malta?
@AussieReg your Italian bird is coming along nicely. I'm typically a RAF/Luftwaffe guy but this year I have more Japanese and some Italian in the mix. Those tri-motors always looked cool. Were they used in anti-shipping at Malta?

JPTRR
#051


Joined: December 21, 2002
KitMaker: 7,772 posts
AeroScale: 3,175 posts
Posted: Friday, January 28, 2011 - 03:23 AM UTC
Damian,
That is a sharp looking Sparviero--especially with the "postage stamp" insignia!
That is a sharp looking Sparviero--especially with the "postage stamp" insignia!

JPTRR
#051
Joined: December 21, 2002
KitMaker: 7,772 posts
AeroScale: 3,175 posts
Posted: Friday, January 28, 2011 - 03:26 AM UTC
Great models, everyone!
611_sqd
Joined: January 24, 2011
KitMaker: 470 posts
AeroScale: 99 posts
Posted: Friday, January 28, 2011 - 08:30 AM UTC
The fun never stops.
This kit is really a kit of surprises. You will never know what its going to do next. The gear assembly actually worked pretty well. Only problem with it is they didn't leave enough excess from the tab that connects to the plane and the sprue. Which makes getting it off and keeping enough to slide in where it is meant to just a little tricky. Otherwise the gear went fine. Zero wheel bays. Which shows the age of this kit. I haven't seen any new[er] kits that don't have that kind of interior detail. Sometimes not always accurate but its there.
The bomb racks and I think dive brakes were added. Both went on without huge issues. One set of wings went together ok. Ok is still bad but its workable. It was at this point the kit decided that its been going easy on me and threw me a curve. The wings on one side had warped. Ok we have all had that if we have done a really old kit, but I have never had them warp in OPPOSITE directions. If you held them at the base they opened up like a beautiful flower. I had to break out the superglue and rubber bands came in handy. I have to putty and sand but its ok now. The kit looks a little off as well. The curve of the leading edge on the wing on the right just seems a little...off. Not sure if its my perception or if the wing had also warp a little in that direction as well. Added the base colors of silver and black on the wheels and gear. No weathering yet.
I was going to do it kind of new looking. But now I think i'll try to weather it to hide some of my mistakes...I mean some of its imperfections. Yeah that one.

vonHengest
Joined: June 29, 2010
KitMaker: 5,854 posts
AeroScale: 372 posts

Posted: Friday, January 28, 2011 - 03:41 PM UTC
Damian: Your S.79 is coming along great! How far are you going to go on weathering?
Aaron: Keep at it, at least you have a semi-reasonable excuse for blemishes on your build. I however have no such excuse and am left to blame any mistakes on myself

Aaron: Keep at it, at least you have a semi-reasonable excuse for blemishes on your build. I however have no such excuse and am left to blame any mistakes on myself
AussieReg
#007
Joined: June 09, 2009
KitMaker: 8,156 posts
AeroScale: 3,756 posts
Posted: Friday, January 28, 2011 - 06:07 PM UTC
Thanks Aaron, Fred and Jeremy, I'm very happy with this little build, it has been a nice kit to work with and the scheme is nice and simple, but it makes a very attractive aircraft.
I'm not going to do much weathering on this, just some wear on the props and leading edges and a light wash to bring out the panel lines. I'm going to try out "Invisible Mending Thread" for the first time on the rigging for the tail and for the aerial wires.
Aaron you are doing a sterling job with your build, coming along great.
Cheers, D

CMOT70
Joined: August 23, 2007
KitMaker: 629 posts
AeroScale: 539 posts
Posted: Saturday, January 29, 2011 - 02:56 PM UTC
Last look at the inside before it's closed. Sorry about the lighting quality, i took two pics and then closed it it up...only to find that one was out of focus and the other one way under lighted. The glue is setting on the fuselage halves now.

Andrew
Andrew
CMOT70
Joined: August 23, 2007
KitMaker: 629 posts
AeroScale: 539 posts
Posted: Saturday, January 29, 2011 - 06:45 PM UTC
Back again already. The airframe is all together, just needing a little filler and sanding on the cockpit fuselage joins because i ended up with a slight step there. Very easy model kit overall, Hasegawa always seems to dig a little deeper when it comes to Japanese subjects in my opinion.

Andrew
Andrew

camogirl
Joined: October 20, 2005
KitMaker: 1,045 posts
AeroScale: 622 posts

Posted: Saturday, January 29, 2011 - 08:38 PM UTC
Wow some fab looking models are coming along  Im so far behind with mine its unreal but that should change because the replacement part has arrived
It arrived on Friday thankfully I know one of the office workers at The Hobby Company so one quick phone call and it arrived
Not sure if will be at the bench today as Spirit threw me off yesterday which has resulted in severe pain in left knee (I was thankful nothing else on the left leg seems hurt or damaged), my right hip (cant lift my leg up) my right shoulder and the right side of my neck. So currently stuck laid down oh well these things happen
Im so far behind with mine its unreal but that should change because the replacement part has arrived It arrived on Friday thankfully I know one of the office workers at The Hobby Company so one quick phone call and it arrived
Not sure if will be at the bench today as Spirit threw me off yesterday which has resulted in severe pain in left knee (I was thankful nothing else on the left leg seems hurt or damaged), my right hip (cant lift my leg up) my right shoulder and the right side of my neck. So currently stuck laid down
oh well these things happen

warreni
Joined: August 14, 2007
KitMaker: 5,926 posts
AeroScale: 2,201 posts

Posted: Saturday, January 29, 2011 - 08:52 PM UTC
Get better soon Sam.. Off to the glue-factory for Spirit?? 

camogirl
Joined: October 20, 2005
KitMaker: 1,045 posts
AeroScale: 622 posts
Posted: Saturday, January 29, 2011 - 09:20 PM UTC
I couldn't do that Im putting it down to him being babyish and trying to get out of having to work. Anyway he can not go yet Ive got another four and a half years to pay him off

BlackWidow

Joined: August 09, 2009
KitMaker: 1,732 posts
AeroScale: 1,336 posts
Posted: Sunday, January 30, 2011 - 05:08 AM UTC
Quoted Text
.... Hasegawa always seems to dig a little deeper when it comes to Japanese subjects in my opinion.
Andrew, your Katie looks fine already, it's one of my fav japanese aircraft of WW2, though it was poor in self defense ....
You're right, it seems that the guys (and gals) in Shizuoka always do a slightly better job when it comes to their own air force(s). I noticed that recently when I threw my "Japanese Twins" together (have a look on the AS Homepage or in the Features). No problems at all!Okay, well .... Future is on [check], landing gear is down [check], propellers are on [check] and the first engines test runs were successfull!
Just waiting for the decals now ....In front of the aircraft you can see the external fuel tank which comes under the left wing and the "bad guy" (or "good boy", depends which side you're on), which belongs under the right wing in the end ....

.... looks still a bit like Blind Flight School


I may need another week to finish my campaign build ....
Sam, good luck for your kit and get well soon!
Happy modelling
Torsten


windysean
Joined: September 11, 2009
KitMaker: 1,917 posts
AeroScale: 563 posts
Posted: Tuesday, February 01, 2011 - 03:44 AM UTC
I've got this campaign at the front of my work area. Not as nice as some here, but always room to learn more. I realize I'm detailing some areas and not others-- hopefully all the most visible areas are the most detailed, if I planned this right.
Since the turret is set inside with tricky overlaps, I dreaded the idea of masking the glass later, so I'm painting it before installation and closing up the fuselage. I didn't see what others are using, but I mask canopies with household Scotch tape, since it's thin, transparent, and I can cut it simply with my hobby knife along the raised framework.


I put some quick detail on the inside wall opposite the open crew door:

Finally, I tried something new. I painted the wheel wells with chromate green and masked with low-tack drafting tape, with a fold in the middle for a handle for later. My thought is to pull the tape out later, after the wings are glued, filled, sanded, and painted. We'll see if this works.

Anyway. That's where I am.
-Sean.
Since the turret is set inside with tricky overlaps, I dreaded the idea of masking the glass later, so I'm painting it before installation and closing up the fuselage. I didn't see what others are using, but I mask canopies with household Scotch tape, since it's thin, transparent, and I can cut it simply with my hobby knife along the raised framework.
I put some quick detail on the inside wall opposite the open crew door:
Finally, I tried something new. I painted the wheel wells with chromate green and masked with low-tack drafting tape, with a fold in the middle for a handle for later. My thought is to pull the tape out later, after the wings are glued, filled, sanded, and painted. We'll see if this works.
Anyway. That's where I am.
-Sean.
611_sqd
Joined: January 24, 2011
KitMaker: 470 posts
AeroScale: 99 posts
Posted: Tuesday, February 01, 2011 - 05:55 AM UTC
Construction now basically finished. In all probability this particular was above my skill level. The problems in just about every area of the build was extremely frustrating. Some I had experienced before, others were totally new problems for me.
There was so much filing to do I was like a admin assistant on crack and the two halves of the fuse had a lip so big it would make Mic Jagger envious. I would need to re-scribe some of the panel lines but on this old kit the lines are raised. many of the pieces are right up close to the main sprue and even with a knife rather than hobby clippers it is hard in some places to cut the piece and not cut some of the actual piece. This is something newer kits don't seem to have a problem with as the molding process is better. now its on to painting. As soon as I can find my airbrush. Packed away from the move.

There was so much filing to do I was like a admin assistant on crack and the two halves of the fuse had a lip so big it would make Mic Jagger envious. I would need to re-scribe some of the panel lines but on this old kit the lines are raised. many of the pieces are right up close to the main sprue and even with a knife rather than hobby clippers it is hard in some places to cut the piece and not cut some of the actual piece. This is something newer kits don't seem to have a problem with as the molding process is better. now its on to painting. As soon as I can find my airbrush. Packed away from the move.
warreni
Joined: August 14, 2007
KitMaker: 5,926 posts
AeroScale: 2,201 posts
Posted: Tuesday, February 01, 2011 - 06:40 AM UTC
I did not know they had Daleks in World War 2, Sean. You learn something new everyday..
611_sqd
Joined: January 24, 2011
KitMaker: 470 posts
AeroScale: 99 posts
Posted: Tuesday, February 01, 2011 - 08:08 AM UTC
They sure did I dig the Union Jack under the eye stalk.

I dig the Union Jack under the eye stalk. windysean
Joined: September 11, 2009
KitMaker: 1,917 posts
AeroScale: 563 posts
Posted: Tuesday, February 01, 2011 - 08:26 AM UTC
A dallek in the back of the Avenger should have handled any Japanese. "Exterminate!"
camogirl
Joined: October 20, 2005
KitMaker: 1,045 posts
AeroScale: 622 posts
Posted: Tuesday, February 01, 2011 - 11:34 AM UTC
I have a R/C WW2 Olive Drab Dalek
in other news the missing part has been painted added to the model and the fuselage is now together wooooooo Pics will be posted but will probably be tomorrow as have not got any decent light (roll on Spring and Summer)
in other news the missing part has been painted added to the model and the fuselage is now together wooooooo
Pics will be posted but will probably be tomorrow as have not got any decent light (roll on Spring and Summer)CMOT70
Joined: August 23, 2007
KitMaker: 629 posts
AeroScale: 539 posts
Posted: Thursday, February 03, 2011 - 03:00 PM UTC
Not much progress on anything this week, as it's a late shift week and i'm not an early riser.
But i did get the airframe cleaned up and primered and the "aotake" sprayed for the wheel wells.
I am having a "clumsy and dropsy" sort of week unfortunately. I was planning to do the cockpit fully closed using the one piece canopy, but i cracked it when removing it from the sprue. So i'm using the one piece canpoy as a cockpit mask now and have prepared the individual open canopy pieces seperately- without cracks.


Andrew
But i did get the airframe cleaned up and primered and the "aotake" sprayed for the wheel wells.
I am having a "clumsy and dropsy" sort of week unfortunately. I was planning to do the cockpit fully closed using the one piece canopy, but i cracked it when removing it from the sprue. So i'm using the one piece canpoy as a cockpit mask now and have prepared the individual open canopy pieces seperately- without cracks.
Andrew
611_sqd
Joined: January 24, 2011
KitMaker: 470 posts
AeroScale: 99 posts
Posted: Friday, February 04, 2011 - 12:09 AM UTC
Don't you love that. I cut a piece wrong a while ago and screwed it up as I read it as part 6 when it was part 9 and they were similar but not quite the same.
Quoted Text
I am having a "clumsy and dropsy" sort of week unfortunately. I was planning to do the cockpit fully closed using the one piece canopy, but i cracked it when removing it from the sprue. So i'm using the one piece canpoy as a cockpit mask now and have prepared the individual open canopy pieces seperately- without cracks.
Andrew
CMOT70
Joined: August 23, 2007
KitMaker: 629 posts
AeroScale: 539 posts
Posted: Friday, February 04, 2011 - 10:53 PM UTC
Got some more done today, flying through it.


Andrew
Andrew
AussieReg
#007
Joined: June 09, 2009
KitMaker: 8,156 posts
AeroScale: 3,756 posts
Posted: Friday, February 04, 2011 - 11:24 PM UTC
Kate is looking great Andrew, lovely work.
What paint did you use for the aotake? I have several Japanese kits in the stash and that's one paint I need to pick up before I get started on them.
Final assembly is complete on the S.79, and tonight I am cleaning up the weathering. Tomorrow I will set up the rigging and antenna wires, then it will be time for the photo shoot !!
Sam, I'm sorry to hear that you've had another equine misadventure, but it's great that you have the spare part sorted.
Aaron, well done on the '88, I'm looking forward to seeing some colour on it.
Sean, what can I say, ya gotta love those Daleks.
Torsten, as always you are doing a very impressive job with the big Dornier !
Cheers, D
CMOT70
Joined: August 23, 2007
KitMaker: 629 posts
AeroScale: 539 posts
Posted: Friday, February 04, 2011 - 11:59 PM UTC
Quoted Text
What paint did you use for the aotake? I have several Japanese kits in the stash and that's one paint I need to pick up before I get started on them.
Thanks Damian. The aotake is Gunze H63. But another good way is to spray silver and then a mix of clear green/blue over the top.
Andrew
 |

WEB HOSTING BY


Copyright ©2021 AeroScale and Kitmaker Network, a subsidiary of Silver Star Enterprises
All Rights Reserved. Please read our Conditions of Use and Privacy Policy.
All Rights Reserved. Please read our Conditions of Use and Privacy Policy.