Air Campaigns
Want to start or join a group build? This is where to start.
Want to start or join a group build? This is where to start.
Hosted by Frederick Boucher, Michael Satin
OFFICIAL: Fighters! Campaign Thread

Snorri23

Joined: March 25, 2010
KitMaker: 514 posts
AeroScale: 244 posts

Posted: Thursday, August 30, 2012 - 01:15 AM UTC
Thank you for the assistance, greatly appreciated. Now I would humbly ask how to give an all black a/c some character/tonal. Heard of adding red anything else? What does adding red do? 

Posted: Thursday, August 30, 2012 - 10:39 AM UTC
Dunno about red, make it shades of dark grey,very dark grey,being able to shade it slightly breaks the monotony

Emeritus

Joined: March 30, 2004
KitMaker: 2,845 posts
AeroScale: 1,564 posts

Posted: Thursday, August 30, 2012 - 11:35 AM UTC
It's done to take off the unnatural starkness of pure black. I've also come across browns being added to make a "scale black" shade.
Dark(ish) greys can also be used sparingly, too much will easily turn black to looking very dark grey instead. Adding reds and browns will make a warmer scale black shade, greys a colder one respectively.
Dark(ish) greys can also be used sparingly, too much will easily turn black to looking very dark grey instead. Adding reds and browns will make a warmer scale black shade, greys a colder one respectively.
Posted: Thursday, August 30, 2012 - 11:05 PM UTC
Great progress everyone great to see so many build progressing and finishing.
Have not got anything to add about the black finish that has not already been said that and I don't think Ive ever had a black finish on an aircraft as yet. Hmmm maybe something for me to tackle in the future?
Have not got anything to add about the black finish that has not already been said that and I don't think Ive ever had a black finish on an aircraft as yet. Hmmm maybe something for me to tackle in the future?
Posted: Friday, August 31, 2012 - 06:44 AM UTC
Posted: Friday, August 31, 2012 - 07:42 AM UTC
Impressive preshading Dave! I took the easy way out and did it with a wash.
So here's my 1/144 Swiss Airforce F-18 ready for action. Fun little build! Though I'm not happy with the decals, as they silvered and I only noticed after flat coat...


Thanks for a great campaign! I'll keep watching and learning.
Cheers!
Stefan
So here's my 1/144 Swiss Airforce F-18 ready for action. Fun little build! Though I'm not happy with the decals, as they silvered and I only noticed after flat coat...
Thanks for a great campaign! I'll keep watching and learning.
Cheers!
Stefan
Posted: Friday, August 31, 2012 - 08:19 AM UTC
Don't we all Stefan, nice F-18
Posted: Friday, August 31, 2012 - 10:10 AM UTC
Great Hornet Stefan ! especially for 1/144 ! 


SaxonTheShiba

Joined: February 01, 2009
KitMaker: 1,233 posts
AeroScale: 663 posts

Posted: Friday, August 31, 2012 - 11:45 AM UTC
Stefan-----great looking Swiss AF Hornet.....especially in 1/144th.
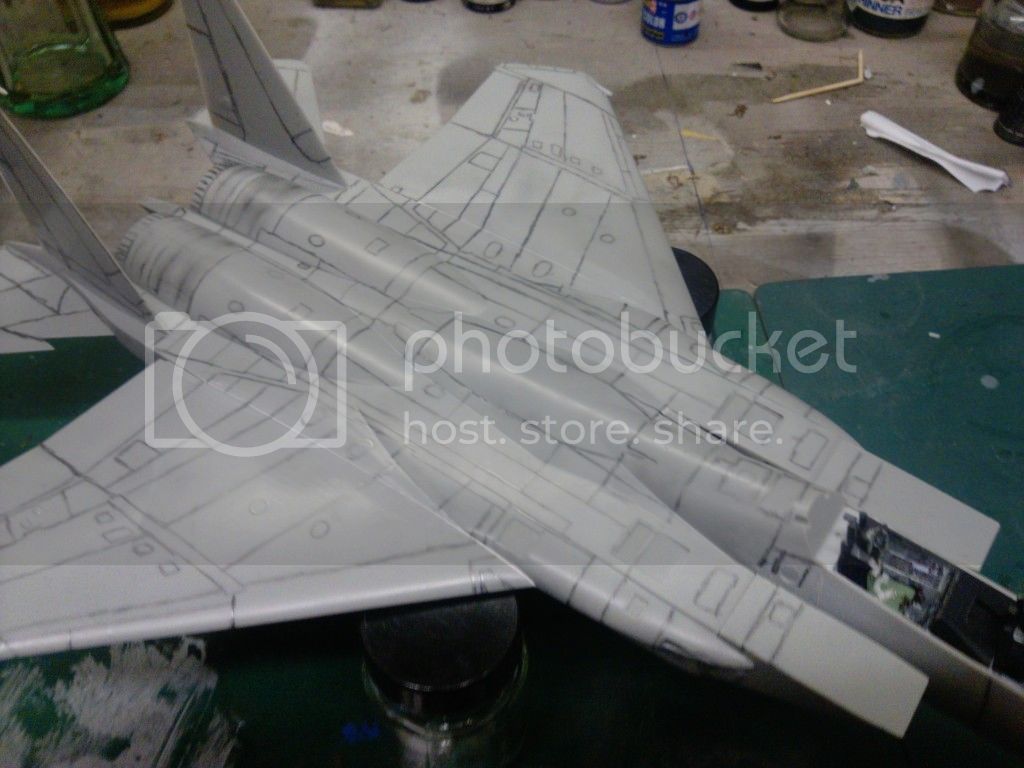
Dave-----Outstanding looking panel line work on the "Mudhen". What scheme will your jet be in?
Best wishes, Ian
Dave-----Outstanding looking panel line work on the "Mudhen". What scheme will your jet be in?
Best wishes, Ian
Posted: Saturday, September 01, 2012 - 04:21 AM UTC
Hi Ian .. thanks for the comments im just going to use the decals and color scheme that came with the model i think its from the 71st Fighter Squadron, 1st Fighter Wing, at Langley Air Force Base.. ( WA-677 ).. as for the preshading to do this i use a 6B artists pencil and simply go over all the panel lines with it .. Its good because you can use your finger tip to smudge the lines if you want a more faded edge or you can keep them sharp , also you can simply wipe it away if you make any mistakes  .. the effect after painting is very good
 .. the effect after painting is very good
Posted: Saturday, September 01, 2012 - 07:07 PM UTC
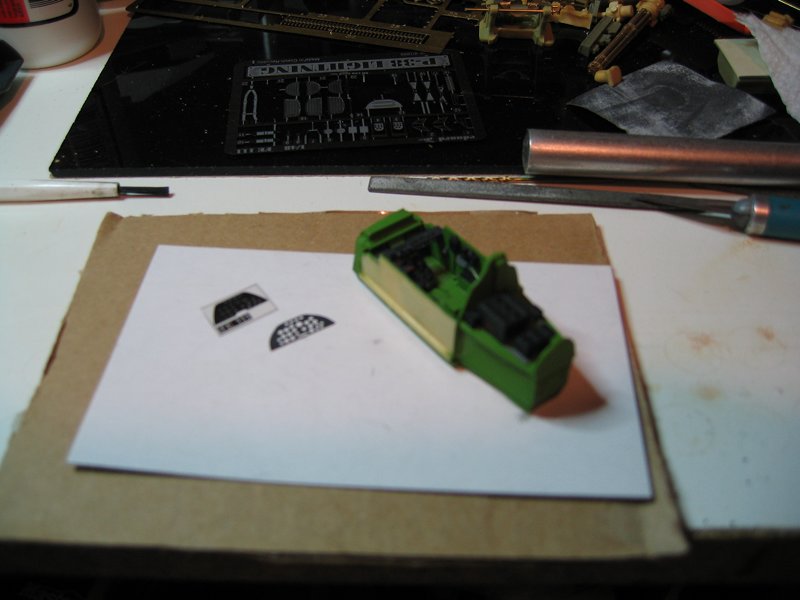
A bit more done on the cockpit.
Cheers Rob.
Cheers Rob.

Posted: Saturday, September 01, 2012 - 09:02 PM UTC
Hi all,
as I am actually in the mood for modelbuilding, I signed into the campaign. I have a Eduard Bf 109E-3 in the final stage. I am not sure when I started it. But it was in late April or May (earliest). It gets the decals from the Royal class for Ioan DiCesare who died just some weeks ago (10th August). I did not make in progress pictures, as I did some for my Bf 109E-1.
If that is not o.k. for the campaign leaders, I try something else. I just started Zvezdas Bf 109F-2 (great kit BTW).
all the best
Steffen
Posted: Saturday, September 01, 2012 - 11:09 PM UTC
Here is a pic of the Bf109E-3 how it looks today:

all the best
Steffen

all the best
Steffen
Posted: Sunday, September 02, 2012 - 10:20 AM UTC
Hi all .. OK so I have put all the weapons together and I gave the Sparrows a coat of paint ... also I have laid down some coluor on the model .... 


Posted: Sunday, September 02, 2012 - 07:57 PM UTC
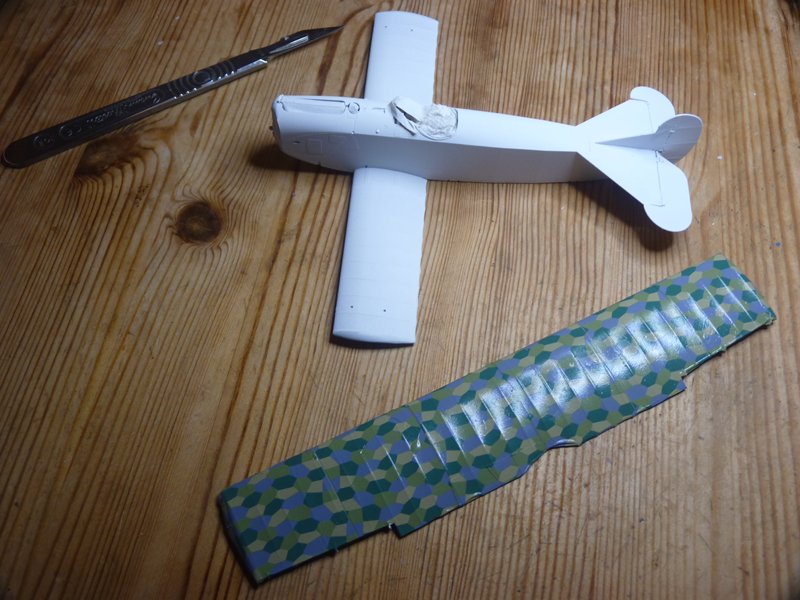
Finally got some primer and white base coat on the Fokker. Did the top surface of the top wing with lozenge decal. Looked up the stripe width for the fuselage striping and noted the stripes are 3mm wide and 4mm apart. I have 1mm,2mm (somewhere), 3mm and 6mm tape but no 4mm. Do I bodge or try and get some? Doh 


Snorri23

Joined: March 25, 2010
KitMaker: 514 posts
AeroScale: 244 posts

Posted: Monday, September 03, 2012 - 01:32 AM UTC
The builds that I have seen here are excellent and give me some inspiration on my next build. The assistance that has been given me has proved to be of great help. He interior of the Do 17 is slowly getting together. The Ju 52 is being finished in between the drying time. Will post some pics when the office is finished. 

Posted: Monday, September 03, 2012 - 08:35 PM UTC
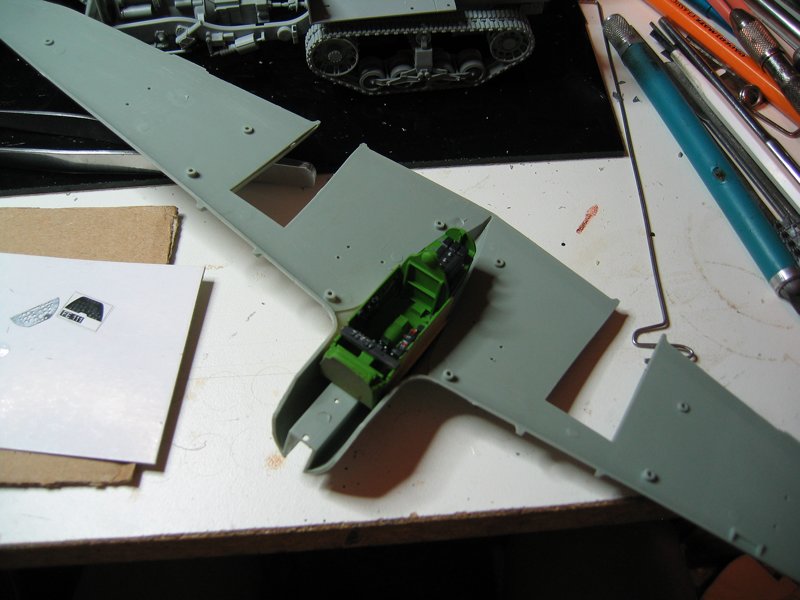
Finally got the cockpit in and the wing together. 
Cheers Rob.
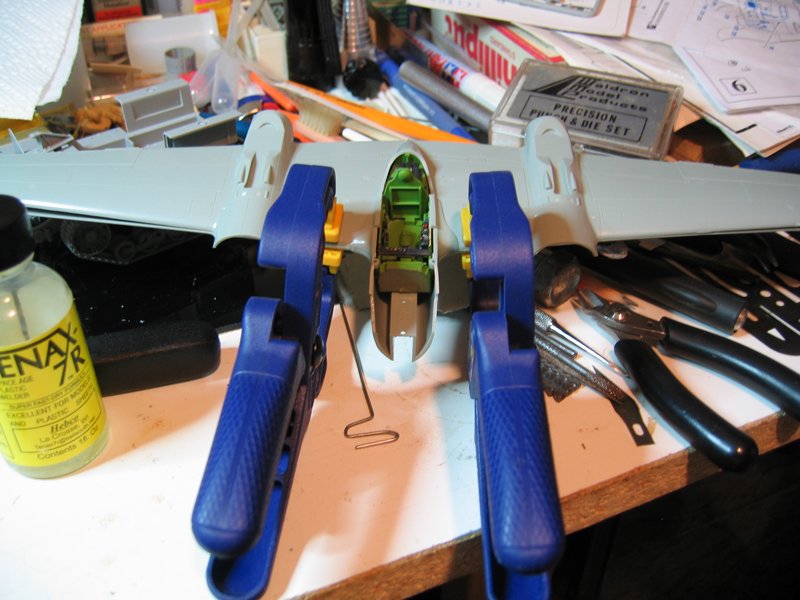
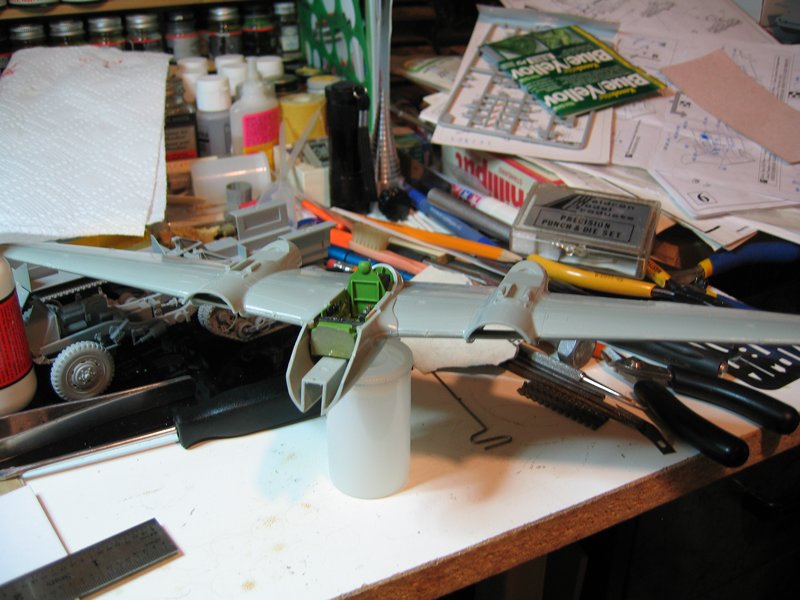

Cheers Rob.


hannover67

Joined: June 08, 2012
KitMaker: 49 posts
AeroScale: 26 posts

Posted: Tuesday, September 04, 2012 - 12:52 AM UTC
Hi all I know its been a long time since I put up any progress pics of the little sabre but it is done and has been for several weeks now, not that it matters too much because everything here looks so much better than it dose anyway.Oh well here are the last of the pics.

only now do I see how bad that join between the wing and fuselage is. Damn

finally finished

Rudolph the red nosed sabre!

the real name
Well thats it from me I have really enjoyed this campaign and seeing all of your work way outclassing mine.

only now do I see how bad that join between the wing and fuselage is. Damn

finally finished

Rudolph the red nosed sabre!

the real name
Well thats it from me I have really enjoyed this campaign and seeing all of your work way outclassing mine.

Posted: Tuesday, September 04, 2012 - 02:19 AM UTC
I finished my Fw190 a couple of weekends ago but I've only just been able to get the final photos done.
So here we go a Fw190 F-8 of I/SG2, Hungary, Winter 1944-45


Some of the more astute members may notice the locating holes on the underside is is because I will eventually get round to doing the bomb loading cart and bombs for this plane.
As always comments, suggestions and critique is welcomed
So here we go a Fw190 F-8 of I/SG2, Hungary, Winter 1944-45


Some of the more astute members may notice the locating holes on the underside is is because I will eventually get round to doing the bomb loading cart and bombs for this plane.
As always comments, suggestions and critique is welcomed

Posted: Tuesday, September 04, 2012 - 05:06 AM UTC
WOW !! Thats really nice ! big thumbs up from me 


Posted: Tuesday, September 04, 2012 - 08:45 AM UTC
Quoted Text
Hi Steffan I've discussed this with Sam and she think this would be the better option as your not sure when you started the Eduard kit.If that is not o.k. for the campaign leaders, I try something else. I just started Zvezdas Bf 109F-2 (great kit BTW)
Sam is a bit busy at the moment so I'll take the reins by saying great progress everyone

Posted: Tuesday, September 04, 2012 - 10:47 AM UTC
Afew eventful days since I posted and disaster
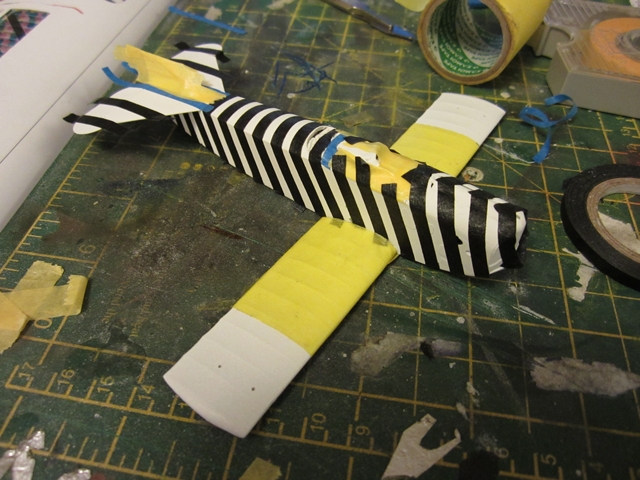
Happily masked up the Fokker using 3 and 4mm tape. Sprayed it with 3 light coats and unmasked
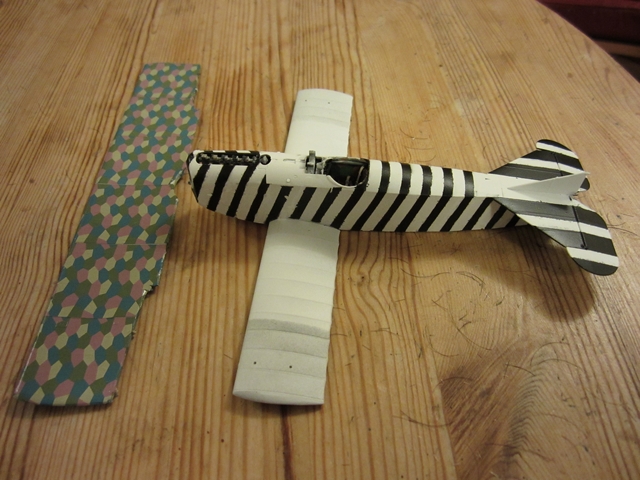


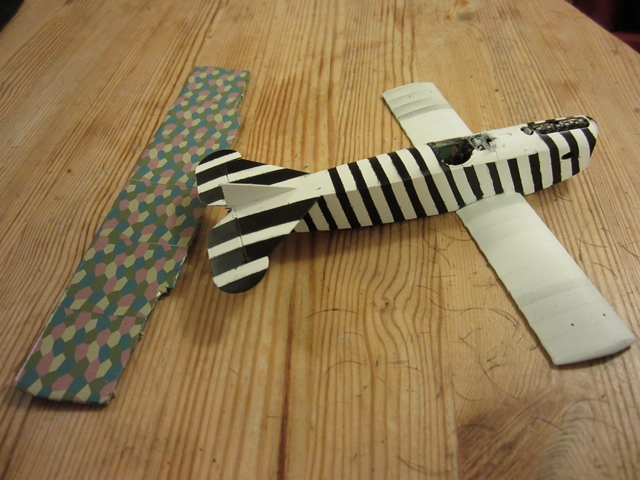
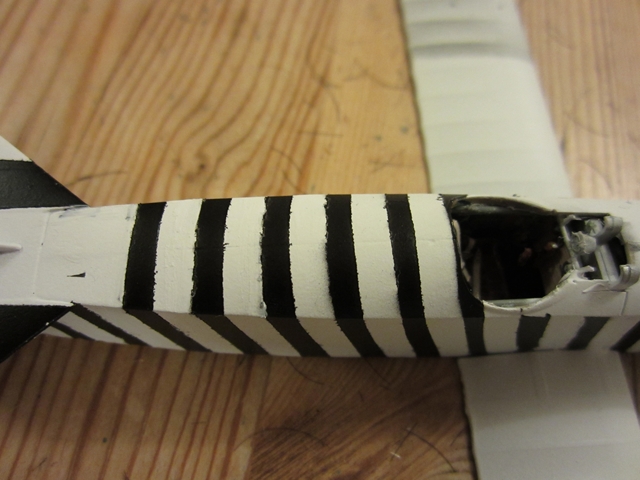
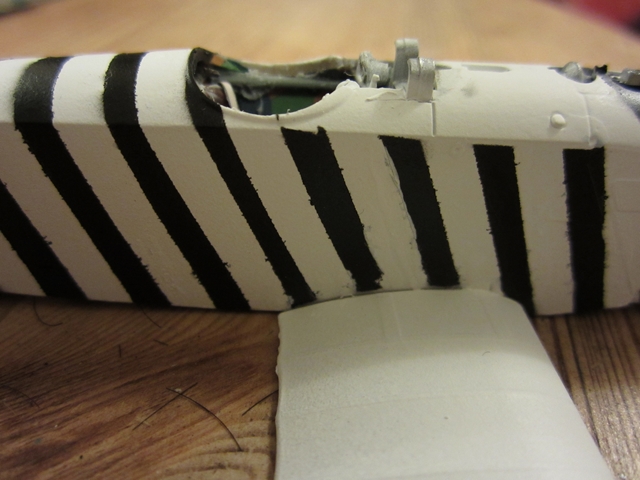
I have obviously gone too far beyond my skill limits, these results I can't live with. Thinking of stripping the paint and changing schemes

Happily masked up the Fokker using 3 and 4mm tape. Sprayed it with 3 light coats and unmasked


I have obviously gone too far beyond my skill limits, these results I can't live with. Thinking of stripping the paint and changing schemes
mrockhill

Joined: June 17, 2009
KitMaker: 566 posts
AeroScale: 507 posts

Posted: Tuesday, September 04, 2012 - 11:11 AM UTC
What sort of tape was that you used? The quality of the tape may be an issue. Did you burnish the edges of the tape? I use a toothpick and run it along the tape edges pressing them onto the surface. I find it helps limit the blemishes. I can see on your fokker you had some paint bleeding under and some where the tape wasnt sticking or got loose, where the over spray is. If you havent already, Id try burnishing the edges of the tape and spraying in several thin layers.
Posted: Tuesday, September 04, 2012 - 06:13 PM UTC
Ohh noo what a shame  .. may i suggest using pin stripe masking tape .. i use this for all my thin lines and it is really good stuff you can get it from any good car body repair shop or car paint shop . it comes in various widths and is soft so you can curve it if you need to also you get no bleeding with it and it wont lift .. hope you manage to get it sorted mate
 .. may i suggest using pin stripe masking tape .. i use this for all my thin lines and it is really good stuff you can get it from any good car body repair shop or car paint shop . it comes in various widths and is soft so you can curve it if you need to also you get no bleeding with it and it wont lift .. hope you manage to get it sorted mate
Posted: Wednesday, September 05, 2012 - 12:41 AM UTC
Another suggestion after masking spray a clear coat, that will seal the edge of the tape and if anything gets under it's clear. 
Cheers Rob.

Cheers Rob.
 |


